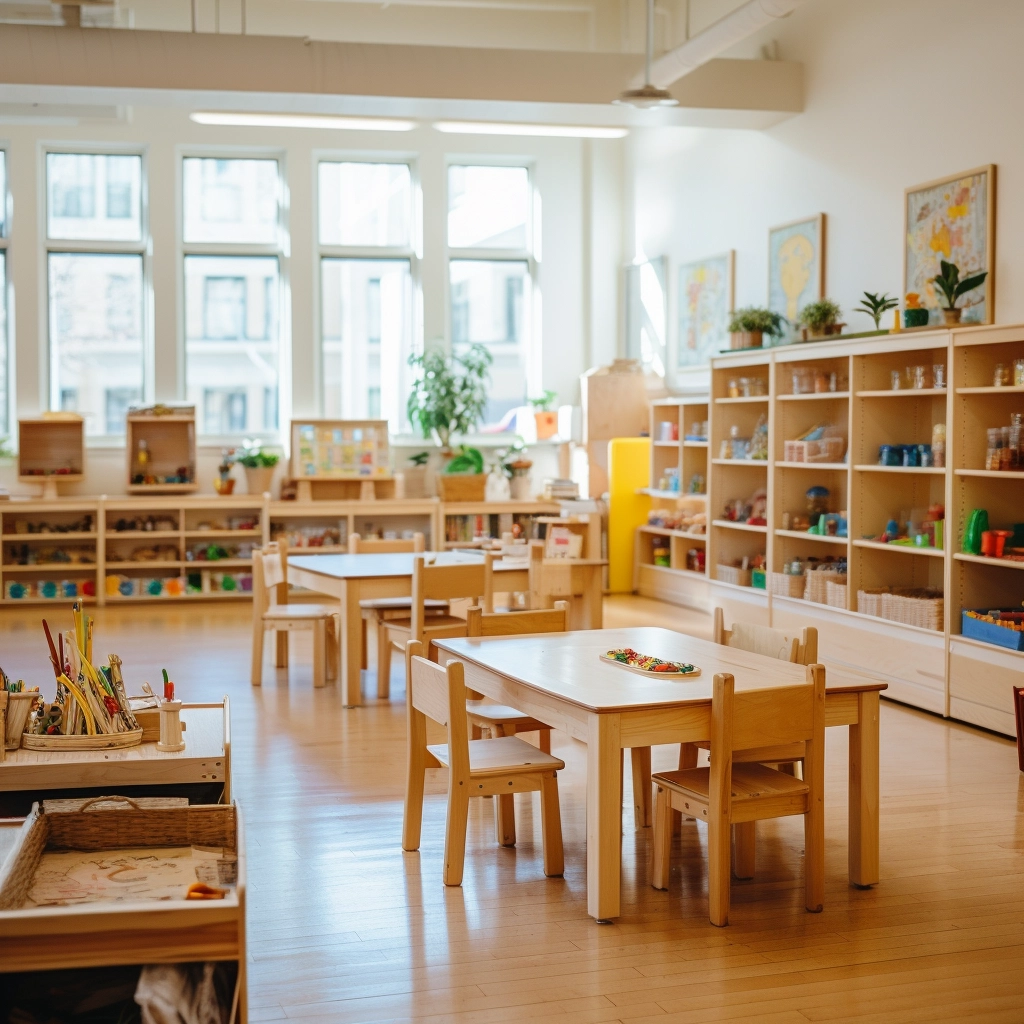
Do you know how to help preschoolers develop their artistic and creative abilities at school? One of the most popular kindergarten classes is crafts, which allows children to freely explore and create art and enjoy this special creative moment. This is where arts and crafts for preschoolers truly shine.
Through arts and crafts for preschoolers, they can explore their imaginations, improve fine motor skills, develop cognitive abilities, and express themselves creatively. Learning new skills and repeated exposure to art supplies builds confidence, which impacts future development.
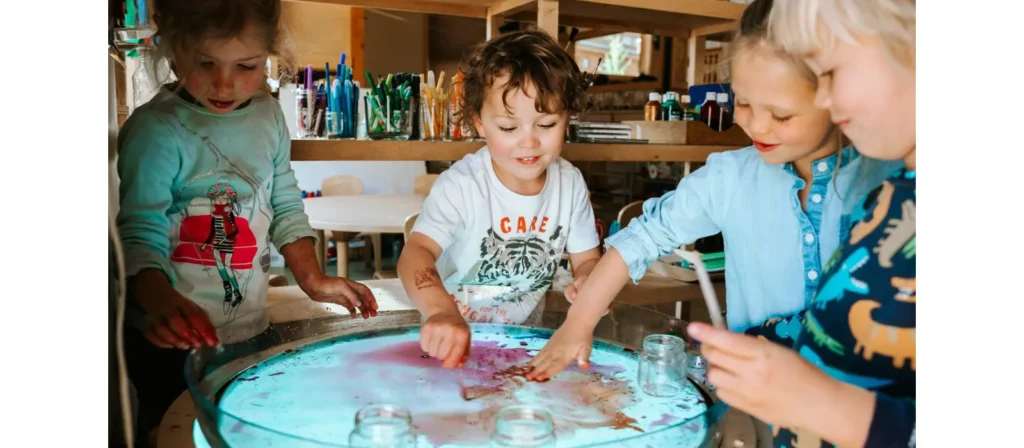
In this article, I’ll show you 21 of the best preschool and daycare craft projects—easy, fun, and educational. Introducing arts and crafts for preschoolers opens up a world of imaginative and meaningful play.
Basteln im Vorschulalter: Mehr als nur eine lustige Aktivität
Im Vorschulbereich wird oft darüber diskutiert, ob Kunsthandwerk in der frühkindlichen Bildung einen Platz hat. Zwar sind Kunsthandwerk und Kunst unterschiedlich – Kunst ist unbegrenzte Kreativität, während Handwerk in der Regel ein festgelegtes Ergebnis hat – beide sind in einem umfassenden Lehrplan wertvoll.
Kunst ermöglicht es Kindern, Materialien, Farben und Texturen frei und ohne Einschränkungen zu erkunden und sich auf den Prozess statt auf das Endprodukt zu konzentrieren. Dies ist wichtig für die Förderung von Kreativität und Selbstdarstellung. Handwerk bietet jedoch einzigartige Vorteile. Es fördert die Entwicklung feinmotorischer Fähigkeiten und stärkt Konzepte wie Farb- und Formerkennung, und kann umfassendere Lernthemen unterstützen. Wenn man zu Hause mit einem fürsorglichen Erwachsenen bastelt, wird das Basteln zu einer einzigartigen Aktivität, die Bindung aufbaut und bedeutungsvolle Erinnerungen schafft.
Rather than viewing crafts as limiting, we should see them as complementing open-ended art experiences. A balance of both ensures that children are free to create while gaining valuable skills through structured activities.
Hier entdecken wir die 21 besten Bastelprojekte für den Vorschulbereich, die perfekt für kleine Hände sind.
21 beste Bastelarbeiten für die Vorschule
1. Gesichter aus Papptellern
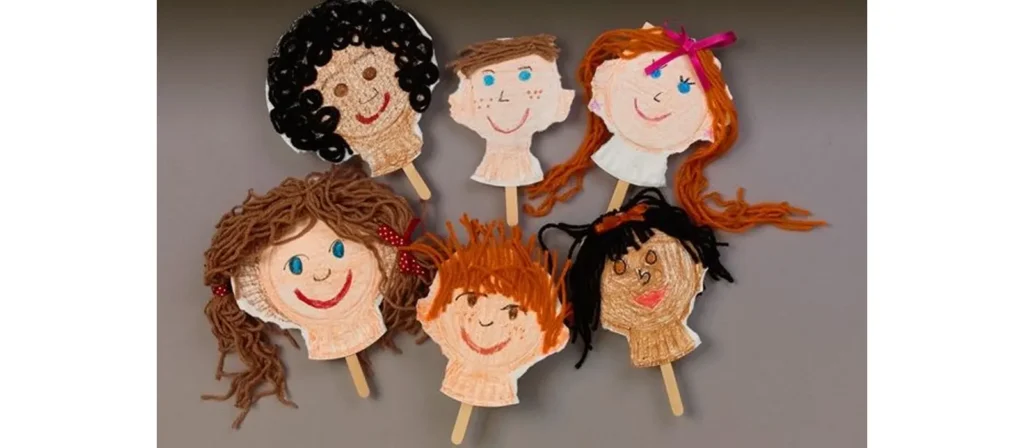
Aktivitätsübersicht:
Turn ordinary paper plates into a gallery of joyful expressions with this delightful Paper Plate Faces activity. Children can draw, paint, or glue on yarn, buttons, and colored paper to create funny, happy, or even curious faces that reflect their emotions. Through this creative process, they begin to understand feelings, develop empathy, and strengthen their fine motor skills while having fun with textures and shapes.
Materialien:
Pappteller, Marker, Garn, Kleber, verschiedene Dekorationen (Aufkleber, Wackelaugen, Pompons)
So geht's:
- Set up a cheerful crafting station by laying out paper plates, markers, glue, and all sorts of fun decorations within easy reach.
- Give each child their own plate and invite them to design a face that shows an emotion such as happy, silly, surprised, or sleepy.
- Show them how to draw simple features, then let them freely add yarn hair, googly eyes, or stickers to bring their creations to life.
- Chat as they work by asking questions like “What feeling does your face have?” or “Can you make that expression too?”
- When the masterpieces are dry, turn your classroom into a Face Gallery or let the children take their smiling plates home to share.
Variationen:
Verwenden Sie Teller in verschiedenen Größen, um eine Gruppe ausdrucksstarker „Gesichtsfamilien“ zu bilden – eine perfekte Ergänzung zum thematischen Kunsthandwerk für Vorschulkinder.
2. DIY-Fernglas

Aktivitätsübersicht:
Spark curiosity and adventure with this charming DIY Binoculars craft. Using cardboard tubes, colorful paper, string, and a touch of imagination, children can create their very own pair of pretend binoculars. As they decorate and assemble their masterpiece, they strengthen hand-eye coordination, fine motor skills, and creativity while learning about observation and exploration.
Materialien:
Zwei leere Toilettenpapierrollen pro Kind, Klebeband oder Klebstoff, Schnur oder Garn, Locher, Buntstifte oder Marker, Aufkleber, farbiges Papier (optional)
So geht's:
- Get your creative corner ready with cardboard tubes, colorful paper, tape, glue, and string.
- Give each child two rolls and invite them to decorate using markers, crayons, stickers, or paper wraps to make their binoculars uniquely theirs.
- Help them tape or glue the rolls together to form the binocular shape.
- Show how to thread yarn through the holes and tie knots to create a neck strap, introducing safe tool use in a fun way.
- Encourage kids to go on a pretend “explorer walk” around the classroom or playground, observing everything they can spot.
- Ask playful questions such as “What did you find?” or “Can you see something that starts with the letter B?”
- When finished, let them share their discoveries and show off their colorful binoculars to friends and family.
Variationen:
- Verwenden Sie für Jumbo-Ferngläser halbierte Papierhandtuchrollen.
- Machen Sie aus diesem Handwerk ein Spiel, indem Sie eine Schnitzeljagd veranstalten, bei der Kinder versteckte Objekte „entdecken“ müssen.
- Kombinieren Sie es mit Büchern oder Liedern über die Natur oder Entdeckungen, um thematische Kunst- und Bastelstunden für Vorschulkinder zu bereichern.
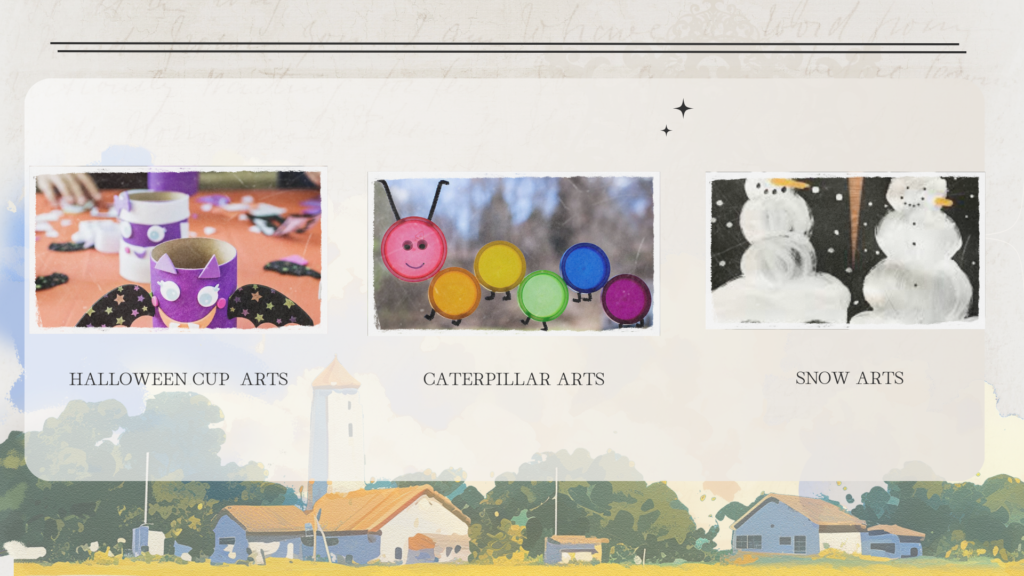
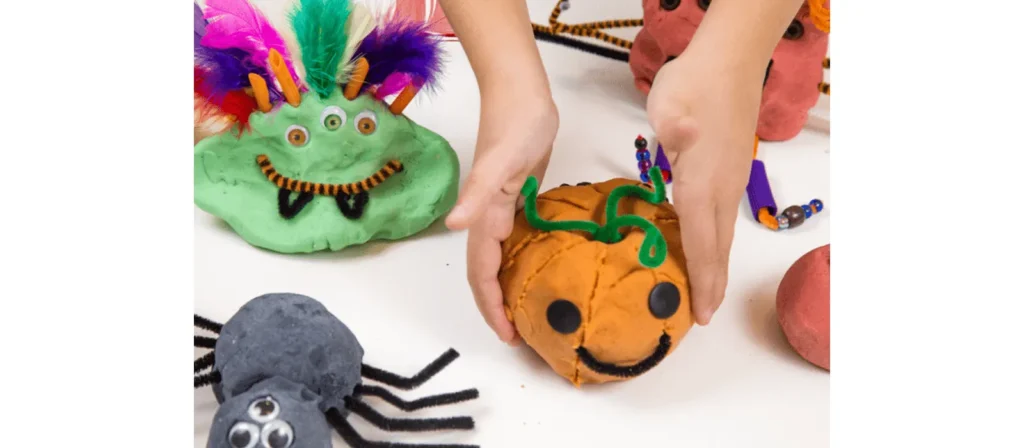
3. Einfaches Kürbishandwerk

Aktivitätsübersicht:
Celebrate the cozy spirit of autumn with this adorable Easy Pumpkin Craft. Using orange paper, glue, and a little creativity, children can cut, roll, or layer pieces to form their own bright, cheerful pumpkins. As they work with shapes and colors, they strengthen fine motor skills, practice hand coordination, and learn basic concepts like size and pattern.
Materialien:
Orange construction paper, green construction paper, scissors (child-safe), glue sticks, black markers, optional: googly eyes, yarn, glitter.
So geht's:
- Prepare a cozy crafting table with orange and green paper, glue sticks, scissors, and fun extras like googly eyes or glitter.
- Give each child orange paper circles or strips and guide them to glue the pieces together into a round pumpkin shape.
- Show how to add a green paper stem and let them draw a face using markers.
- Encourage them to decorate their pumpkins with yarn vines, sparkly glitter, or funny eyes to make each one special.
- Chat as they create by asking, “What kind of face will your pumpkin have? Happy or spooky?”
- After drying, use their adorable pumpkins to decorate a classroom wall or create a cheerful pumpkin patch for everyone to enjoy.
Variationen:
- Versuchen Sie, für eine stabilere Basis Pappteller anstelle von Bastelpapier zu verwenden.
- Machen Sie daraus ein Namenserkennungs-Kunstwerk, indem Sie die Kinder ihre Namen auf die Kürbisse schreiben lassen.
- Machen Sie Mini-Kürbisse und basteln Sie daraus eine Girlande, die Sie im Zimmer aufhängen können.
4. Truthahn-Stirnband

Aktivitätsübersicht:
Nothing captures the joy of fall quite like creating a colorful Turkey Headband. In this heartwarming craft, children use simple materials such as construction paper, feathers, and glue to design their own playful turkey crowns. As they cut, paste, and arrange the feathers, little hands strengthen fine motor skills while young minds practice color recognition and creativity.
This activity naturally invites storytelling and imagination. Children love pretending to be cheerful turkeys, moving around the classroom with laughter and excitement. It is also a wonderful opportunity to talk about gratitude, sharing, and the beauty of autumn traditions.
Materialien:
Braunes Tonpapier, rotes, orangefarbenes und gelbes Tonpapier, Schere (kindersicher), Kleber oder Klebeband, Buntstifte oder Marker, Wackelaugen (optional), Hefter
So geht's:
- Get the table ready with brown paper strips, colorful paper feathers, glue, and markers.
- Help each child fit a brown strip around their head and secure it into a circle to form the headband base.
- Invite children to color and decorate their paper feathers, then glue them to the back of the headband.
- Show how to make a turkey face using paper shapes or googly eyes, and add a beak and red wattle for fun.
- Chat about Thanksgiving and encourage each child to share one thing they are thankful for.
- When finished, let them wear their festive headbands and waddle around like cheerful turkeys during a classroom parade.
Variationen:
- Fügen Sie den Namen des Kindes als lustiges Personalisierungselement auf der Vorderseite des Stirnbands hinzu.
- Gestalten Sie eine Dankbarkeitsfeder: Lassen Sie jedes Kind etwas, wofür es dankbar ist, auf eine Feder schreiben oder zeichnen, bevor Sie sie daran befestigen.
5. Pappbecher-Hexe

Aktivitätsübersicht:
Bring a touch of Halloween magic to the classroom with this fun and imaginative Paper Cup Witch craft. Using simple materials like paper cups, construction paper, yarn, and markers, children can create their own friendly witches complete with pointy hats, bright eyes, and curly hair. As they cut, glue, and decorate, they strengthen fine motor skills and practice following steps, turning creativity into confidence.
Materialien:
Pappbecher (grün oder weiß), schwarzes Bastelpapier, Kleber, Schere (kindersicher), Garn oder Papierschnitzel (für die Haare), Wackelaugen, Filzstifte oder Buntstifte
So geht's:
- Arrange paper cups, pre-cut witch hats, yarn hair, and black paper shapes on the table so everything is easy to reach.
- Give each child a paper cup and invite them to glue on googly eyes and draw a friendly witch face with markers.
- Help them add yarn or shredded paper hair, then top it with a pointy black hat for a magical touch.
- Wrap a small paper cape or collar around the cup to complete the witch’s outfit.
- As they create, ask fun questions such as “What kind of magic does your witch do?” or “Is your witch silly, spooky, or kind?”
- When finished, line up all the witches together for a charming Halloween display that’s full of personality.
Variationen:
- Fügen Sie einen kleinen Besenstiel aus Eisstielen und Bast oder Packpapier hinzu.
- Machen Sie eine Halloween-Puppe daraus, indem Sie einen Strohhalm oder Stock am Boden des Bechers befestigen.
- Ermutigen Sie Kinder, andere Figuren – Geister, Kürbisse oder Zauberer – für eine komplette Halloween-Szene zu erschaffen.
6. Eistüten mit Puffy Paint
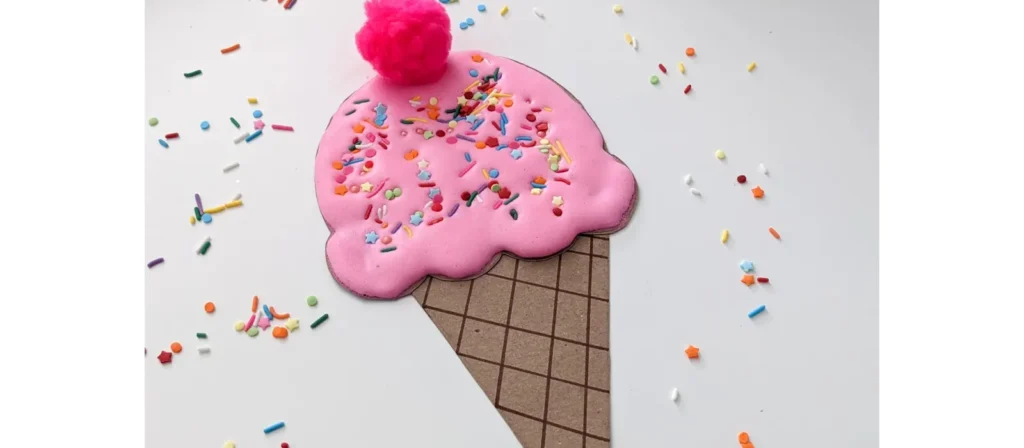
Aktivitätsübersicht:
Bring a scoop of sweetness into the classroom with this delightful Puffy Paint Ice Cream Cones craft. Using homemade puffy paint made from shaving cream and glue, children can swirl and spread “ice cream” on paper cones, then top them with sprinkles, glitter, or pom-poms for extra fun. As they mix colors and textures, they explore sensory play while strengthening hand control and creativity.
Materialien:
Rasierschaum, Weißleim, Lebensmittelfarbe oder abwaschbare Farbe, braunes Tonpapier (Kegel), weißer Karton oder Papier (Hintergrund), Schere, Rührschüsseln, Löffel
So geht's:
- Start by mixing equal parts shaving cream and white glue in bowls, then add a few drops of food coloring or washable paint to create colorful “ice cream” puffy paint.
- Give each child a cone cutout and a sheet of cardstock to glue it on.
- Invite them to scoop, swirl, and spread the puffy paint above the cone to make their ice cream scoops.
- Encourage creativity by mixing colors, stacking tall cones, and talking about pretend flavors like strawberry, mint, or rainbow swirl.
- Let them sprinkle glitter, tiny paper dots, or pom-poms for extra toppings.
- Allow the artwork to dry overnight so the puffy texture stays firm, leaving behind a sweet, fluffy masterpiece that looks good enough to eat.
Variationen:
- Fügen Sie Streusel mit Glitzer oder kleinen ausgeschnittenen Papierpunkten hinzu.
- Verwandeln Sie die fertigen Tüten in ein Wanddisplay mit dem Titel „Unsere süßesten Ideen!“
- Verwenden Sie duftende Rasiercreme oder geben Sie einen Tropfen Vanille hinzu, um eine multisensorische Note zu erzielen.
7. Blattreibkunst
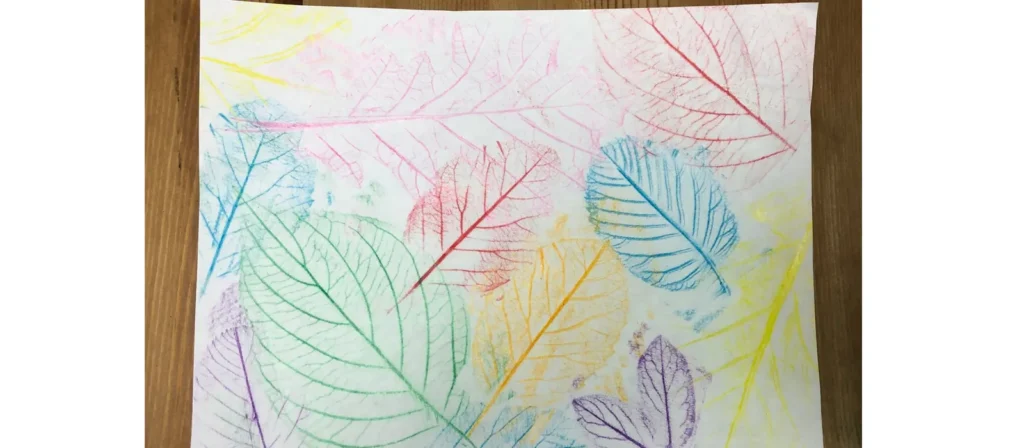
Aktivitätsübersicht:
Celebrate the beauty of nature with this enchanting Leaf Rubbing Art activity. Children can collect leaves of different shapes and sizes, place them under a sheet of paper, and gently rub crayons or colored pencils over the surface to reveal the delicate patterns and veins. As the hidden designs appear, little learners experience the wonder of discovery while developing fine motor control and observational skills.
Materialien:
Verschiedene Blätter (unterschiedliche Formen/Größen), weißes Papier, Buntstifte (ohne Verpackung), Klebeband (optional), Klemmbretter oder flache Arbeitsfläche
So geht's:
- Take children outside to collect leaves of different shapes and sizes, or provide a set of pre-collected leaves at the table.
- Give each child a few leaves and show them how to place them vein-side up on a flat surface or clipboard.
- Lay a sheet of white paper over the leaves and demonstrate how to gently rub the side of a crayon to reveal the patterns beneath.
- Encourage kids to try different colors and leaf types, comparing the shapes and textures they uncover.
- Chat about nature as they work by asking, “What kind of tree do you think this leaf came from?” or “Why do leaves change color in fall?”
- Display their colorful rubbings around the classroom or turn them into bookmarks and greeting cards to celebrate the beauty of the season.
Variationen:
- Machen Sie aus den fertigen Abreibungen Grußkarten, Lesezeichen oder saisonale Dekorationen.
- Verwenden Sie schwarzes Papier und helle Buntstifte für einen dramatischen Effekt.
- Kombinieren Sie es mit einem einfachen Spaziergang in der Natur und einer Schnitzeljagd nach Blättern für einen Tag mit vollem Thema.
8. Selbstgemachte Knete-Kreationen
Aktivitätsübersicht:
There’s something truly magical about molding, rolling, and shaping with soft, colorful dough. In this joyful Homemade Playdough Creations activity, children make their own playdough using simple ingredients like flour, salt, and water, then use it to sculpt anything their imagination can dream up such as animals, food, or playful patterns. The process engages all their senses while building fine motor strength, creativity, and focus.
Materialien:
Mehl, Salz, Weinstein, Wasser, Pflanzenöl, Lebensmittelfarbe (oder fertige Knete), Rührschüsseln, Löffel, kindersichere Modellierwerkzeuge (Plastikmesser, Ausstechformen, Nudelhölzer)
So geht's:
- Prepare colorful playdough ahead of time or let children join in the fun of making it themselves by mixing flour, salt, water, oil, and food coloring.
- Once the dough is ready and cool, divide it into different colors and place it on trays or mats for easy shaping.
- Provide rolling pins, cookie cutters, and plastic tools so children can mold animals, letters, or their favorite foods.
- Encourage creativity by asking playful questions such as “What are you making today?” or “Can you shape your name out of dough?”
- Let them explore textures, colors, and shapes freely, building both imagination and fine motor skills along the way.
- When finished, store the dough in sealed containers so it can be used again for more creative sessions throughout the week.
Variationen:
- Fügen Sie ätherische Öle (wie Lavendel oder Pfefferminze) für eine beruhigende sensorische Note hinzu.
- Integrieren Sie natürliche Elemente wie Zweige, Steine oder Blätter für ein naturbasiertes Thema.
- Verwenden Sie Ausstechformen, um die Aktivität mit frühen mathematischen Konzepten wie Mustern oder Geometrie zu verknüpfen.
9. Die kleine Raupe Nimmersatt
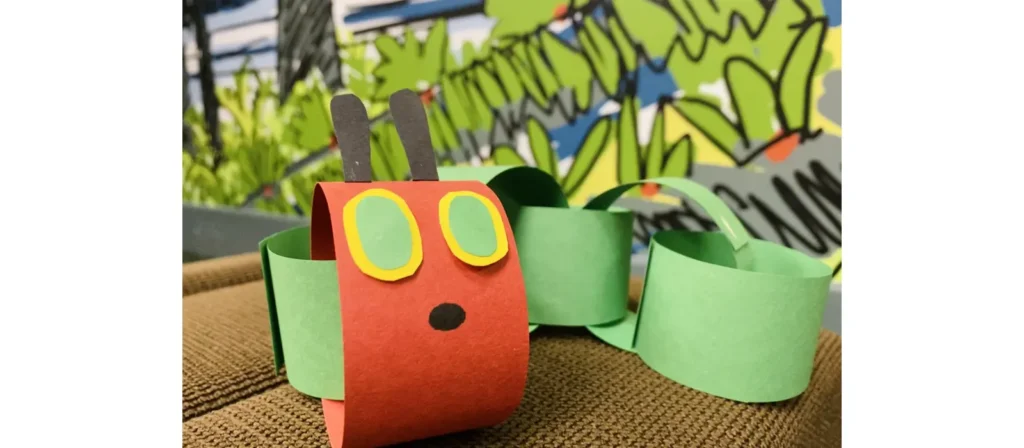
Aktivitätsübersicht:
Bring Eric Carle’s beloved story to life with this charming The Very Hungry Caterpillar Craft. Using colorful paper circles, glue, and googly eyes, children can create their own friendly caterpillar while recalling each part of the story. As they cut, count, and arrange the pieces, they strengthen fine motor skills, practice sequencing, and develop early literacy through storytelling connections.
Materialien:
Farbiges Bastelpapier (rot und grün), Klebestifte, Schere (kindersicher), schwarzer Marker, Wackelaugen, Pappteller (optional zur Präsentation), Exemplare des Buches (optional)
So geht's:
- Begin by reading Die kleine Raupe Nimmersatt together or watching a short video version to spark children’s imagination.
- Give each child a set of green circles for the body and one red circle for the head.
- Show them how to glue the circles in a line to form the caterpillar, then add googly eyes, a smile, and antennae using a marker or paper strips.
- Encourage counting and sequencing by asking, “How many green circles did you use?” or “What did the caterpillar eat first?”
- Once finished, display the adorable caterpillars on a bulletin board or let children take them home as a fun reminder of the story.
- For added creativity, invite them to make the butterfly stage next, connecting art with storytelling and learning.
Variationen:
- Fügen Sie ein Zählelement hinzu, indem Sie jeden grünen Kreis nummerieren.
- Erstellen Sie ein Wandbild zum Lebenszyklus mit den Stadien Raupe, Kokon und Schmetterling.
- Verwenden Sie für ein flauschigeres Aussehen Wattebäusche anstelle von Papierkreisen.
10. Handabdruck-Sonnenblumen
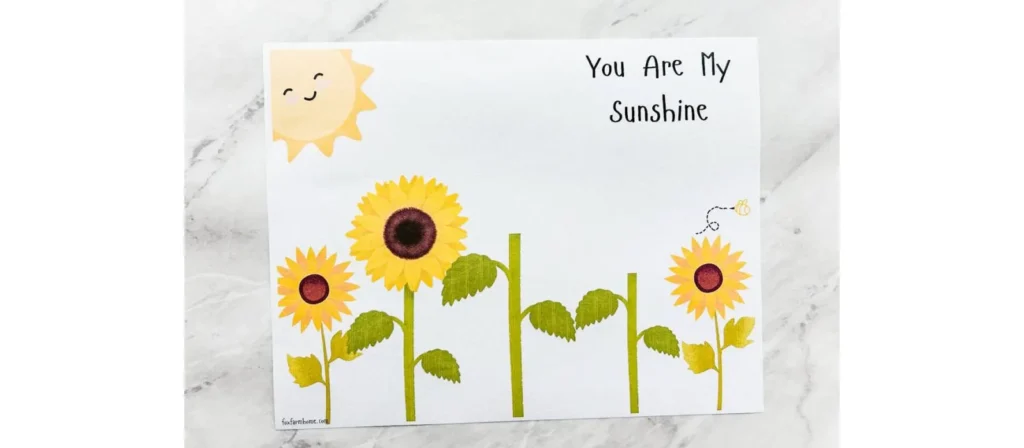
Aktivitätsübersicht:
Fill the classroom with sunshine and smiles through this beautiful Handprint Sunflowers activity. Children trace and paint their hands to form bright yellow petals, then add a brown center and a green stem to complete their cheerful sunflowers. As they press their colorful handprints onto the paper, they build fine motor strength, explore symmetry and color blending, and experience the joy of creating something uniquely their own.
Materialien:
Gelbes und grünes Tonpapier, braune Papierkreise (oder Cupcake-Förmchen), Kleber, Schere (kindersicher), Bleistift, schwarzer Marker, optional: echte Sonnenblumenkerne
So geht's:
- Get your table ready with yellow, green, and brown paper, glue, pencils, and scissors.
- Help children trace their hands several times on yellow paper and cut them out to form bright sunflower petals.
- Glue a brown circle or cupcake liner in the center of the page to make the flower’s middle.
- Invite kids to arrange and glue their handprint petals around the center to create a full, sunny bloom.
- Add a green stem and leaves to finish the sunflower.
- For extra fun, glue real sunflower seeds in the middle to give it a textured look.
- When all the flowers are done, display them together to form a cheerful classroom “garden” that shines with creativity and color.
Variationen:
- Schreiben Sie den Namen jedes Kindes auf ein Blütenblatt und machen Sie daraus eine „Klassengarten“-Ausstellung.
- Verwenden Sie Farbe, um Blütenblätter aus Handabdrücken zu erstellen und so eine chaotischere, taktilere Version zu erhalten.
- Erstellen Sie eine Zählaktivität, indem Sie die Kinder bitten, die verwendeten Blütenblätter zu zählen.
11. Regenbogencollage
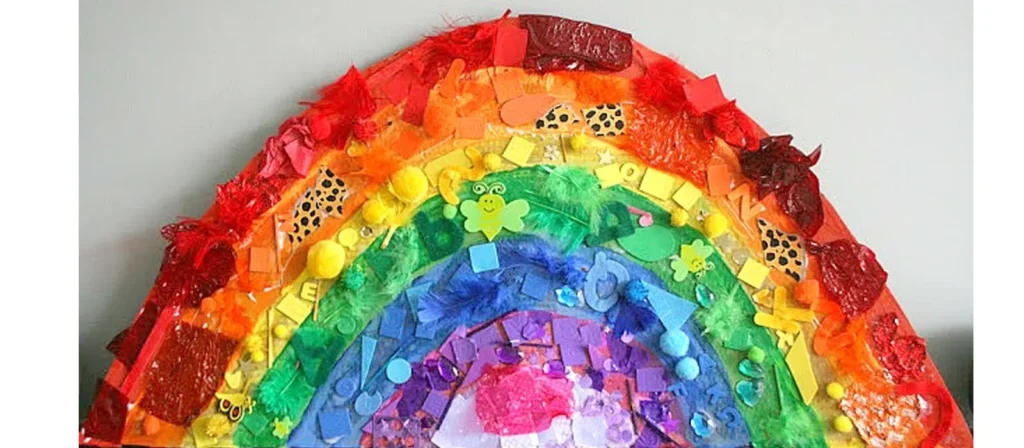
Aktivitätsübersicht:
Brighten the classroom with color and creativity through this joyful Rainbow Collage activity. Children use scraps of paper, tissue, fabric, or any colorful materials to build their very own rainbows. As they sort, cut, and glue each color into place, they practice fine motor coordination, color recognition, and sequencing while expressing their individual creativity in a vibrant way.
Materialien:
Farbige Bastelpapierreste (oder Seidenpapier), Klebestifte, weißes Papier oder Karton, Wattebäusche, Schere (kindersicher), Buntstifte oder Marker (optional)
So geht's:
- Get the table ready with sorted paper scraps or tissue pieces in rainbow color order, along with glue sticks, scissors, and cotton balls.
- Give each child a rainbow outline or let them draw their own on white paper or cardstock.
- Invite them to glue colorful scraps one by one, following the rainbow order and naming each color as they go.
- Add cotton balls at both ends to make soft, fluffy clouds that complete the rainbow.
- Encourage conversation by asking questions like “What comes after yellow?” or “Which color is your favorite?”
- Once dry, display the bright rainbows on a classroom wall or send them home to bring a little sunshine to family spaces.
Variationen:
- Verwenden Sie natürliche Materialien wie Blätter und Blütenblätter für einen Regenbogen zum Thema Tag der Erde.
- Machen Sie eine 3D-Version daraus, indem Sie Materialien wie Garn, Filz oder Knöpfe übereinander legen.
- Für eine schnellere Gruppenversion können Sie Mini-Regenbögen auf Papptellern erstellen.
12. Fingerabdruckbäume

Aktivitätsübersicht:
Turn tiny fingerprints into a forest of creativity with this heartwarming Fingerprint Trees activity. Children use their fingertips dipped in colorful paint to create leaves, blossoms, or fruits on tree branches drawn or printed on paper. Each gentle press leaves a unique mark, helping them explore colors, patterns, and the beauty of individuality while developing fine motor coordination and sensory awareness.
Materialien:
Weißer Karton, braune Marker oder Buntstifte, abwaschbare Farbe (Herbst- oder Frühlingsfarben), Pappteller oder Farbwannen, Tücher oder Wasserschüsseln zum Aufräumen
So geht's:
- Prepare white cardstock with tree trunks and branches already drawn, or let children sketch their own using brown markers or crayons.
- Pour small amounts of washable paint onto paper plates—choose warm tones like red, yellow, and orange for fall, or fresh colors like green, pink, and purple for spring.
- Invite children to dip their fingertips lightly into the paint and press them along the branches to create colorful leaves or blossoms.
- Encourage them to experiment with different colors and pressure to see how each fingerprint looks unique.
- Talk together about the seasons by asking, “Do these colors remind you of autumn or spring?”
- Let the paintings dry and display them as a bright seasonal forest that celebrates every child’s individuality.
Variationen:
- Erstellen Sie vier Bäume nebeneinander, um alle vier Jahreszeiten darzustellen.
- Verwenden Sie Q-Tips oder Wattestäbchen für Kinder, die ihre Finger lieber nicht benutzen möchten.
- Fügen Sie für zusätzliche Details herabfallende Blätter um die Basis herum oder Vögel in den Zweigen hinzu.
13. Luftpolsterfolienmalerei
Aktivitätsübersicht:
Turn ordinary packaging into a burst of creativity with this exciting Bubble Wrap Painting activity. Children dip pieces of bubble wrap into paint and press them onto paper to reveal fun, textured patterns that pop with color and imagination. As they explore the bumpy surface, they engage their senses, strengthen fine motor skills, and learn about texture and repetition in art.
Materialien:
Luftpolsterfolie (in kleine Blätter oder Formen geschnitten), abwaschbare Farbe, Pappteller (für die Farbe), weißer Karton oder große Blätter Papier, Klebeband (optional), Kittel oder Schürzen
So geht's:
- Cut bubble wrap into small squares or fun shapes like hearts, circles, or stars.
- Pour bright washable paints onto paper plates and set out sheets of white cardstock for printing.
- Show children how to dip the bubble wrap into paint and press it onto the paper to make colorful textured patterns.
- Encourage them to try different colors and layering effects, watching how patterns overlap and blend.
- Talk about what they see and feel by asking, “What does it feel like?” or “What happens when two colors mix?”
- Once finished, let the artwork dry flat—when the paint sets, the bubbly textures look even more amazing.
- Display their masterpieces on the wall or use them to decorate classroom bulletin boards for a vibrant touch of creativity.
Variationen:
- Kleben Sie Luftpolsterfolie um ein Nudelholz oder eine Pappröhre, um Texturen auszurollen.
- Schneiden Sie Luftpolsterfolie in saisonale Formen (z. B. Schneeflocken oder Blätter), um thematische Drucke zu erhalten.
- Kombinieren Sie die Aktivität mit einem Buch über Texturen oder die fünf Sinne.
14. Pappteller-Tamburine
Aktivitätsübersicht:
Bring rhythm and laughter to the classroom with this joyful Paper Plate Tambourines activity. Children decorate two paper plates with colorful paints, stickers, or drawings, then fill them with a few dried beans or beads before sealing them together. Once finished, they can shake their handmade tambourines to make cheerful music that fills the room with sound and smiles.
Materialien:
Pappteller (2 pro Kind), trockene Bohnen oder Nudeln, Hefter oder Kleber, Marker oder Buntstifte, Aufkleber, Band oder Garn (optional), Locher
So geht's:
- Prepare two paper plates for each child and set out markers, stickers, and paints for decoration.
- Invite children to decorate the bottom sides of their plates with bright colors and fun designs—this is their very own musical instrument.
- Place a small handful of dried beans or pasta on one plate, then cover it with the second plate, decorated sides facing out.
- Help seal the edges with a stapler or glue to trap the contents securely inside.
- For extra fun, punch small holes around the edges and let children tie colorful ribbons or yarn for movement and flair.
- Once the tambourines are ready, gather everyone for a rhythm circle or mini parade and let the joyful music begin.
- Encourage kids to experiment with different sounds by shaking gently, tapping, or moving to the beat.
Variationen:
- Versuchen Sie, im Inneren Glocken oder Knöpfe für verschiedene Geräusche zu verwenden.
- Fügen Sie ein Namensschild hinzu und verwenden Sie es während der Musikstunde oder bei Auftritten.
- Erkunden Sie Klangunterschiede mit verschiedenen Füllungen – Reis, Perlen oder Kieselsteinen.
15. Papiertütenpuppen
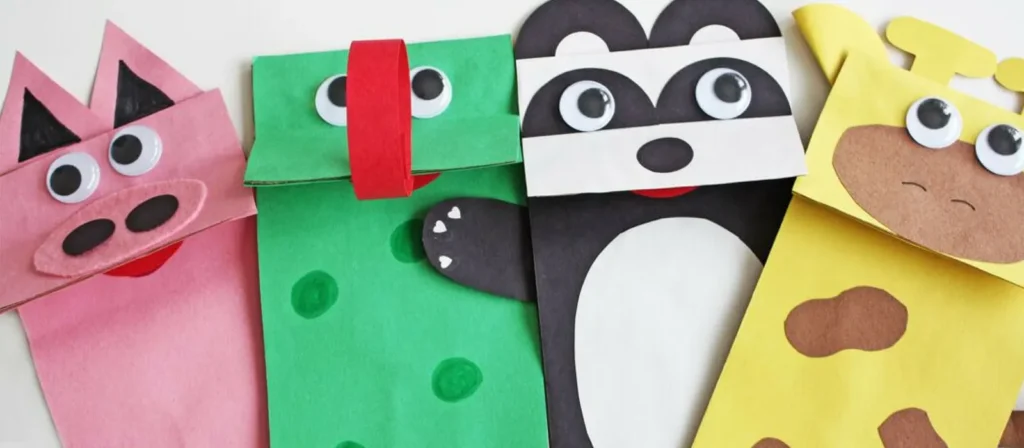
Aktivitätsübersicht:
Let imagination take center stage with this delightful Paper Bag Puppets activity. Children turn simple paper bags into charming characters using markers, yarn, googly eyes, and bits of colored paper. As they design their puppets such as animals, people, or storybook friends, they develop creativity, storytelling skills, and fine motor coordination while expressing their emotions through art.
Materialien:
Braune oder weiße Lunchtüten aus Papier, Bastelpapierreste, Klebestifte, Buntstifte oder Marker, Wackelaugen, Garn, Schere (kindersicher), Aufkleber oder Knöpfe (optional)
So geht's:
- Prepare paper bags, colorful paper scraps, yarn, googly eyes, glue, and markers on the table.
- Let children choose a paper bag and start by decorating the flap to make their puppet’s face.
- Encourage them to add googly eyes, yarn hair, and paper cutouts for mouths, ears, or hats.
- Decorate the lower part of the bag as clothing, adding details like buttons, arms, or accessories.
- Once dry, have children slip their hands inside the bags and bring their puppets to life through playful storytelling.
- Pair children to perform mini puppet shows together and encourage them to give voices to their characters.
- Create a classroom puppet theater corner so their new friends can star in many future adventures.
Variationen:
- Weisen Sie Themen wie Tiere, Helfer in der Gemeinde oder beliebte Märchenfiguren zu.
- Fügen Sie für mehr Struktur Garn oder Haarbänder hinzu.
- Gestalten Sie mit einem Karton und Vorhängen eine Puppentheaterecke für ausgedehntes Fantasiespiel.
16. Sonnenfänger aus Seidenpapier

Aktivitätsübersicht:
Fill the classroom with color and light through this enchanting Tissue Paper Suncatchers activity. Children use pieces of colorful tissue paper, clear contact paper, and simple shapes like hearts, stars, or circles to create beautiful window art that glows in the sunlight. As they layer and arrange the colors, they learn about transparency, color blending, and composition while strengthening their fine motor and visual-spatial skills.
Materialien:
Transparentes Kontaktpapier oder Laminierfolien, Seidenpapier in verschiedenen Farben (in kleine Quadrate geschnitten), schwarzes Bastelpapier (für Rahmen), Schere (kindersicher), Klebeband
So geht's:
- Prepare black paper frames by cutting simple shapes like hearts, stars, or circles, and remove the centers.
- Peel the backing off a piece of clear contact paper and place it sticky-side up on the table.
- Position the black frame on top and press it gently to secure it in place.
- Invite children to fill the inside with colorful tissue paper squares, overlapping the pieces to see how new colors appear.
- Once their design is complete, cover it with another piece of contact paper to seal the suncatcher.
- Trim any extra edges, then tape the finished artwork to a sunny window.
- Watch as sunlight shines through, turning the classroom into a rainbow-filled gallery of glowing colors.
Variationen:
- Verwenden Sie saisonale Formen – Kürbisse für den Herbst, Eier für den Frühling oder Schneeflocken für den Winter.
- Lassen Sie Kinder abstrakte, frei geformte Designs ohne Rahmen erstellen.
- Für zusätzlichen Glanz können Sie Glitzer oder Pailletten einarbeiten.
17. Handabdrücke aus Salzteig
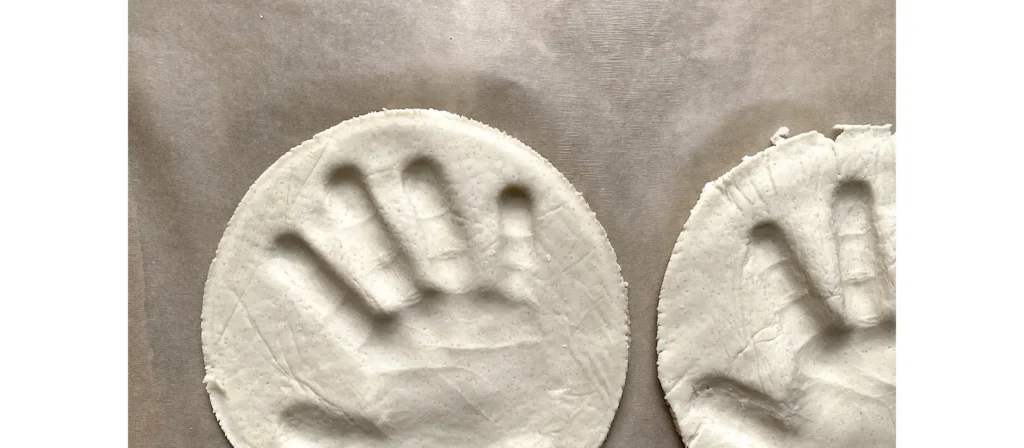
Aktivitätsübersicht:
Capture a precious moment in time with this heartfelt Salt Dough Handprints activity. Children mix simple ingredients like flour, salt, and water to make soft dough, then press their tiny hands into it to create lasting impressions. After baking and decorating with paint or glitter, each handprint becomes a beautiful keepsake that celebrates growth, creativity, and the joy of making something by hand.
Materialien:
Mehl, Salz, Wasser, Rührschüssel, Nudelholz, Backblech, Farbe, Pinsel, transparentes Dichtungsmittel (optional), Band oder Schnur (optional zum Aufhängen)
Aufstellen:
- Den Salzteig vormischen oder die Kinder mithelfen lassen, indem sie 2 Tassen Mehl, 1 Tasse Salz und 1 Tasse warmes Wasser unterrühren. Vermischen und kneten, bis alles glatt ist.
- Legen Sie Nudelhölzer und kleine Matten oder Tabletts zum Arbeiten bereit.
- Wenn Sie zum Aushärten backen, heizen Sie den Backofen auf 90 °C (200 °F) vor.
Aktivitätsanweisungen:
- Rollen Sie für jedes Kind ein etwa 1,25 cm dickes Stück Teig aus.
- Helfen Sie ihnen, ihre Hand fest in den Teig zu drücken, um einen tiefen Handabdruck zu hinterlassen.
- Wenn das Stück später aufgehängt werden soll, machen Sie mit einem Bleistift oder Strohhalm oben ein kleines Loch.
- 1–2 Stunden backen oder mehrere Tage an der Luft trocknen lassen.
- Nach dem Trocknen können Kinder ihre Handabdrücke in jeder beliebigen Farbe bemalen. Für eine längere Haltbarkeit können Sie sie mit Klarlackspray versiegeln.
Variationen:
- Schreiben Sie vor dem Backen den Namen des Kindes und das Datum in den Teig, um eine bleibende Erinnerung zu schaffen.
- Für einen ausgefallenen Effekt fügen Sie Glitzerfarbe oder Metallic-Oberflächen hinzu.
- Machen Sie daraus ein Geschenk zum Muttertag oder Vatertag mit einer Botschaft wie „Du bist zweifellos der Beste!“
18. Tanzende Bandstäbe
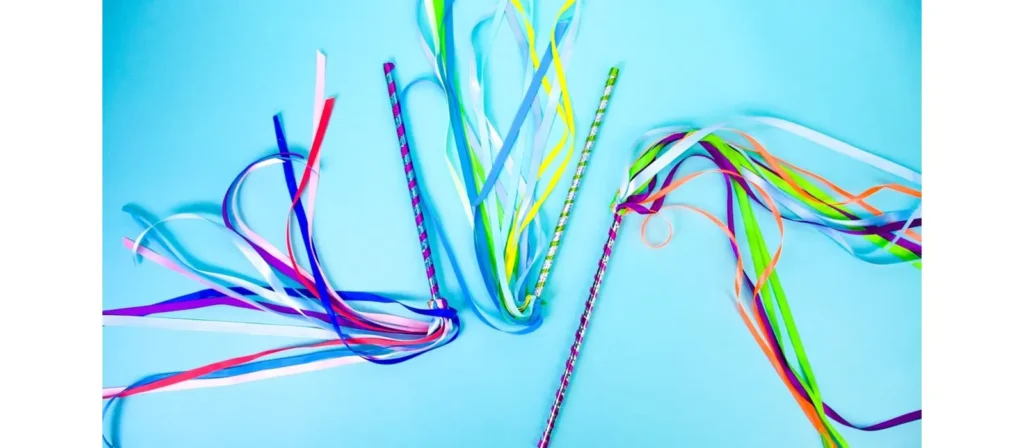
Aktivitätsübersicht:
Add movement, color, and joy to the classroom with this lively Dancing Ribbon Wands activity. Children decorate sticks or dowels with bright ribbons, streamers, or fabric strips, then twirl and dance as their wands flutter through the air. As they wave and spin, they strengthen gross motor skills, coordination, and rhythm while expressing themselves through motion and music.
Materialien:
Holzdübel oder Bastelstäbe, Bänder oder Krepppapier-Luftschlangen (verschiedene Farben), Kleber oder Klebeband, Schere (kindersicher), Aufkleber oder Marker zum Dekorieren der Griffe
So geht's:
- Mix 2 cups of flour, 1 cup of salt, and 1 cup of warm water in a bowl until the dough is smooth and easy to knead.
- Give each child a small piece of dough and let them roll it out to about half an inch thick on a mat or tray.
- Help them press their hand firmly into the dough to make a deep, clear handprint.
- If the piece will be hung, use a straw or pencil to poke a small hole near the top.
- Bake the handprints at 200°F (90°C) for 1–2 hours, or let them air dry over a few days until hard.
- Once dry, children can paint their creations with bright colors, add glitter for sparkle, and even write their names or the date.
- Seal with a clear spray for lasting shine, then tie a ribbon through the hole to hang it as a precious keepsake or family gift.
Variationen:
- Verwenden Sie saisonale Farben, um thematisch passende Zauberstäbe zu erstellen (z. B. Rot und Grün für Feiertage, Pastellfarben für den Frühling).
- Fügen Sie an den Enden der Bänder Glöckchen hinzu, um ein musikalisches Element hinzuzufügen.
- Machen Sie eine Aufführung daraus: Erstellen Sie eine einfache Gruppenroutine und lassen Sie sie vor Eltern oder anderen Klassen „auftreten“.
19. Dumme Monsterpuppen
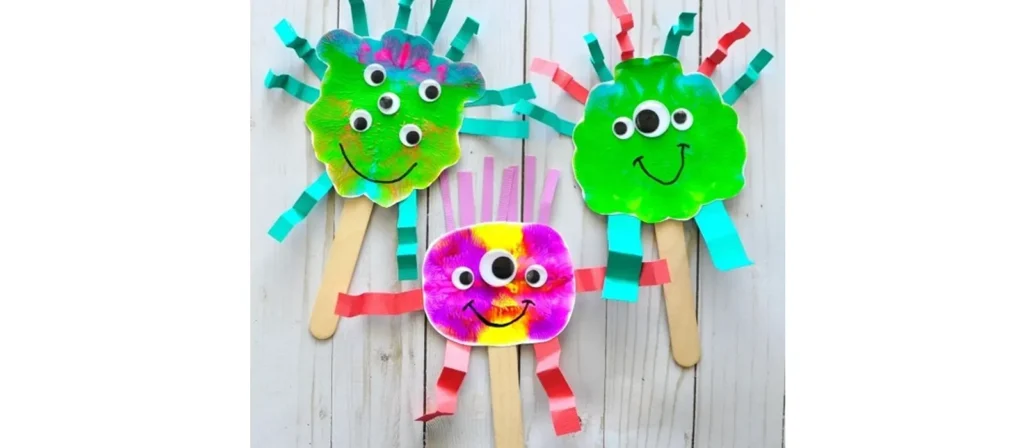
Aktivitätsübersicht:
Bring giggles and creativity to art time with this playful Silly Monster Puppets activity. Children use colorful paper, yarn, googly eyes, and craft sticks to design their own friendly monsters with funny faces, spiky hair, and wobbly eyes. As they cut, glue, and decorate, they strengthen fine motor skills, experiment with colors and shapes, and discover how imagination can turn ordinary materials into extraordinary creations.
Materialien:
Papiertüten für das Mittagessen, Bastelpapier, Klebestifte, Filzstifte oder Buntstifte, Pompons, Wackelaugen, Garn, Schere (kindersicher), Schaumstoffformen oder Pfeifenreiniger (optional)
So geht's:
- Prepare paper bags, colorful paper shapes, googly eyes, pom poms, yarn, and glue for each child.
- Show how the flap of the paper bag can become the monster’s mouth, then let children start decorating.
- Encourage them to glue on eyes in any number they like and add fun details like spiky hair, horns, arms, or big teeth.
- Let them use markers or crayons to draw silly smiles, wiggly tongues, or tiny spots for extra personality.
- As they work, ask fun questions such as “What’s your monster’s name?” or “Does it roar or laugh?”
- Once finished, gather the group for a monster puppet show where each child can perform with their silly new friend.
- Celebrate their creativity by displaying the puppets or creating a “Monster of the Week” wall to introduce everyone’s creations.
Variationen:
- Ordnen Sie den Monstern bestimmte Unterrichtsstunden zu (z. B. Emotionsmonster für SEL-Lernen).
- Verwenden Sie für eine strukturierte Version Filz statt Papier.
- Gestalten Sie eine Wanddekoration mit dem Titel „Monster der Woche“, auf der jedes Kind seine Figur vorstellt.
20. Kaffeefilter Planet Art

Aktivitätsübersicht:
Take young learners on an out-of-this-world adventure with this mesmerizing Coffee Filter Planet Art activity. Children color round coffee filters with markers, then lightly mist them with water to watch the colors blend and swirl like real galaxies. Once dry, they can cut out and label their colorful “planets,” turning simple materials into a stunning solar system full of imagination and discovery.
Materialien:
Runde Kaffeefilter, abwaschbare Marker, Sprühflaschen oder kleine Tassen Wasser mit Tropfern, Papiertücher, Folie oder Tabletts, schwarzes Bastelpapier (optional für den Hintergrund), Kleber
So geht's:
- Flatten coffee filters on trays or foil so they are ready for coloring.
- Give children washable markers and let them fill the filters with bright circular designs that look like planets.
- When finished, spray the filters lightly with water or use droppers to wet the surface and watch the colors swirl together.
- Allow the filters to dry completely for one to two hours until the watercolor effect appears.
- Once dry, cut out the colorful planets and glue them onto black paper to create a mini solar system.
- Encourage children to name their planets or add stars and fun space facts around them.
- Display the finished artwork on the classroom wall to create a dazzling galaxy full of imagination and discovery.
Variationen:
- Machen Sie ein Sonnensystemprojekt daraus, indem Sie mehrere Planeten erschaffen und sie in die Umlaufbahn bringen.
- Zeichnen Sie zunächst mit weißen Buntstiften auf die Filter, um einen versteckten „Resist“-Effekt zu erzielen.
- Fügen Sie Glitzerkleber hinzu, um ein galaktisches Funkeln zu erzeugen.
21. Natur-Mandalas

Aktivitätsübersicht:
Invite peace, focus, and creativity into the classroom with this beautiful Nature Mandalas activity. Children gather natural materials such as leaves, petals, stones, and twigs, then arrange them in circular patterns to create stunning mandalas that celebrate balance and harmony in nature. As they carefully place each piece, they strengthen concentration, pattern recognition, and an appreciation for the beauty found outdoors.
Materialien:
Blätter, Blütenblätter, Stöcke, kleine Steine, Tannenzapfen, Eicheln, Rinde, Papierkreise oder Pappunterlagen (optional), Kleber (optional für dauerhafte Präsentation)
So geht's:
- Take children on a short nature walk to collect safe and interesting materials such as leaves, petals, stones, and twigs.
- Provide paper or cardboard circles as bases, or let children create directly on the ground or table for a more natural feel.
- Explain that a mandala begins in the center and grows outward in patterns or circles.
- Invite children to place one object in the center, then build outward by arranging similar items in repeating or symmetrical designs.
- Encourage them to observe textures and colors while working by asking, “How does this leaf feel?” or “What shapes do you notice?”
- When the mandalas are finished, display them indoors or take photos before nature reclaims the materials.
- Celebrate their creativity by discussing how each mandala is unique, just like the natural world it was made from.
Variationen:
- Verwenden Sie saisonale Materialien – Blumen im Frühling und bunte Blätter im Herbst.
- Fügen Sie persönliche Details hinzu, beispielsweise bemalte Steine oder beschriftete Gegenstände.
- Machen Sie es zu einem Gruppenprojekt: ein großes Mandala, das in kollektiver Teamarbeit erstellt wird.
Sicherheits- und Aufräumtipps für die Bastelzeit
Selbst die beste Bastelarbeit für Vorschulkinder kann zu einem Chaos werden, wenn wir nicht vorbereitet sind. Mit der richtigen Struktur und den richtigen Gewohnheiten können Sie Kreativität fördern, ohne sich um Verschüttetes, Flecken oder klebrige Finger sorgen zu müssen.

Grenzen setzen, bevor der Spaß beginnt
- Bastelzonen: Verwenden Sie spezielle Tische oder waschbare Matten
- Schürzen oder alte T-Shirts: Ein Must-have für Vorschulkinder
- Legen Sie die Regel „saubere Hände“ fest, bevor Sie kleben oder malen
Verwendung sicherer, altersgerechter Materialien
- Entscheiden Sie sich immer für ungiftige, waschbare Produkte
- Vermeiden Sie scharfe Werkzeuge, leichte Erstickungsgefahren oder allergene Materialien
- Gefährliche Stoffe außerhalb der Reichweite aufbewahren
Aufräumen als Teil der Aktivität lehren
- Verwenden Sie farbcodierte Behälter zur Organisation von Materialien
- Erstellen Sie lustige Lieder oder Routinen rund ums Putzen
- Weisen Sie jedem Tisch einen kleinen „Aufräumleiter“ zu
Wie Kunst und Handwerk das Montessori- und Reggio-Lernen unterstützen
Die Philosophien dahinter Montessori und Reggio Emilia unterstützen Kunst und Handwerk für Vorschulkinder nachdrücklich – nicht nur als Kunstform, sondern als Möglichkeit zu lernen, sich auszudrücken und die Welt zu verstehen.
Förderung der Unabhängigkeit durch praktische Arbeit
- Kinder wählen Materialien aus und erledigen Aufgaben in ihrem eigenen Tempo
- Selbstgesteuerte Projekte fördern Autonomie und Selbstvertrauen
- Werkzeuge und Zubehör sind auf Kinderhöhe erreichbar
Förderung der Beobachtung und der von der Natur inspirierten Kreativität
- Reggio Emilia legt Wert auf natürliche Materialien und sensorische Erkundung
- Spaziergänge in der Natur und das Spiel mit freier Hand verbinden Kunst mit der realen Welt
- Saisonales Basteln verstärkt Rhythmen und Zyklen des Lebens
Unterstützung der kognitiven Entwicklung durch Wiederholung und Routine
- Die Wiederholung feinmotorischer Aktionen hilft beim Aufbau von Gehirnbahnen
- Rituale rund um Kunst und Handwerk schaffen Ordnung, Geduld und Konzentration
- Montessori-Materialien können handwerkliche Erweiterungen beinhalten (z. B. Nadelstiche, Nachzeichnen)
Basteln mit kleinem Budget: Tipps für Vorschule und Kindergarten
Hochwertiges Kunsthandwerk für Vorschulkinder erfordert kein großes Budget. Mit etwas Kreativität und Planung können Sie sinnvolle Kunsterlebnisse ermöglichen, ohne die Bank zu sprengen.
Verwenden Sie recycelte und alltägliche Materialien
- Toilettenpapierrollen, Flaschendeckel, Müslischachteln und Stoffreste
- Arbeiten Sie mit Eltern zusammen, um Spendenbehälter zu erstellen
- Nachhaltigkeit durch Wiederverwendung lehren
Kaufen Sie in großen Mengen und organisieren Sie intelligent
- Besorgen Sie sich Grundbedarfsartikel (Kleber, Papier, Pinsel) von Großhändlern
- Für schnellen Zugriff nach Kategorie und Farbe speichern
- Laminieren Sie häufig verwendete Vorlagen für die wiederholte Verwendung
Planen Sie Themeneinheiten im Voraus
- Passen Sie das Basteln an Jahreszeiten, Feiertage oder Unterrichtsthemen an
- Bastelarbeiten mit leichten Variationen für alle Altersstufen wiederverwenden
- Bewahren Sie einen Ordner mit druckbaren Vorlagen und Anweisungen für Ihr Team auf
Abschluss
Basteln für Vorschulkinder ist mehr als nur ein vergnüglicher Teil des Tages – es ist wichtig für die Entwicklung der Feinmotorik, fördert den emotionalen Ausdruck und weckt eine lebenslange Freude an Kreativität. Ob Lehrer, Schulbesitzer oder Eltern: Kindern die Freiheit zu geben, mit ihren Händen zu gestalten, stärkt ihr Selbstvertrauen, ihre Verbundenheit und ihre Neugier.
Hinter jedem erfolgreichen Handwerksraum steht eine durchdachte Umgebung. Bei West Shore MöbelWir sind auf die Gestaltung dieser Umgebungen spezialisiert. Mit über 20 Jahren Erfahrung in der Herstellung und Lieferung von Vorschulmöbeln bieten wir eine Komplettlösung –Von der Klassenzimmergestaltung und Möbelanpassung bis hin zur Produktion, Qualitätskontrolle und Lieferung. Unser Produktsortiment umfasst verschiedene Vorschulmöbel in unterschiedlichen Stilen, Materialien und Größen, um den vielfältigen Anforderungen frühkindlicher Lernräume gerecht zu werden.
Wenn Sie bereit sind, Ihre Kunstbereiche aufzuwerten oder Ihren Vorschulbereich neu zu gestalten, um noch mehr Kreativität zu fördern, sind wir hier, um Ihnen zu helfen – denn die richtige Umgebung macht den Unterschied.