Do you know how to help preschoolers develop their artistic and creative abilities at school? One of the most popular kindergarten classes is crafts, which allows children to freely explore and create art and enjoy this special creative moment. This is where arts and crafts for preschoolers truly shine.
Through arts and crafts for preschoolers, they can explore their imaginations, improve fine motor skills, develop cognitive abilities, and express themselves creatively. Learning new skills and repeated exposure to art supplies builds confidence, which impacts future development.
In this article, I’ll show you 21 of the best preschool and daycare craft projects—easy, fun, and educational. Introducing arts and crafts for preschoolers opens up a world of imaginative and meaningful play.
Bricolages préscolaires : plus qu’une simple activité amusante
Dans le monde préscolaire, la place des activités manuelles dans l'éducation de la petite enfance est souvent débattue. S'il est vrai que les activités manuelles et l'art sont différents, l'art est avant tout une question de créativité ouverte, tandis que l’artisanat a généralement un résultat défini, tous deux ont de la valeur dans un programme d’études complet.
L'art permet aux enfants d'explorer librement les matières, les couleurs et les textures, sans contraintes, en se concentrant sur le processus plutôt que sur le produit final. C'est essentiel pour stimuler la créativité et l'expression personnelle. Cependant, les activités manuelles offrent des avantages uniques. Elles contribuent au développement de la motricité fine et renforcent des concepts tels que reconnaissance des couleurs et des formes, et peut soutenir des thèmes d'apprentissage plus larges. Réalisé à la maison avec un adulte attentionné, le bricolage devient une activité unique et enrichissante, créant des souvenirs précieux.
Rather than viewing crafts as limiting, we should see them as complementing open-ended art experiences. A balance of both ensures that children are free to create while gaining valuable skills through structured activities.
Ici, nous explorons les 21 meilleurs bricolages préscolaires parfaits pour les petites mains.
21 meilleurs bricolages pour enfants d'âge préscolaire
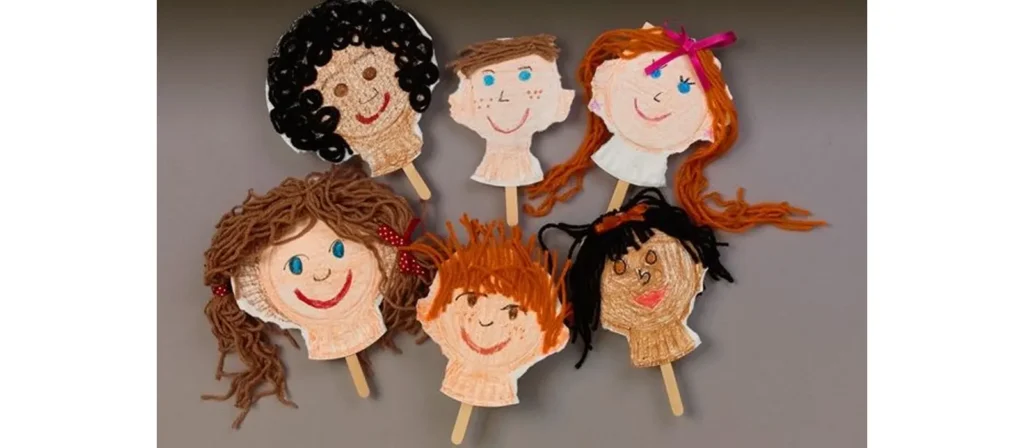
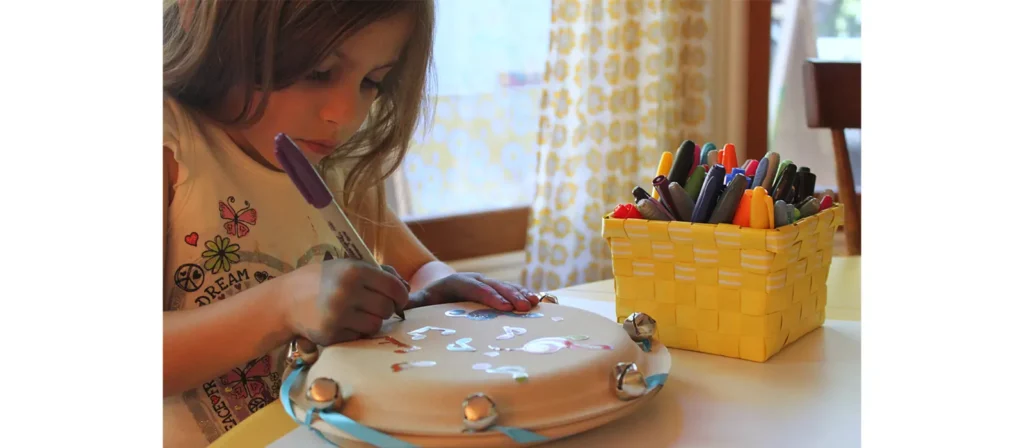
1. Visages d'assiettes en carton
Aperçu de l'activité :
Turn ordinary paper plates into a gallery of joyful expressions with this delightful Paper Plate Faces activity. Children can draw, paint, or glue on yarn, buttons, and colored paper to create funny, happy, or even curious faces that reflect their emotions. Through this creative process, they begin to understand feelings, develop empathy, and strengthen their fine motor skills while having fun with textures and shapes.
Matériels:
Assiettes en carton, marqueurs, fil, colle, décorations assorties (autocollants, yeux mobiles, pompons)
Comment faire :
- Set up a cheerful crafting station by laying out paper plates, markers, glue, and all sorts of fun decorations within easy reach.
- Give each child their own plate and invite them to design a face that shows an emotion such as happy, silly, surprised, or sleepy.
- Show them how to draw simple features, then let them freely add yarn hair, googly eyes, or stickers to bring their creations to life.
- Chat as they work by asking questions like “What feeling does your face have?” or “Can you make that expression too?”
- When the masterpieces are dry, turn your classroom into a Face Gallery or let the children take their smiling plates home to share.
Variantes :
Utilisez des assiettes de différentes tailles pour créer un groupe de « familles de visages » expressives — un complément parfait aux arts et à l’artisanat thématiques pour les enfants d’âge préscolaire.
2. Jumelles DIY

Aperçu de l'activité :
Spark curiosity and adventure with this charming DIY Binoculars craft. Using cardboard tubes, colorful paper, string, and a touch of imagination, children can create their very own pair of pretend binoculars. As they decorate and assemble their masterpiece, they strengthen hand-eye coordination, fine motor skills, and creativity while learning about observation and exploration.
Matériels:
Deux rouleaux de papier toilette vides par enfant, du ruban adhésif ou de la colle, de la ficelle ou du fil, une perforatrice, des crayons ou des marqueurs, des autocollants, du papier de couleur (facultatif)
Comment faire :
- Get your creative corner ready with cardboard tubes, colorful paper, tape, glue, and string.
- Give each child two rolls and invite them to decorate using markers, crayons, stickers, or paper wraps to make their binoculars uniquely theirs.
- Help them tape or glue the rolls together to form the binocular shape.
- Show how to thread yarn through the holes and tie knots to create a neck strap, introducing safe tool use in a fun way.
- Encourage kids to go on a pretend “explorer walk” around the classroom or playground, observing everything they can spot.
- Ask playful questions such as “What did you find?” or “Can you see something that starts with the letter B?”
- When finished, let them share their discoveries and show off their colorful binoculars to friends and family.
Variantes :
- Utilisez des rouleaux d’essuie-tout coupés en deux pour les jumelles géantes.
- Transformez ce bricolage en jeu en créant une chasse au trésor où les enfants doivent « repérer » des objets cachés.
- Associez-le à des livres ou des chansons sur la nature ou l'exploration pour enrichir les séances thématiques d'arts et d'artisanat pour les enfants d'âge préscolaire.
3. Bricolage facile avec une citrouille

Aperçu de l'activité :
Celebrate the cozy spirit of autumn with this adorable Easy Pumpkin Craft. Using orange paper, glue, and a little creativity, children can cut, roll, or layer pieces to form their own bright, cheerful pumpkins. As they work with shapes and colors, they strengthen fine motor skills, practice hand coordination, and learn basic concepts like size and pattern.
Matériels:
Orange construction paper, green construction paper, scissors (child-safe), glue sticks, black markers, optional: googly eyes, yarn, glitter.
Comment faire :
- Prepare a cozy crafting table with orange and green paper, glue sticks, scissors, and fun extras like googly eyes or glitter.
- Give each child orange paper circles or strips and guide them to glue the pieces together into a round pumpkin shape.
- Show how to add a green paper stem and let them draw a face using markers.
- Encourage them to decorate their pumpkins with yarn vines, sparkly glitter, or funny eyes to make each one special.
- Chat as they create by asking, “What kind of face will your pumpkin have? Happy or spooky?”
- After drying, use their adorable pumpkins to decorate a classroom wall or create a cheerful pumpkin patch for everyone to enjoy.
Variantes :
- Essayez d’utiliser des assiettes en papier au lieu de papier de construction pour une base plus solide.
- Transformez-le en un bricolage de reconnaissance de noms en demandant aux enfants d’écrire leurs noms sur les citrouilles.
- Fabriquez des mini citrouilles et créez une guirlande à accrocher dans la pièce.
4. Bandeau de dinde

Aperçu de l'activité :
Nothing captures the joy of fall quite like creating a colorful Turkey Headband. In this heartwarming craft, children use simple materials such as construction paper, feathers, and glue to design their own playful turkey crowns. As they cut, paste, and arrange the feathers, little hands strengthen fine motor skills while young minds practice color recognition and creativity.
This activity naturally invites storytelling and imagination. Children love pretending to be cheerful turkeys, moving around the classroom with laughter and excitement. It is also a wonderful opportunity to talk about gratitude, sharing, and the beauty of autumn traditions.
Matériels:
Papier de construction marron, papier de construction rouge, orange et jaune, ciseaux (sans danger pour les enfants), colle ou ruban adhésif, crayons ou marqueurs, yeux mobiles (facultatif), agrafeuse
Comment faire :
- Get the table ready with brown paper strips, colorful paper feathers, glue, and markers.
- Help each child fit a brown strip around their head and secure it into a circle to form the headband base.
- Invite children to color and decorate their paper feathers, then glue them to the back of the headband.
- Show how to make a turkey face using paper shapes or googly eyes, and add a beak and red wattle for fun.
- Chat about Thanksgiving and encourage each child to share one thing they are thankful for.
- When finished, let them wear their festive headbands and waddle around like cheerful turkeys during a classroom parade.
Variantes :
- Ajoutez le nom de l'enfant sur le devant du bandeau comme élément de personnalisation amusant.
- Créez une plume de gratitude : demandez à chaque enfant d'écrire ou de dessiner quelque chose pour lequel il est reconnaissant sur une plume avant de l'attacher.
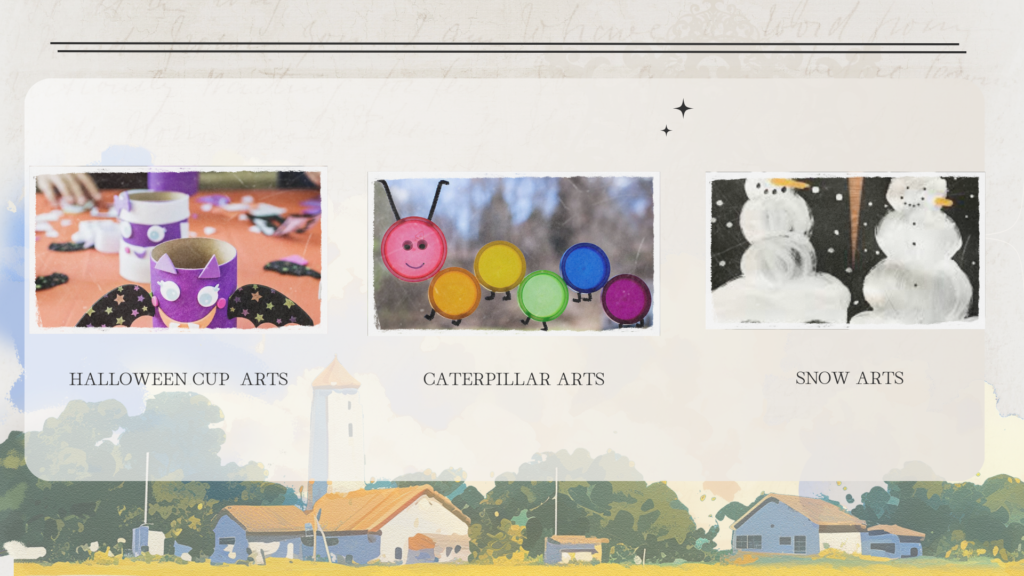
5. Sorcière en gobelet en papier

Aperçu de l'activité :
Bring a touch of Halloween magic to the classroom with this fun and imaginative Paper Cup Witch craft. Using simple materials like paper cups, construction paper, yarn, and markers, children can create their own friendly witches complete with pointy hats, bright eyes, and curly hair. As they cut, glue, and decorate, they strengthen fine motor skills and practice following steps, turning creativity into confidence.
Matériels:
Gobelets en papier (verts ou blancs), papier de construction noir, colle, ciseaux (sans danger pour les enfants), fil ou papier déchiqueté (pour les cheveux), yeux mobiles, marqueurs ou crayons de couleur
Comment faire :
- Arrange paper cups, pre-cut witch hats, yarn hair, and black paper shapes on the table so everything is easy to reach.
- Give each child a paper cup and invite them to glue on googly eyes and draw a friendly witch face with markers.
- Help them add yarn or shredded paper hair, then top it with a pointy black hat for a magical touch.
- Wrap a small paper cape or collar around the cup to complete the witch’s outfit.
- As they create, ask fun questions such as “What kind of magic does your witch do?” or “Is your witch silly, spooky, or kind?”
- When finished, line up all the witches together for a charming Halloween display that’s full of personality.
Variantes :
- Ajoutez un petit manche à balai en utilisant des bâtons de popsicle et du raphia ou du papier brun.
- Transformez-le en marionnette d’Halloween en attachant une paille ou un bâton au fond de la tasse.
- Encouragez les enfants à créer d’autres personnages — fantômes, citrouilles ou sorciers — pour une scène d’Halloween entière.
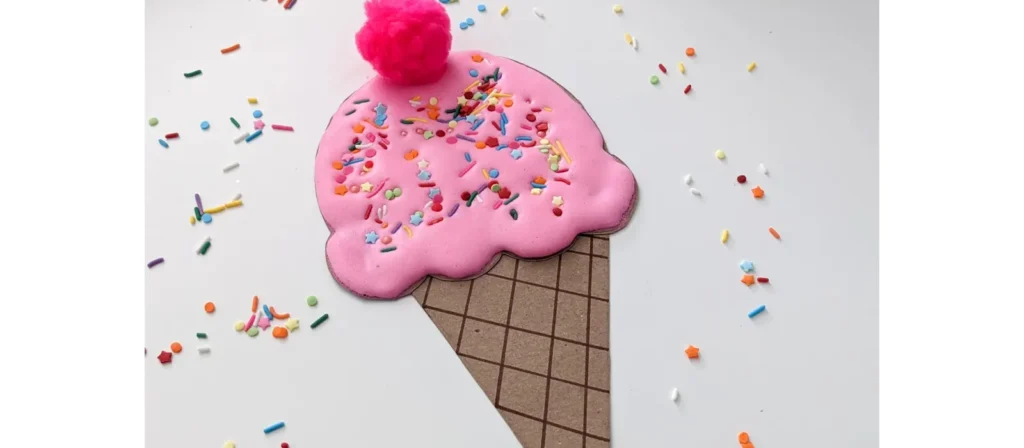
6. Cornets de glace à la peinture gonflante
Aperçu de l'activité :
Bring a scoop of sweetness into the classroom with this delightful Puffy Paint Ice Cream Cones craft. Using homemade puffy paint made from shaving cream and glue, children can swirl and spread “ice cream” on paper cones, then top them with sprinkles, glitter, or pom-poms for extra fun. As they mix colors and textures, they explore sensory play while strengthening hand control and creativity.
Matériels:
Crème à raser, colle blanche, colorant alimentaire ou peinture lavable, papier de construction marron (cône), papier cartonné ou papier blanc (arrière-plan), ciseaux, bols à mélanger, cuillères
Comment faire :
- Start by mixing equal parts shaving cream and white glue in bowls, then add a few drops of food coloring or washable paint to create colorful “ice cream” puffy paint.
- Give each child a cone cutout and a sheet of cardstock to glue it on.
- Invite them to scoop, swirl, and spread the puffy paint above the cone to make their ice cream scoops.
- Encourage creativity by mixing colors, stacking tall cones, and talking about pretend flavors like strawberry, mint, or rainbow swirl.
- Let them sprinkle glitter, tiny paper dots, or pom-poms for extra toppings.
- Allow the artwork to dry overnight so the puffy texture stays firm, leaving behind a sweet, fluffy masterpiece that looks good enough to eat.
Variantes :
- Ajoutez des paillettes à l'aide de paillettes ou de petits points de papier découpés.
- Transformez les cônes finis en un présentoir mural intitulé « Nos idées les plus douces ! »
- Utilisez une crème à raser parfumée ou ajoutez une goutte de vanille pour une touche multisensorielle.
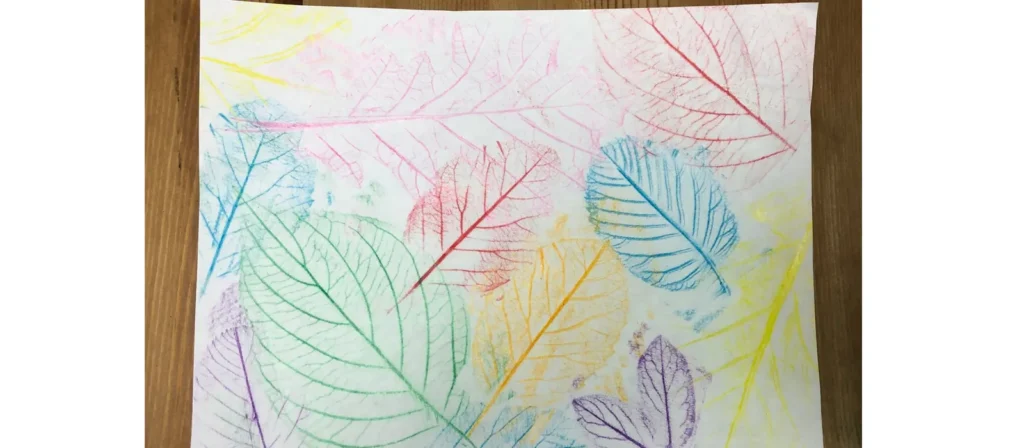
7. Art du frottement des feuilles
Aperçu de l'activité :
Celebrate the beauty of nature with this enchanting Leaf Rubbing Art activity. Children can collect leaves of different shapes and sizes, place them under a sheet of paper, and gently rub crayons or colored pencils over the surface to reveal the delicate patterns and veins. As the hidden designs appear, little learners experience the wonder of discovery while developing fine motor control and observational skills.
Matériels:
Différentes feuilles (formes/tailles différentes), papier blanc, crayons (sans emballage), ruban adhésif (facultatif), presse-papiers ou surface de travail plane
Comment faire :
- Take children outside to collect leaves of different shapes and sizes, or provide a set of pre-collected leaves at the table.
- Give each child a few leaves and show them how to place them vein-side up on a flat surface or clipboard.
- Lay a sheet of white paper over the leaves and demonstrate how to gently rub the side of a crayon to reveal the patterns beneath.
- Encourage kids to try different colors and leaf types, comparing the shapes and textures they uncover.
- Chat about nature as they work by asking, “What kind of tree do you think this leaf came from?” or “Why do leaves change color in fall?”
- Display their colorful rubbings around the classroom or turn them into bookmarks and greeting cards to celebrate the beauty of the season.
Variantes :
- Transformez les frottages terminés en cartes de vœux, en marque-pages ou en décorations saisonnières.
- Utilisez du papier noir et des crayons de couleur claire pour un effet dramatique.
- Associez-le à une simple promenade dans la nature et à une chasse au trésor de feuilles pour une journée thématique complète.
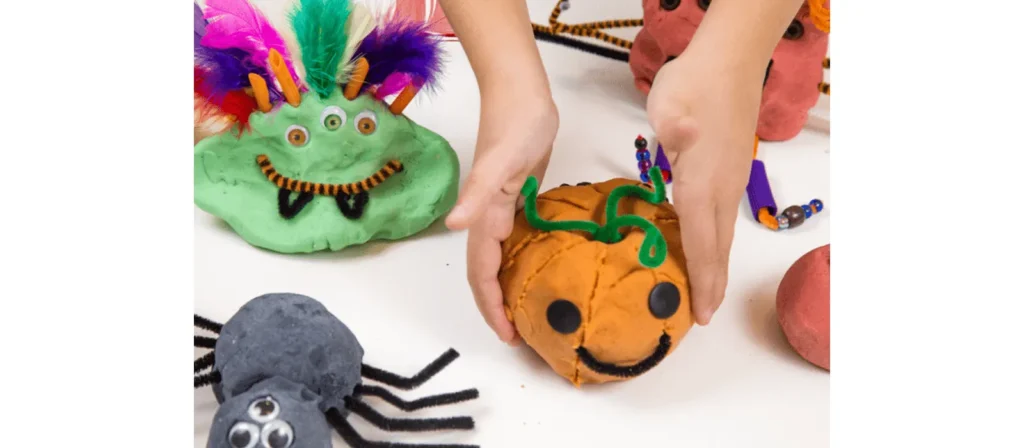
8. Créations en pâte à modeler maison
Aperçu de l'activité :
There’s something truly magical about molding, rolling, and shaping with soft, colorful dough. In this joyful Homemade Playdough Creations activity, children make their own playdough using simple ingredients like flour, salt, and water, then use it to sculpt anything their imagination can dream up such as animals, food, or playful patterns. The process engages all their senses while building fine motor strength, creativity, and focus.
Matériels:
Farine, sel, crème de tartre, eau, huile végétale, colorant alimentaire (ou pâte à modeler toute prête), bols à mélanger, cuillères, outils de sculpture sans danger pour les enfants (couteaux en plastique, emporte-pièces, rouleaux à pâtisserie)
Comment faire :
- Prepare colorful playdough ahead of time or let children join in the fun of making it themselves by mixing flour, salt, water, oil, and food coloring.
- Once the dough is ready and cool, divide it into different colors and place it on trays or mats for easy shaping.
- Provide rolling pins, cookie cutters, and plastic tools so children can mold animals, letters, or their favorite foods.
- Encourage creativity by asking playful questions such as “What are you making today?” or “Can you shape your name out of dough?”
- Let them explore textures, colors, and shapes freely, building both imagination and fine motor skills along the way.
- When finished, store the dough in sealed containers so it can be used again for more creative sessions throughout the week.
Variantes :
- Ajoutez des huiles essentielles (comme la lavande ou la menthe poivrée) pour une touche sensorielle apaisante.
- Incorporez des éléments naturels comme des brindilles, des pierres ou des feuilles pour un thème basé sur la nature.
- Utilisez des emporte-pièces pour relier l’activité aux premiers concepts mathématiques comme les motifs ou la géométrie.
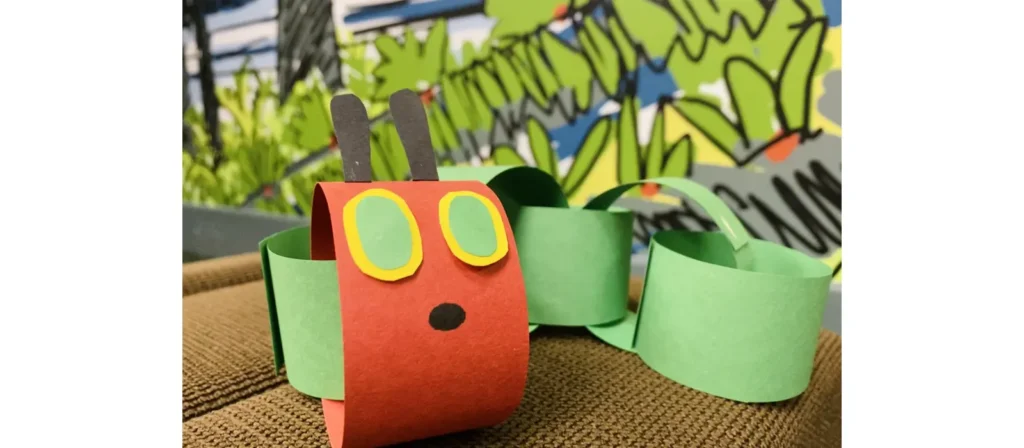
9. Le vaisseau de la chenille qui fait des trous
Aperçu de l'activité :
Bring Eric Carle’s beloved story to life with this charming The Very Hungry Caterpillar Craft. Using colorful paper circles, glue, and googly eyes, children can create their own friendly caterpillar while recalling each part of the story. As they cut, count, and arrange the pieces, they strengthen fine motor skills, practice sequencing, and develop early literacy through storytelling connections.
Matériels:
Papier de construction coloré (rouge et vert), bâtons de colle, ciseaux (sans danger pour les enfants), marqueur noir, yeux mobiles, assiettes en carton (facultatif pour l'affichage), exemplaires du livre (facultatif)
Comment faire :
- Begin by reading La chenille qui fait des trous together or watching a short video version to spark children’s imagination.
- Give each child a set of green circles for the body and one red circle for the head.
- Show them how to glue the circles in a line to form the caterpillar, then add googly eyes, a smile, and antennae using a marker or paper strips.
- Encourage counting and sequencing by asking, “How many green circles did you use?” or “What did the caterpillar eat first?”
- Once finished, display the adorable caterpillars on a bulletin board or let children take them home as a fun reminder of the story.
- For added creativity, invite them to make the butterfly stage next, connecting art with storytelling and learning.
Variantes :
- Ajoutez un élément de comptage en numérotant chaque cercle vert.
- Créez une fresque murale sur le cycle de vie avec les étapes de la chenille, du cocon et du papillon.
- Utilisez des boules de coton au lieu de cercles de papier pour un aspect plus moelleux.
10. Tournesols à empreintes de mains
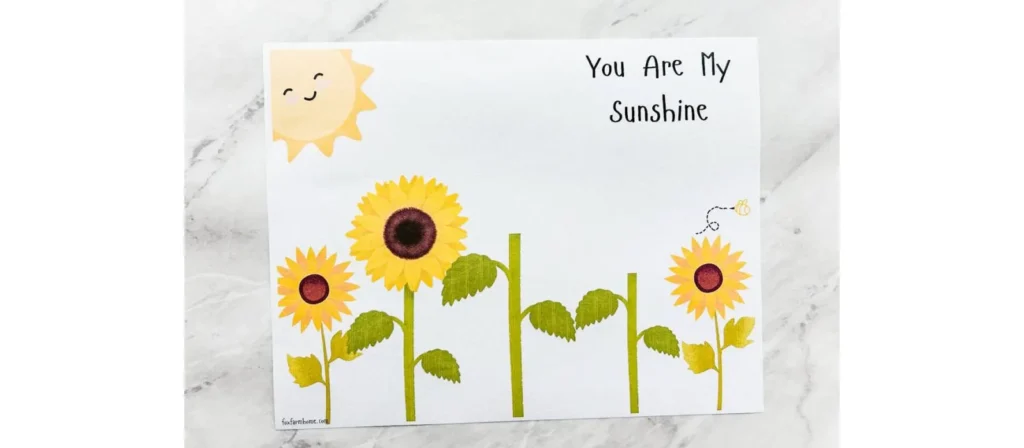
Aperçu de l'activité :
Fill the classroom with sunshine and smiles through this beautiful Handprint Sunflowers activity. Children trace and paint their hands to form bright yellow petals, then add a brown center and a green stem to complete their cheerful sunflowers. As they press their colorful handprints onto the paper, they build fine motor strength, explore symmetry and color blending, and experience the joy of creating something uniquely their own.
Matériels:
Papier de construction jaune et vert, cercles de papier kraft (ou caissettes à cupcakes), colle, ciseaux (sans danger pour les enfants), crayon, marqueur noir, facultatif : vraies graines de tournesol
Comment faire :
- Get your table ready with yellow, green, and brown paper, glue, pencils, and scissors.
- Help children trace their hands several times on yellow paper and cut them out to form bright sunflower petals.
- Glue a brown circle or cupcake liner in the center of the page to make the flower’s middle.
- Invite kids to arrange and glue their handprint petals around the center to create a full, sunny bloom.
- Add a green stem and leaves to finish the sunflower.
- For extra fun, glue real sunflower seeds in the middle to give it a textured look.
- When all the flowers are done, display them together to form a cheerful classroom “garden” that shines with creativity and color.
Variantes :
- Écrivez le nom de chaque enfant sur un pétale et transformez-le en un « jardin de classe ».
- Utilisez de la peinture pour créer des pétales d'empreintes de main pour une version plus désordonnée et plus tactile.
- Créez une activité de comptage en demandant aux enfants de compter les pétales qu’ils ont utilisés.
11. Collage arc-en-ciel
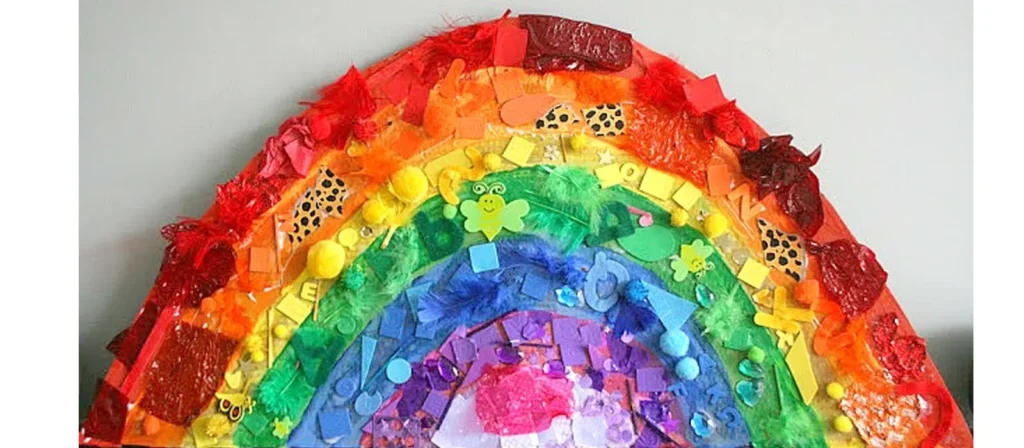
Aperçu de l'activité :
Brighten the classroom with color and creativity through this joyful Rainbow Collage activity. Children use scraps of paper, tissue, fabric, or any colorful materials to build their very own rainbows. As they sort, cut, and glue each color into place, they practice fine motor coordination, color recognition, and sequencing while expressing their individual creativity in a vibrant way.
Matériels:
Des chutes de papier de construction colorées (ou du papier de soie), des bâtons de colle, du papier blanc ou du papier cartonné, des boules de coton, des ciseaux (sans danger pour les enfants), des crayons ou des marqueurs (facultatif)
Comment faire :
- Get the table ready with sorted paper scraps or tissue pieces in rainbow color order, along with glue sticks, scissors, and cotton balls.
- Give each child a rainbow outline or let them draw their own on white paper or cardstock.
- Invite them to glue colorful scraps one by one, following the rainbow order and naming each color as they go.
- Add cotton balls at both ends to make soft, fluffy clouds that complete the rainbow.
- Encourage conversation by asking questions like “What comes after yellow?” or “Which color is your favorite?”
- Once dry, display the bright rainbows on a classroom wall or send them home to bring a little sunshine to family spaces.
Variantes :
- Utilisez des matériaux naturels comme des feuilles et des pétales pour créer un arc-en-ciel sur le thème du Jour de la Terre.
- Transformez-le en version 3D en superposant des matériaux comme du fil, du feutre ou des boutons.
- Créez des mini arcs-en-ciel sur des assiettes en papier pour une version de groupe plus rapide.
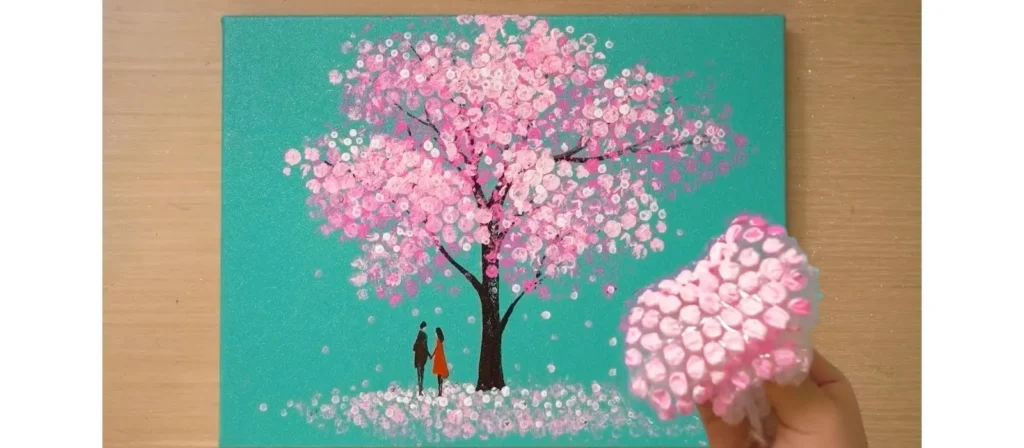
12. Arbres à empreintes digitales

Aperçu de l'activité :
Turn tiny fingerprints into a forest of creativity with this heartwarming Fingerprint Trees activity. Children use their fingertips dipped in colorful paint to create leaves, blossoms, or fruits on tree branches drawn or printed on paper. Each gentle press leaves a unique mark, helping them explore colors, patterns, and the beauty of individuality while developing fine motor coordination and sensory awareness.
Matériels:
Papier cartonné blanc, marqueurs ou crayons marron, peinture lavable (couleurs d'automne ou de printemps), assiettes en papier ou bacs à peinture, lingettes ou bols d'eau pour le nettoyage
Comment faire :
- Prepare white cardstock with tree trunks and branches already drawn, or let children sketch their own using brown markers or crayons.
- Pour small amounts of washable paint onto paper plates—choose warm tones like red, yellow, and orange for fall, or fresh colors like green, pink, and purple for spring.
- Invite children to dip their fingertips lightly into the paint and press them along the branches to create colorful leaves or blossoms.
- Encourage them to experiment with different colors and pressure to see how each fingerprint looks unique.
- Talk together about the seasons by asking, “Do these colors remind you of autumn or spring?”
- Let the paintings dry and display them as a bright seasonal forest that celebrates every child’s individuality.
Variantes :
- Créez quatre arbres côte à côte pour représenter les quatre saisons.
- Utilisez des cotons-tiges ou des cotons-tiges pour les enfants qui préfèrent ne pas utiliser leurs doigts.
- Ajoutez des feuilles qui tombent autour de la base ou des oiseaux dans les branches pour plus de détails.
13. Peinture au papier bulle
Aperçu de l'activité :
Turn ordinary packaging into a burst of creativity with this exciting Bubble Wrap Painting activity. Children dip pieces of bubble wrap into paint and press them onto paper to reveal fun, textured patterns that pop with color and imagination. As they explore the bumpy surface, they engage their senses, strengthen fine motor skills, and learn about texture and repetition in art.
Matériels:
Papier bulle (découpé en petites feuilles ou formes), peinture lavable, assiettes en carton (pour la peinture), papier cartonné blanc ou grandes feuilles de papier, ruban adhésif (facultatif), blouses ou tabliers
Comment faire :
- Cut bubble wrap into small squares or fun shapes like hearts, circles, or stars.
- Pour bright washable paints onto paper plates and set out sheets of white cardstock for printing.
- Show children how to dip the bubble wrap into paint and press it onto the paper to make colorful textured patterns.
- Encourage them to try different colors and layering effects, watching how patterns overlap and blend.
- Talk about what they see and feel by asking, “What does it feel like?” or “What happens when two colors mix?”
- Once finished, let the artwork dry flat—when the paint sets, the bubbly textures look even more amazing.
- Display their masterpieces on the wall or use them to decorate classroom bulletin boards for a vibrant touch of creativity.
Variantes :
- Collez du papier bulle autour d'un rouleau à pâtisserie ou d'un tube en carton pour étaler les textures.
- Découpez du papier bulle en formes saisonnières (par exemple, des flocons de neige ou des feuilles) pour des impressions thématiques.
- Associez l’activité à un livre sur les textures ou les cinq sens.
14. Tambourins en assiette en papier
Aperçu de l'activité :
Bring rhythm and laughter to the classroom with this joyful Paper Plate Tambourines activity. Children decorate two paper plates with colorful paints, stickers, or drawings, then fill them with a few dried beans or beads before sealing them together. Once finished, they can shake their handmade tambourines to make cheerful music that fills the room with sound and smiles.
Matériels:
Assiettes en carton (2 par enfant), haricots secs ou pâtes, agrafeuse ou colle, marqueurs ou crayons, autocollants, ruban ou fil (facultatif), perforatrice
Comment faire :
- Prepare two paper plates for each child and set out markers, stickers, and paints for decoration.
- Invite children to decorate the bottom sides of their plates with bright colors and fun designs—this is their very own musical instrument.
- Place a small handful of dried beans or pasta on one plate, then cover it with the second plate, decorated sides facing out.
- Help seal the edges with a stapler or glue to trap the contents securely inside.
- For extra fun, punch small holes around the edges and let children tie colorful ribbons or yarn for movement and flair.
- Once the tambourines are ready, gather everyone for a rhythm circle or mini parade and let the joyful music begin.
- Encourage kids to experiment with different sounds by shaking gently, tapping, or moving to the beat.
Variantes :
- Essayez d'utiliser des cloches ou des boutons à l'intérieur pour différents sons.
- Add a name label and use it during music time or performances.
- Explorez les différences sonores avec différentes garnitures : riz, perles ou galets.
15. Marionnettes en sac en papier
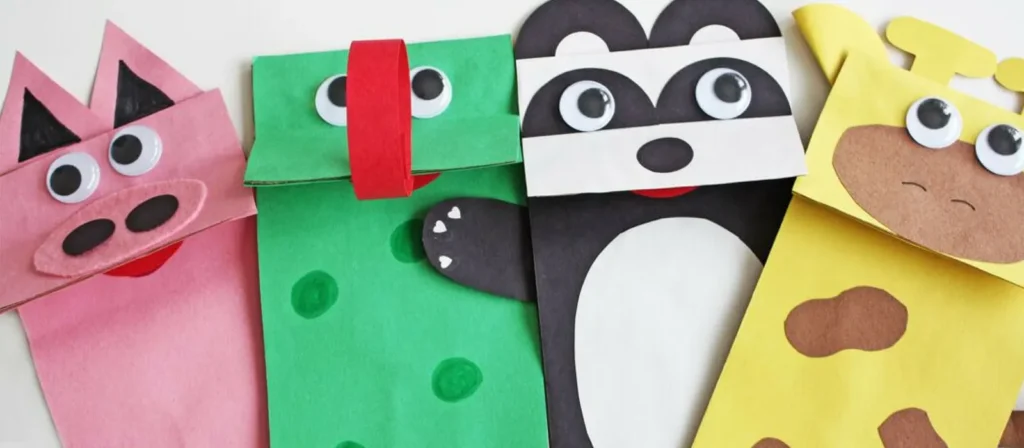
Aperçu de l'activité :
Let imagination take center stage with this delightful Paper Bag Puppets activity. Children turn simple paper bags into charming characters using markers, yarn, googly eyes, and bits of colored paper. As they design their puppets such as animals, people, or storybook friends, they develop creativity, storytelling skills, and fine motor coordination while expressing their emotions through art.
Matériels:
Sacs à lunch en papier brun ou blanc, chutes de papier de construction, bâtons de colle, crayons ou marqueurs, yeux mobiles, fil, ciseaux (sans danger pour les enfants), autocollants ou boutons (facultatif)
Comment faire :
- Prepare paper bags, colorful paper scraps, yarn, googly eyes, glue, and markers on the table.
- Let children choose a paper bag and start by decorating the flap to make their puppet’s face.
- Encourage them to add googly eyes, yarn hair, and paper cutouts for mouths, ears, or hats.
- Decorate the lower part of the bag as clothing, adding details like buttons, arms, or accessories.
- Once dry, have children slip their hands inside the bags and bring their puppets to life through playful storytelling.
- Pair children to perform mini puppet shows together and encourage them to give voices to their characters.
- Create a classroom puppet theater corner so their new friends can star in many future adventures.
Variantes :
- Attribuez des thèmes tels que les animaux, les aides communautaires ou les personnages de livres d’histoires préférés.
- Ajoutez du fil ou du ruban pour les cheveux pour la texture.
- Créez un coin théâtre de marionnettes en utilisant une boîte en carton et des rideaux pour un jeu imaginatif prolongé.
16. Attrape-soleil en papier de soie

Aperçu de l'activité :
Fill the classroom with color and light through this enchanting Tissue Paper Suncatchers activity. Children use pieces of colorful tissue paper, clear contact paper, and simple shapes like hearts, stars, or circles to create beautiful window art that glows in the sunlight. As they layer and arrange the colors, they learn about transparency, color blending, and composition while strengthening their fine motor and visual-spatial skills.
Matériels:
Papier contact transparent ou feuilles de plastification, papier de soie de différentes couleurs (coupé en petits carrés), papier de construction noir (pour les cadres), ciseaux (sans danger pour les enfants), ruban adhésif
Comment faire :
- Prepare black paper frames by cutting simple shapes like hearts, stars, or circles, and remove the centers.
- Peel the backing off a piece of clear contact paper and place it sticky-side up on the table.
- Position the black frame on top and press it gently to secure it in place.
- Invite children to fill the inside with colorful tissue paper squares, overlapping the pieces to see how new colors appear.
- Once their design is complete, cover it with another piece of contact paper to seal the suncatcher.
- Trim any extra edges, then tape the finished artwork to a sunny window.
- Watch as sunlight shines through, turning the classroom into a rainbow-filled gallery of glowing colors.
Variantes :
- Utilisez des formes saisonnières : des citrouilles pour l’automne, des œufs pour le printemps ou des flocons de neige pour l’hiver.
- Laissez les enfants créer des motifs abstraits et de forme libre sans cadre.
- Incorporez des paillettes ou des sequins pour plus d'éclat.
17. Empreintes de mains en pâte à sel
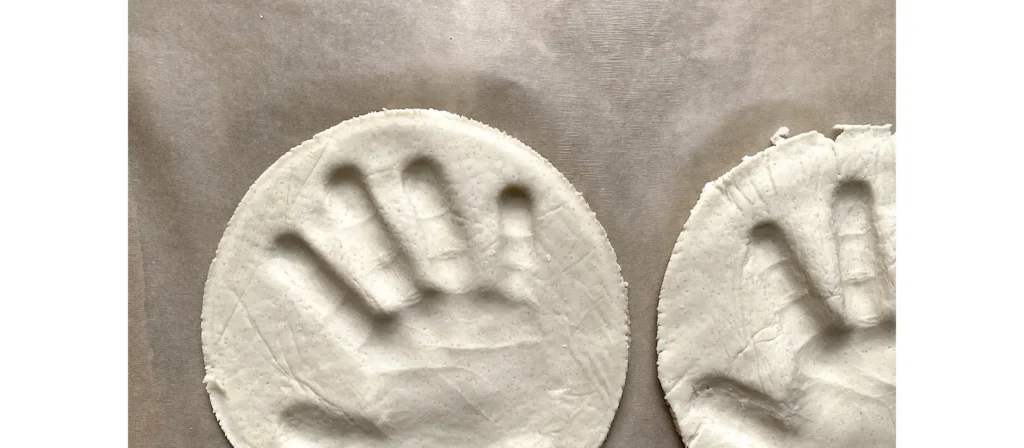
Aperçu de l'activité :
Capture a precious moment in time with this heartfelt Salt Dough Handprints activity. Children mix simple ingredients like flour, salt, and water to make soft dough, then press their tiny hands into it to create lasting impressions. After baking and decorating with paint or glitter, each handprint becomes a beautiful keepsake that celebrates growth, creativity, and the joy of making something by hand.
Matériels:
Farine, sel, eau, bol à mélanger, rouleau à pâtisserie, plaque de cuisson, peinture, pinceaux, mastic transparent (facultatif), ruban ou ficelle (facultatif pour suspendre)
Installation:
- Pré-mélanger la pâte à sel ou demander aux enfants de vous aider en y ajoutant 2 tasses de farine, 1 tasse de sel et 1 tasse d'eau tiède. Mélanger et pétrir jusqu'à obtenir une pâte lisse.
- Préparez des rouleaux à pâtisserie et des petits tapis ou plateaux sur lesquels travailler.
- Préchauffer le four à 200°F (90°C) si la cuisson doit durcir.
Instructions d'activité :
- Étalez un morceau de pâte pour chaque enfant, d’environ 1,25 cm d’épaisseur.
- Aidez-les à appuyer fermement leur main dans la pâte pour faire une empreinte de main profonde.
- Si la pièce doit être accrochée plus tard, utilisez un crayon ou une paille pour faire un petit trou en haut.
- Cuire au four pendant 1 à 2 heures ou laisser sécher à l’air libre pendant plusieurs jours.
- Une fois sèches, les enfants peuvent peindre leurs empreintes de mains de la couleur de leur choix. Pour une meilleure durabilité, elles peuvent être scellées avec un spray transparent.
Variantes :
- Écrivez le nom de l'enfant et la date sur la pâte avant la cuisson pour un souvenir durable.
- Ajoutez de la peinture pailletée ou des finitions métalliques pour un effet fantaisie.
- Transformez-le en cadeau pour la fête des mères ou des pères avec un message comme « Sans aucun doute, vous êtes le meilleur ! »
18. Baguettes de ruban dansantes
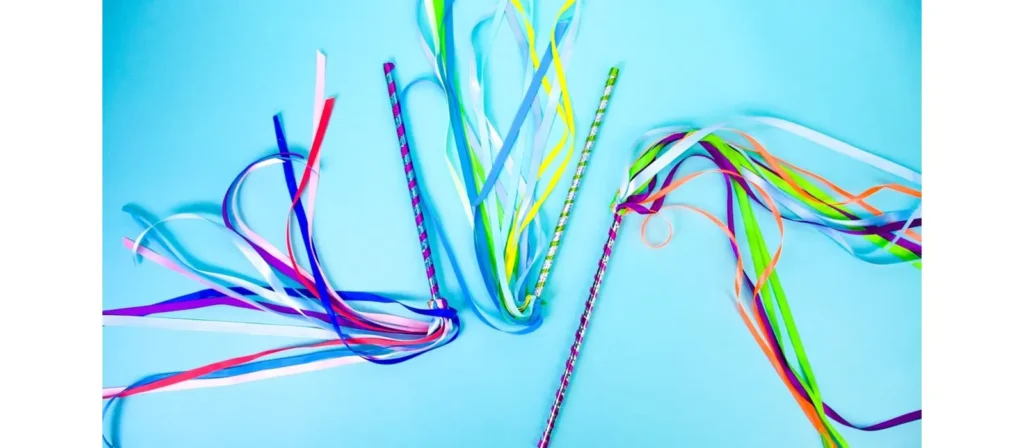
Aperçu de l'activité :
Add movement, color, and joy to the classroom with this lively Dancing Ribbon Wands activity. Children decorate sticks or dowels with bright ribbons, streamers, or fabric strips, then twirl and dance as their wands flutter through the air. As they wave and spin, they strengthen gross motor skills, coordination, and rhythm while expressing themselves through motion and music.
Matériels:
Chevilles en bois ou bâtons d'artisanat, ruban ou banderoles en papier crépon (différentes couleurs), colle ou ruban adhésif, ciseaux (sans danger pour les enfants), autocollants ou marqueurs pour décorer les poignées
Comment faire :
- Mix 2 cups of flour, 1 cup of salt, and 1 cup of warm water in a bowl until the dough is smooth and easy to knead.
- Give each child a small piece of dough and let them roll it out to about half an inch thick on a mat or tray.
- Help them press their hand firmly into the dough to make a deep, clear handprint.
- If the piece will be hung, use a straw or pencil to poke a small hole near the top.
- Bake the handprints at 200°F (90°C) for 1–2 hours, or let them air dry over a few days until hard.
- Once dry, children can paint their creations with bright colors, add glitter for sparkle, and even write their names or the date.
- Seal with a clear spray for lasting shine, then tie a ribbon through the hole to hang it as a precious keepsake or family gift.
Variantes :
- Utilisez des couleurs saisonnières pour créer des baguettes à thème (par exemple, rouge et vert pour les vacances, pastels pour le printemps).
- Add bells to the ends of the ribbons for a musical element.
- Transformez-le en performance : créez une routine de groupe simple et laissez-les « jouer » devant leurs parents ou d’autres classes.
19. Marionnettes monstrueuses et ridicules
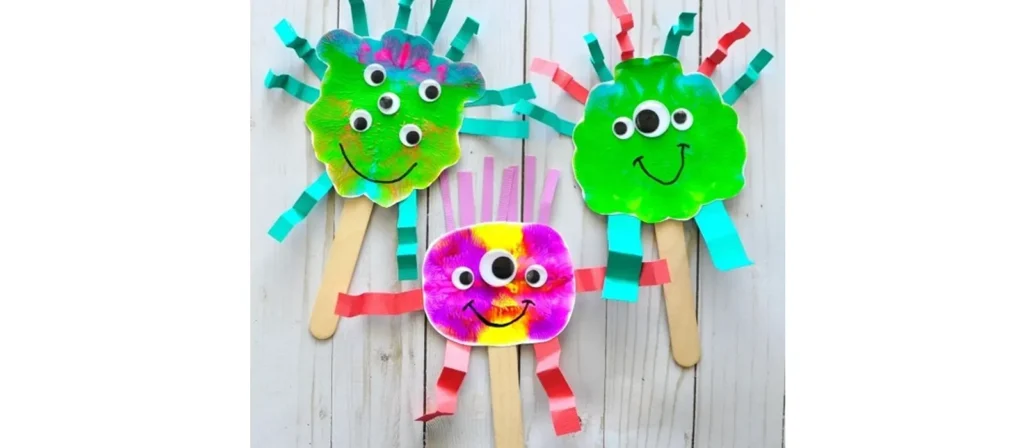
Aperçu de l'activité :
Bring giggles and creativity to art time with this playful Silly Monster Puppets activity. Children use colorful paper, yarn, googly eyes, and craft sticks to design their own friendly monsters with funny faces, spiky hair, and wobbly eyes. As they cut, glue, and decorate, they strengthen fine motor skills, experiment with colors and shapes, and discover how imagination can turn ordinary materials into extraordinary creations.
Matériels:
Sacs à lunch en papier, papier de construction, bâtons de colle, marqueurs ou crayons, pompons, yeux mobiles, fil, ciseaux (sans danger pour les enfants), formes en mousse ou cure-pipes (facultatif)
Comment faire :
- Prepare paper bags, colorful paper shapes, googly eyes, pom poms, yarn, and glue for each child.
- Show how the flap of the paper bag can become the monster’s mouth, then let children start decorating.
- Encourage them to glue on eyes in any number they like and add fun details like spiky hair, horns, arms, or big teeth.
- Let them use markers or crayons to draw silly smiles, wiggly tongues, or tiny spots for extra personality.
- As they work, ask fun questions such as “What’s your monster’s name?” or “Does it roar or laugh?”
- Once finished, gather the group for a monster puppet show where each child can perform with their silly new friend.
- Celebrate their creativity by displaying the puppets or creating a “Monster of the Week” wall to introduce everyone’s creations.
Variantes :
- Attribuez un thème aux monstres pour des leçons spécifiques (par exemple, des monstres émotionnels pour l'apprentissage SEL).
- Utilisez du feutre à la place du papier pour une version texturée.
- Créez un affichage mural « Monstre de la semaine » où chaque enfant présente son personnage.
20. Planète Art Filtre à Café

Aperçu de l'activité :
Take young learners on an out-of-this-world adventure with this mesmerizing Coffee Filter Planet Art activity. Children color round coffee filters with markers, then lightly mist them with water to watch the colors blend and swirl like real galaxies. Once dry, they can cut out and label their colorful “planets,” turning simple materials into a stunning solar system full of imagination and discovery.
Matériels:
Filtres à café ronds, marqueurs lavables, vaporisateurs ou petites tasses d'eau avec compte-gouttes, serviettes en papier, papier aluminium ou plateaux, papier de construction noir (facultatif pour l'arrière-plan), colle
Comment faire :
- Flatten coffee filters on trays or foil so they are ready for coloring.
- Give children washable markers and let them fill the filters with bright circular designs that look like planets.
- When finished, spray the filters lightly with water or use droppers to wet the surface and watch the colors swirl together.
- Allow the filters to dry completely for one to two hours until the watercolor effect appears.
- Once dry, cut out the colorful planets and glue them onto black paper to create a mini solar system.
- Encourage children to name their planets or add stars and fun space facts around them.
- Display the finished artwork on the classroom wall to create a dazzling galaxy full of imagination and discovery.
Variantes :
- Transformez-le en un projet de système solaire en créant plusieurs planètes et en les plaçant en orbite.
- Utilisez des crayons blancs pour dessiner d’abord sur les filtres pour un effet « résistance » caché.
- Ajoutez de la colle pailletée pour un éclat galactique.
21. Mandalas de la nature

Aperçu de l'activité :
Invite peace, focus, and creativity into the classroom with this beautiful Nature Mandalas activity. Children gather natural materials such as leaves, petals, stones, and twigs, then arrange them in circular patterns to create stunning mandalas that celebrate balance and harmony in nature. As they carefully place each piece, they strengthen concentration, pattern recognition, and an appreciation for the beauty found outdoors.
Matériels:
Feuilles, pétales, bâtons, petites pierres, pommes de pin, glands, écorce, cercles de papier ou bases en carton (facultatif), colle (facultatif pour un affichage permanent)
Comment faire :
- Take children on a short nature walk to collect safe and interesting materials such as leaves, petals, stones, and twigs.
- Provide paper or cardboard circles as bases, or let children create directly on the ground or table for a more natural feel.
- Explain that a mandala begins in the center and grows outward in patterns or circles.
- Invite children to place one object in the center, then build outward by arranging similar items in repeating or symmetrical designs.
- Encourage them to observe textures and colors while working by asking, “How does this leaf feel?” or “What shapes do you notice?”
- When the mandalas are finished, display them indoors or take photos before nature reclaims the materials.
- Celebrate their creativity by discussing how each mandala is unique, just like the natural world it was made from.
Variantes :
- Utilisez des matériaux de saison : des fleurs au printemps et des feuilles colorées en automne.
- Ajoutez des touches personnelles comme des pierres peintes ou des objets étiquetés.
- Transformez-le en projet de groupe : un grand mandala réalisé grâce au travail d'équipe collectif.
Conseils de sécurité et de nettoyage pour les activités manuelles
Même les meilleurs travaux manuels pour les enfants d'âge préscolaire peuvent tourner au chaos si on n'est pas préparé. Avec une structure et des habitudes appropriées, vous pouvez encourager la créativité sans craindre les éclaboussures, les taches ou les doigts collants.

Fixer des limites avant que le plaisir ne commence
- Zones d'artisanat : utilisez des tables dédiées ou des tapis lavables
- Tabliers ou vieux t-shirts : un incontournable pour les enfants d'âge préscolaire
- Établissez des règles de « mains propres » avant de coller ou de peindre
Utiliser des matériaux sûrs et adaptés à l'âge
- Optez toujours pour des fournitures non toxiques et lavables
- Évitez les outils tranchants, les risques mineurs d’étouffement ou les matériaux allergènes
- Stocker les matières dangereuses hors de portée
Enseigner le nettoyage dans le cadre de l'activité
- Utilisez des bacs à code couleur pour organiser le matériel
- Créez des chansons ou des routines amusantes autour du nettoyage
- Attribuer des mini « chefs de nettoyage » à chaque table
Comment les arts et l'artisanat soutiennent l'apprentissage Montessori et Reggio
Les philosophies derrière Montessori et Reggio Emilia soutenir fortement les arts et l’artisanat pour les enfants d’âge préscolaire — non seulement en tant que forme d’art, mais aussi comme moyen d’apprendre, d’exprimer et de comprendre le monde.
Favoriser l'indépendance par le travail pratique
- Les enfants choisissent le matériel et accomplissent les tâches à leur propre rythme
- Les projets autodirigés renforcent l'autonomie et la confiance
- Les outils et fournitures sont accessibles à la hauteur de l'enfant
Encourager l'observation et la créativité inspirée par la nature
- Reggio Emilia met l'accent sur les matériaux naturels et l'exploration sensorielle
- Les promenades dans la nature et les jeux libres relient l'art au monde réel
- L'artisanat saisonnier renforce les rythmes et les cycles de la vie
Soutenir le développement cognitif par la répétition et la routine
- La répétition d'actions motrices fines aide à construire des voies cérébrales
- Les rituels autour des arts et de l'artisanat renforcent l'ordre, la patience et la concentration
- Le matériel Montessori peut inclure des extensions d'artisanat (par exemple, poinçonnage, traçage)
Bricolages à petit budget : conseils pour les écoles maternelles et les jardins d'enfants
High-quality arts and crafts for preschoolers don’t require a big budget. With a bit of creativity and planning, you can provide meaningful art experiences without breaking the bank.
Utiliser des matériaux recyclés et du quotidien
- Rouleaux de papier toilette, bouchons de bouteilles, boîtes de céréales et chutes de tissu
- Collaborez avec les parents pour les bacs de dons
- Enseigner la durabilité par la réutilisation
Achetez en gros et organisez intelligemment
- Procurez-vous des fournitures de base (colle, papier, pinceaux) auprès de grossistes
- Stockez par catégorie et par couleur pour un accès rapide
- Plastifiez les modèles couramment utilisés pour une utilisation répétée
Planifier les unités thématiques à l'avance
- Alignez les travaux manuels avec les saisons, les vacances ou les sujets de cours
- Réutilisez les objets artisanaux de tous les niveaux d'âge avec de légères variations
- Conservez un classeur de modèles imprimables et d'instructions pour votre équipe
Conclusion
Les activités manuelles pour les enfants d'âge préscolaire sont bien plus qu'un simple moment de plaisir : elles sont essentielles pour développer la motricité fine, encourager l'expression émotionnelle et susciter un amour durable de la créativité. Que vous soyez enseignant, directeur d'école ou parent, offrir aux enfants la liberté de créer de leurs mains renforce la confiance, les liens et la curiosité.
Derrière chaque espace artisanal réussi se cache un environnement soigneusement conçu. Meubles West ShoreNous sommes spécialisés dans la création de ces environnements. Forts de plus de 20 ans d'expérience dans la fabrication et la fourniture de mobilier préscolaire, nous proposons une solution complète.De l'aménagement des salles de classe à la personnalisation du mobilier, en passant par la production, le contrôle qualité et la livraison, notre gamme de produits comprend divers meubles préscolaires de styles, de matériaux et de tailles variés pour répondre aux besoins variés des espaces d'apprentissage.
Lorsque vous êtes prêt à améliorer vos espaces artistiques ou à repenser votre espace préscolaire pour inspirer encore plus de créativité, nous sommes là pour vous aider, car le bon environnement fait toute la différence.