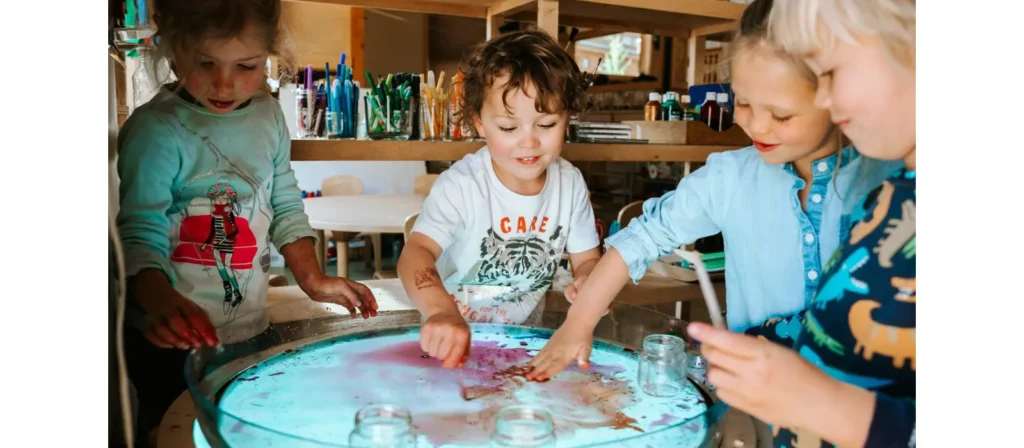
¿Sabes cómo ayudar a los niños de preescolar a desarrollar sus habilidades artísticas y creativas en la escuela? Una de las clases de jardín de infancia más populares son las manualidades, que permiten a los niños explorar y crear arte libremente y disfrutar de este momento creativo especial. Aquí es donde las artes y manualidades para preescolares realmente brillan.
A través de las artes manuales para preescolares, pueden explorar su imaginación, mejorar las habilidades motoras finas, desarrollar habilidades cognitivas y expresarse creativamente. Aprender nuevas habilidades y la exposición repetida a los materiales de arte genera confianza, lo que impacta el desarrollo futuro.
En este artículo, te mostraré 21 de los mejores proyectos de manualidades para preescolar y guardería: fáciles, divertidos y educativos. Introducir las artes y manualidades para preescolares abre un mundo de juego imaginativo y significativo.
Manualidades preescolares: más que una actividad divertida
En el mundo preescolar, a menudo se debate si las manualidades tienen un lugar en la educación de la primera infancia. Si bien es cierto que las manualidades y el arte son diferentes, el arte se trata de... creatividad abiertaSi bien las manualidades suelen tener un resultado determinado, ambas tienen valor en un plan de estudios integral.
El arte permite a los niños explorar libremente materiales, colores y texturas sin restricciones, centrándose en el proceso más que en el producto final. Esto es esencial para fomentar la creatividad y la autoexpresión. Sin embargo, las manualidades ofrecen beneficios únicos. Ayudan a desarrollar la motricidad fina y a reforzar conceptos como... reconocimiento de colores y formas, Y pueden apoyar temas de aprendizaje más amplios. Al realizarlas en casa con un adulto responsable, las manualidades se convierten en una actividad única que fortalece los vínculos y crea recuerdos significativos.
En lugar de ver las manualidades como limitantes, deberíamos verlas como complementarias a las experiencias artísticas abiertas. Un equilibrio entre ambas asegura que los niños sean libres de crear mientras adquieren habilidades valiosas a través de actividades estructuradas.
Aquí exploramos las 21 mejores manualidades preescolares perfectas para manos pequeñas.
21 mejores manualidades para preescolar
1. Caras de platos de papel
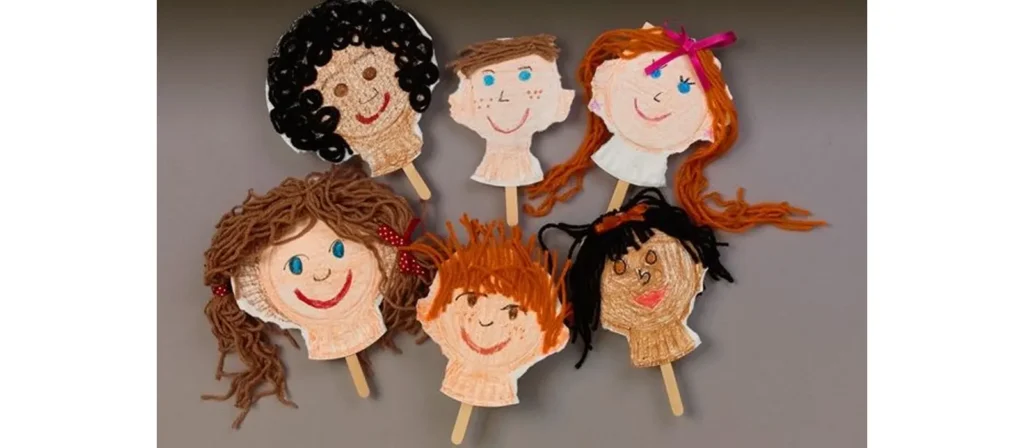
Descripción general de la actividad:
Transforma platos de papel comunes en una galería de expresiones alegres con esta encantadora actividad de "Caras en Platos de Papel". Los niños pueden dibujar, pintar o pegar lana, botones y papel de colores para crear caras graciosas, felices o incluso curiosas que reflejen sus emociones. A través de este proceso creativo, comienzan a comprender los sentimientos, desarrollan empatía y fortalecen sus habilidades motoras finas mientras se divierten con texturas y formas.
Materiales:
Platos de papel, marcadores, hilo, pegamento, decoraciones variadas (pegatinas, ojos saltones, pompones)
Cómo hacerlo:
- Prepara una alegre estación de manualidades colocando platos de papel, rotuladores, pegamento y todo tipo de decoraciones divertidas al alcance.
- Dale a cada niño su propio plato e invítalos a diseñar una cara que muestre una emoción como feliz, tonto, sorprendido o adormilado.
- Muéstrales cómo dibujar características sencillas, luego deja que añadan libremente pelo de lana, ojos saltones o pegatinas para dar vida a sus creaciones.
- Chatea mientras trabajan haciendo preguntas como: “¿Qué sentimiento tiene tu cara?” o “¿Puedes hacer esa expresión también?”
- Cuando las obras maestras estén secas, convierte tu aula en una Galería de Caras o deja que los niños se lleven a casa sus platos sonrientes para compartirlos.
Variaciones:
Use platos de diferentes tamaños para construir un grupo de “familias de caras” expresivas: un complemento perfecto para manualidades temáticas para niños en edad preescolar.
2. Binoculares DIY

Descripción general de la actividad:
Despierta la curiosidad y la aventura con esta encantadora manualidad de binoculares de bricolaje. Usando tubos de cartón, papel de colores, hilo y un toque de imaginación, los niños pueden crear su propio par de binoculares de juguete. Mientras decoran y ensamblan su obra maestra, fortalecen la coordinación mano-ojo, las habilidades motoras finas y la creatividad, al tiempo que aprenden sobre la observación y la exploración.
Materiales:
Dos rollos de papel higiénico vacíos por niño, cinta o pegamento, hilo o lana, perforadora, crayones o marcadores, pegatinas, papel de color (opcional)
Cómo hacerlo:
- Prepara tu rincón creativo con tubos de cartón, papel de colores, cinta adhesiva, pegamento y cuerda.
- Dale a cada niño dos rollos y invítalos a decorar con marcadores, crayones, pegatinas o envolturas de papel para hacer sus binoculares únicos.
- Ayúdalos a pegar los rollos con cinta o pegamento para formar la forma del binocular.
- Muestra cómo pasar el hilo por los agujeros y hacer nudos para crear una correa para el cuello, presentando el uso seguro de las herramientas de forma divertida.
- Anima a los niños a dar un “paseo de explorador” de fantasía por el aula o el patio de recreo, observando todo lo que puedan.
- ¿Qué encontraste? ¿Puedes ver algo que empiece con la letra B?“
- Cuando terminen, que compartan sus descubrimientos y muestren sus coloridos binoculares a amigos y familiares.
Variaciones:
- Utilice rollos de toallas de papel cortados por la mitad para utilizarlos con binoculares gigantes.
- Convierta esta manualidad en un juego creando una búsqueda del tesoro en la que los niños deberán “encontrar” objetos ocultos.
- Combínalo con libros o canciones sobre la naturaleza o la exploración para mejorar las sesiones temáticas de artes y manualidades para niños en edad preescolar.
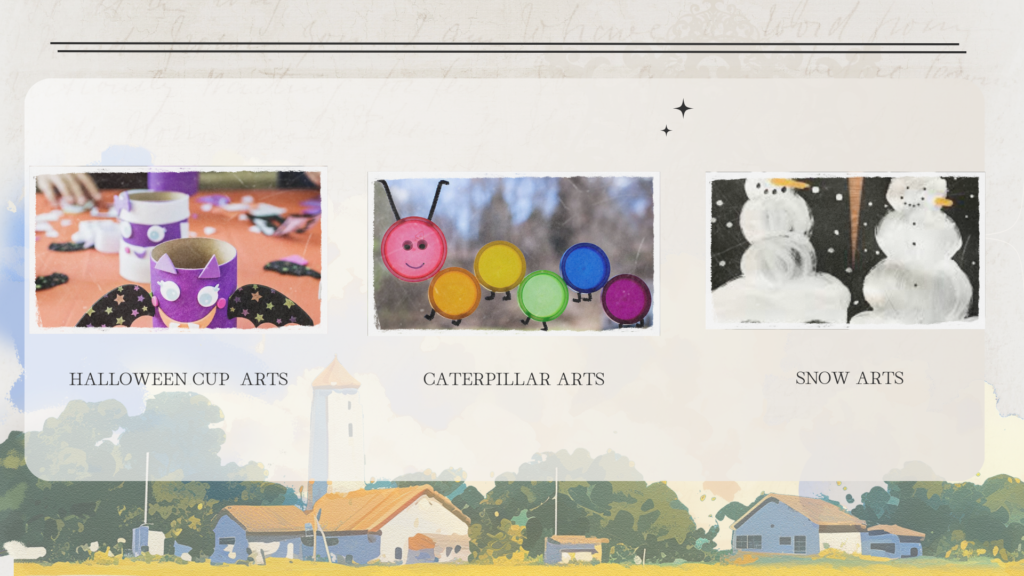
3. Manualidad fácil de calabaza

Descripción general de la actividad:
Celebra el acogedor espíritu del otoño con esta adorable manualidad de calabaza fácil. Usando papel naranja, pegamento y un poco de creatividad, los niños pueden cortar, enrollar o superponer piezas para formar sus propias calabazas brillantes y alegres. Mientras trabajan con formas y colores, fortalecen las habilidades motoras finas, practican la coordinación mano-ojo y aprenden conceptos básicos como tamaño y patrón.
Materiales:
Papel de construcción naranja, papel de construcción verde, tijeras (seguras para niños), pegamento en barra, marcadores negros, opcional: ojos móviles, hilo, purpurina.
Cómo hacerlo:
- Prepara una acogedora mesa de manualidades con papel naranja y verde, barras de pegamento, tijeras y extras divertidos como ojos saltones o purpurina.
- Dale a cada niño círculos o tiras de papel naranja y guíalos para que peguen las piezas y formen la figura redonda de una calabaza.
- Muestra cómo añadir un tallo de papel verde y deja que dibujen una cara con rotuladores.
- Anímales a decorar sus calabazas con enredaderas de lana, brillantina brillante u ojos graciosos para hacer que cada una sea especial.
- Conversa mientras crean, preguntando: “¿Qué tipo de cara tendrá tu calabaza? ¿Feliz o espeluznante?”
- Después de secarlas, usa sus adorables calabazas para decorar una pared del aula o crear un alegre huerto de calabazas para que todos lo disfruten.
Variaciones:
- Intente utilizar platos de papel en lugar de papel de construcción para una base más resistente.
- Conviértalo en una manualidad de reconocimiento de nombres haciendo que los niños escriban sus nombres en las calabazas.
- Haz mini calabazas y crea una guirnalda para colgar en la habitación.
4. Diadema de pavo

Descripción general de la actividad:
Nada captura la alegría del otoño como crear una colorida diadema de pavo. En esta conmovedora manualidad, los niños usan materiales sencillos como cartulina, plumas y pegamento para diseñar sus propias y divertidas coronas de pavo. Al cortar, pegar y colocar las plumas, las manos pequeñas fortalecen las habilidades motoras finas mientras que las mentes jóvenes practican el reconocimiento de colores y la creatividad.
Esta actividad invita de forma natural a la narración y la imaginación. A los niños les encanta fingir que son alegres pavos, moviéndose por el aula con risas y entusiasmo. También es una oportunidad maravillosa para hablar sobre la gratitud, el compartir y la belleza de las tradiciones otoñales.
Materiales:
Papel de construcción marrón, papel de construcción rojo, naranja y amarillo, tijeras (aptas para niños), pegamento o cinta adhesiva, crayones o marcadores, ojos saltones (opcional), grapadora
Cómo hacerlo:
- Prepara la mesa con tiras de papel marrón, plumas de papel de colores, pegamento y rotuladores.
- Ayuda a cada niño a colocar una tira marrón alrededor de su cabeza y asegúrala en un círculo para formar la base de la diadema.
- Invita a los niños a colorear y decorar sus plumas de papel, luego pégalas en la parte posterior de la diadema.
- Muestra cómo hacer una cara de pavo usando figuras de papel o ojos móviles (googly eyes), y añade un pico y barbilla roja para divertirte.
- Charla sobre el Día de Acción de Gracias y anima a cada niño a compartir una cosa por la que estén agradecidos.
- Cuando termines, haz que se pongan sus diademas festivas y que correteen como pavos alegres durante un desfile en el aula.
Variaciones:
- Añade el nombre del niño al frente de la diadema como un divertido elemento de personalización.
- Crea una pluma de gratitud: haz que cada niño escriba o dibuje algo por lo que esté agradecido en una pluma antes de colocarla.
5. Bruja del vaso de papel

Descripción general de la actividad:
Aporta un toque de magia de Halloween al aula con esta divertida e imaginativa manualidad de brujas con vasos de papel. Utilizando materiales sencillos como vasos de papel, cartulina, hilo y rotuladores, los niños pueden crear sus propias brujas amigables, completas con sombreros puntiagudos, ojos brillantes y cabello rizado. Mientras cortan, pegan y decoran, fortalecen las habilidades motoras finas y practican seguir pasos, convirtiendo la creatividad en confianza.
Materiales:
Vasos de papel (verdes o blancos), papel de construcción negro, pegamento, tijeras (aptas para niños), hilo o papel triturado (para el cabello), ojos saltones, marcadores o crayones.
Cómo hacerlo:
- Coloque los vasos de papel, los sombreros de bruja precortados, el cabello de lana y las formas de papel negro sobre la mesa para que todo sea de fácil acceso.
- Dale a cada niño un vaso de papel e invítalos a pegar ojos saltones y a dibujar una cara de bruja amigable con rotuladores.
- Ayúdalos a añadirles pelo de lana o papel triturado, luego corona con un sombrero negro puntiagudo para un toque mágico.
- Envuelve una pequeña capa o cuello de papel alrededor de la taza para completar el atuendo de la bruja.
- Mientras crean, hagan preguntas divertidas como “¿Qué tipo de magia hace tu bruja?” o “¿Tu bruja es tonta, espeluznante o amable?”
- Cuando termines, alinea todas las brujas para una encantadora exhibición de Halloween llena de personalidad.
Variaciones:
- Añade un pequeño palo de escoba usando palitos de helado y rafia o papel marrón.
- Conviértalo en una marioneta de Halloween colocando una pajita o un palo en el fondo del vaso.
- Anime a los niños a crear otros personajes (fantasmas, calabazas o magos) para crear una escena completa de Halloween.
6. Conos de helado con pintura inflada
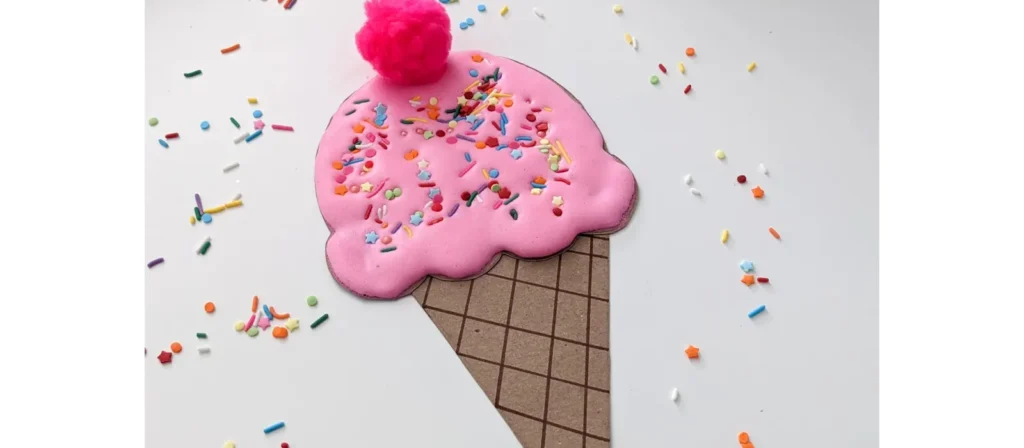
Descripción general de la actividad:
Aporta una pizca de dulzura al aula con esta deliciosa manualidad de conos de helado con pintura hinchable. Usando pintura hinchable casera hecha con crema de afeitar y pegamento, los niños pueden mezclar y extender “helado” en conos de papel, y luego decorarlos con chispas, purpurina o pompones para mayor diversión. Mientras mezclan colores y texturas, exploran el juego sensorial mientras fortalecen el control de las manos y la creatividad.
Materiales:
Crema de afeitar, pegamento blanco, colorante alimentario o pintura lavable, papel de construcción marrón (cono), cartulina o papel blanco (fondo), tijeras, tazones para mezclar, cucharas
Cómo hacerlo:
- Primero, mezcla partes iguales de crema de afeitar y pegamento blanco en recipientes, luego agrega unas gotas de colorante alimentario o pintura lavable para crear una colorida “helado” de pintura hinchable.
- Dale a cada niño un cono de cartulina y una hoja de cartulina para pegarlo.
- Invítales a sacar, mezclar y untar la pintura inflable sobre el cono para hacer sus helados.
- Fomenta la creatividad mezclando colores, apilando conos altos y hablando de sabores imaginarios como fresa, menta o remolino de arcoíris.
- Que esparzan brillantina, puntos de papelitos o pompones para decoraciones adicionales.
- Deja que la obra de arte se seque durante la noche para que la textura hinchada se mantenga firme, dejando una obra maestra dulce y esponjosa que parece comestible.
Variaciones:
- Añade chispas usando brillantina o pequeños puntos de papel cortados.
- ¡Convierta los conos terminados en una exhibición de pared llamada "Nuestras ideas más dulces"!
- Utilice crema de afeitar perfumada o agregue una gota de vainilla para darle un toque multisensorial.
7. Arte de frotar hojas
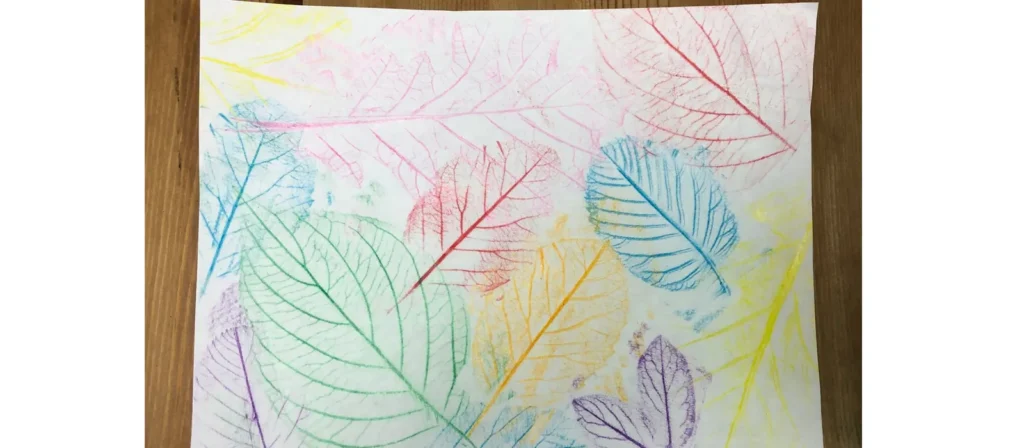
Descripción general de la actividad:
Celebra la belleza de la naturaleza con esta encantadora actividad de arte de frotado de hojas. Los niños pueden recolectar hojas de diferentes formas y tamaños, colocarlas debajo de una hoja de papel y frotar suavemente crayones o lápices de colores sobre la superficie para revelar los delicados patrones y venas. A medida que aparecen los diseños ocultos, los pequeños aprendices experimentan la maravilla del descubrimiento mientras desarrollan el control motor fino y las habilidades de observación.
Materiales:
Varias hojas (diferentes formas/tamaños), papel blanco, crayones (sin envoltorios), cinta (opcional), portapapeles o superficie de trabajo plana.
Cómo hacerlo:
- Lleve a los niños afuera a recolectar hojas de diferentes formas y tamaños, o proporcione un juego de hojas recolectadas previamente en la mesa.
- Dale a cada niño unas pocas hojas y muéstrales cómo colocarlas con el lado de las venas hacia arriba sobre una superficie plana o una tabla.
- Coloca una hoja de papel blanco sobre las hojas y demuestra cómo frotar suavemente el costado de un crayón para revelar los patrones debajo.
- Anima a los niños a probar diferentes colores y tipos de hojas, comparando las formas y texturas que descubren.
- Habla sobre la naturaleza mientras trabajan preguntando: “¿De qué tipo de árbol crees que vino esta hoja?” o “¿Por qué las hojas cambian de color en otoño?”
- Exhibe sus rubbings coloridos por todo el aula o conviértelos en marcapáginas y tarjetas de felicitación para celebrar la belleza de la estación.
Variaciones:
- Convierta los calcos terminados en tarjetas de felicitación, marcapáginas o decoraciones de temporada.
- Utilice papel negro y crayones de colores claros para lograr un efecto dramático.
- Combínalo con una sencilla caminata por la naturaleza y una búsqueda del tesoro de hojas para disfrutar de un día temático completo.
8. Creaciones caseras con plastilina
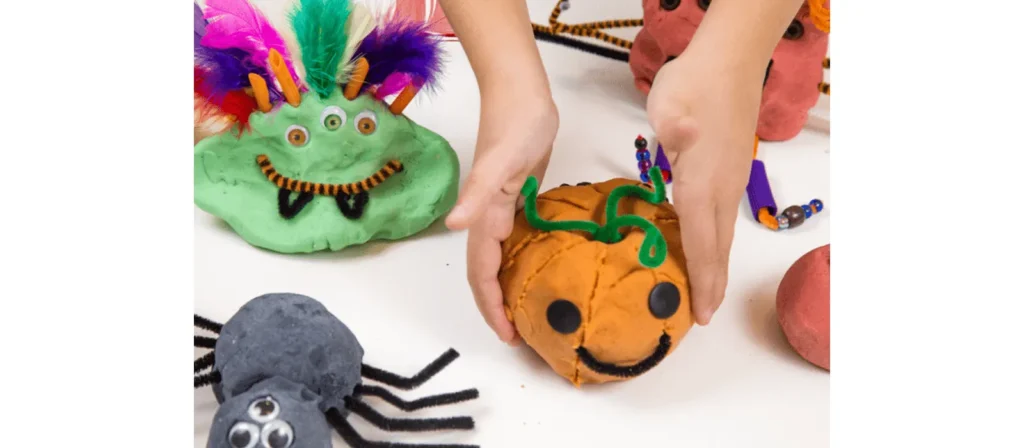
Descripción general de la actividad:
Hay algo verdaderamente mágico en amasar, enrollar y dar forma con masa suave y colorida. En esta alegre actividad "Creaciones de plastilina casera", los niños hacen su propia plastilina utilizando ingredientes sencillos como harina, sal y agua, y luego la usan para esculpir cualquier cosa que su imaginación pueda soñar, como animales, comida o patrones juguetones. El proceso involucra todos sus sentidos mientras desarrolla la fuerza de la motricidad fina, la creatividad y el enfoque.
Materiales:
Harina, sal, crémor tártaro, agua, aceite vegetal, colorante alimentario (o plastilina preparada previamente), tazones para mezclar, cucharas, herramientas para esculpir aptas para niños (cuchillos de plástico, cortadores de galletas, rodillos de amasar).
Cómo hacerlo:
- Prepara plastilina de colores con antelación o deja que los niños se diviertan preparándola ellos mismos mezclando harina, sal, agua, aceite y colorante alimentario.
- Una vez que la masa esté lista y fría, divídela en diferentes colores y colócala en bandejas o tapetes para darle forma fácilmente.
- Proporcione rodillos, cortadores de galletas y herramientas de plástico para que los niños puedan moldear animales, letras o sus comidas favoritas.
- Fomenta la creatividad haciendo preguntas juguetonas como “¿Qué estás haciendo hoy?” o “¿Puedes formar tu nombre con la masa?”.”
- Que exploren texturas, colores y formas libremente, desarrollando tanto la imaginación como la motricidad fina en el proceso.
- Cuando termines, guarda la masa en recipientes herméticos para que pueda usarse nuevamente en más sesiones creativas durante la semana.
Variaciones:
- Agregue aceites esenciales (como lavanda o menta) para darle un toque sensorial y calmante.
- Incorpore elementos naturales como ramitas, piedras u hojas para crear una temática basada en la naturaleza.
- Utilice cortadores de formas para conectar la actividad con conceptos matemáticos tempranos como patrones o geometría.
9. Manualidad de la oruga muy hambrienta
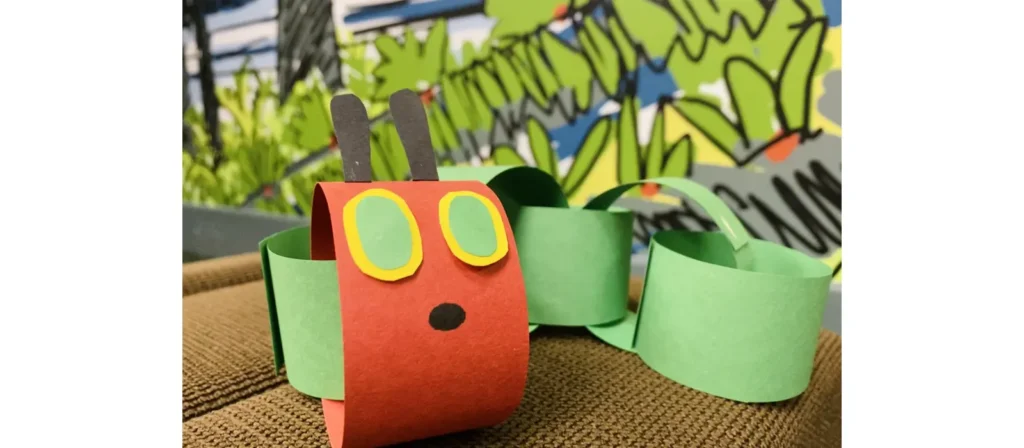
Descripción general de la actividad:
Da vida a la querida historia de Eric Carle con esta encantadora manualidad de "La Oruga Muy Hambrienta". Usando círculos de papel de colores, pegamento y ojos móviles, los niños pueden crear su propia oruga amigable mientras recuerdan cada parte de la historia. Al cortar, contar y organizar las piezas, fortalecen las habilidades motoras finas, practican la secuenciación y desarrollan la alfabetización temprana a través de conexiones narrativas.
Materiales:
Papel de construcción de colores (rojo y verde), barras de pegamento, tijeras (aptas para niños), marcador negro, ojos saltones, platos de papel (opcionales para exhibir), copias del libro (opcional)
Cómo hacerlo:
- Comenzar leyendo La oruga muy hambrienta juntos o viendo una versión en video corto para despertar la imaginación de los niños.
- Dale a cada niño un juego de círculos verdes para el cuerpo y un círculo rojo para la cabeza.
- Enséñales cómo pegar los círculos en una línea para formar la oruga, luego añade ojos móviles, una sonrisa y antenas usando un rotulador o tiras de papel.
- Fomenta el conteo y la secuenciación preguntando: “¿Cuántos círculos verdes usaste?” o “¿Qué comió la oruga primero?”.”
- Una vez terminado, exhiba las adorables orugas en un tablero de anuncios o deje que los niños se las lleven a casa como un divertido recordatorio del cuento.
- Para mayor creatividad, invítalos a hacer la etapa de la mariposa a continuación, conectando el arte con la narración y el aprendizaje.
Variaciones:
- Agregue un elemento de conteo numerando cada círculo verde.
- Crea un mural del ciclo de vida con las etapas de oruga, capullo y mariposa.
- Utilice bolitas de algodón en lugar de círculos de papel para lograr una apariencia más esponjosa.
10. Girasoles con huellas de manos
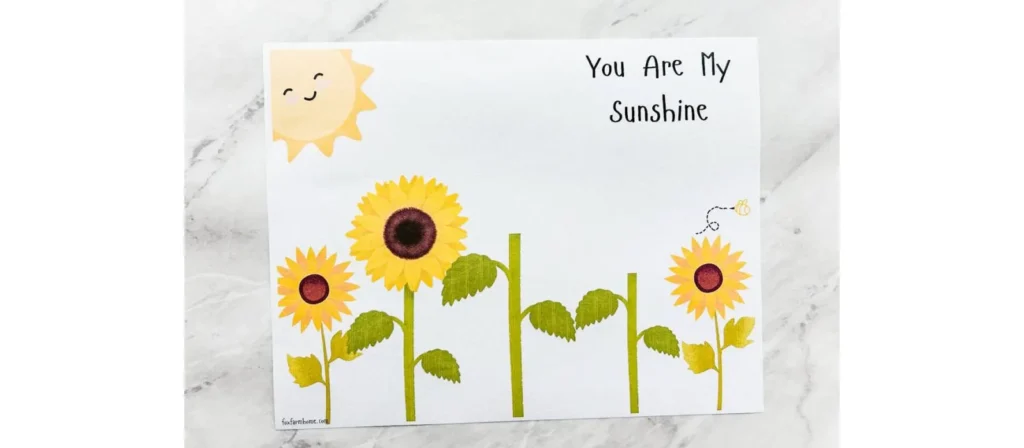
Descripción general de la actividad:
Llena el aula de sol y sonrisas con esta hermosa actividad de girasoles de huellas de manos. Los niños trazan y pintan sus manos para formar brillantes pétalos amarillos, luego agregan un centro marrón y un tallo verde para completar sus alegres girasoles. A medida que presionan sus coloridas huellas de manos en el papel, desarrollan la motricidad fina, exploran la simetría y la mezcla de colores, y experimentan la alegría de crear algo único.
Materiales:
Papel de construcción amarillo y verde, círculos de papel marrón (o envoltorios para cupcakes), pegamento, tijeras (aptas para niños), lápiz, marcador negro, opcional: semillas de girasol reales.
Cómo hacerlo:
- Prepara tu mesa con papel amarillo, verde y marrón, pegamento, lápices y tijeras.
- Ayuda a los niños a dibujar sus manos varias veces en papel amarillo y a recortarlas para formar pétalos brillantes de girasol.
- Pega un círculo de color marrón o un capacillo de magdalena en el centro de la página para hacer el centro de la flor.
- Invita a los niños a colocar y pegar los pétalos de sus huellas de manos alrededor del centro para crear una flor soleada y completa.
- Añade un tallo y hojas verdes para terminar el girasol.
- Para un toque extra de diversión, pega semillas de girasol reales en el centro para darle un aspecto texturizado.
- Cuando todas las flores estén listas, expóngalas juntas para formar un alegre “jardín” en el aula que brille con creatividad y color.
Variaciones:
- Escriba el nombre de cada niño en un pétalo y conviértalo en una exhibición de “jardín de clase”.
- Use pintura para hacer pétalos con huellas de manos para una versión más desordenada y táctil.
- Cree una actividad de conteo pidiendo a los niños que cuenten los pétalos que usaron.
11. Collage de arcoíris
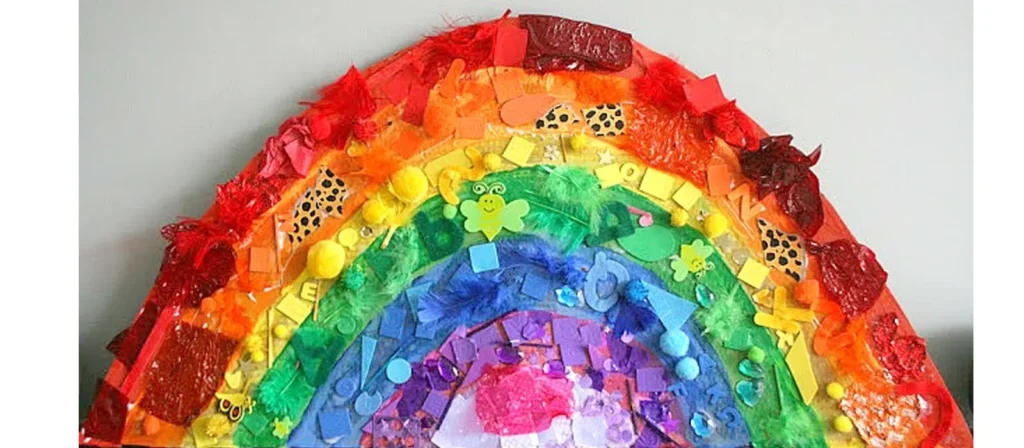
Descripción general de la actividad:
Ilumina el aula con color y creatividad a través de esta alegre actividad de collage de arcoíris. Los niños usan retazos de papel, papel de seda, tela o cualquier material colorido para construir sus propios arcoíris. Mientras clasifican, cortan y pegan cada color en su lugar, practican la coordinación motora fina, el reconocimiento de colores y la secuenciación, al tiempo que expresan su creatividad individual de una manera vibrante.
Materiales:
Trozos de papel de construcción de colores (o papel de seda), barras de pegamento, papel blanco o cartulina, bolitas de algodón, tijeras (seguras para niños), crayones o marcadores (opcional)
Cómo hacerlo:
- Prepara la mesa con recortes de papel o trozos de pañuelo ordenados por color del arcoíris, junto con barras de pegamento, tijeras y bolas de algodón.
- Dale a cada niño un contorno de arcoíris o déjalos que dibujen el suyo en papel blanco o cartulina.
- Invítalos a pegar recortes de colores uno por uno, siguiendo el orden del arcoíris y nombrando cada color a medida que lo hacen.
- Añade bolas de algodón en ambos extremos para crear nubes suaves y esponjosas que completen el arcoíris.
- Anima la conversación haciendo preguntas como “¿Qué viene después del amarillo?” o “¿Cuál es tu color favorito?”.”
- Una vez secos, exhibe los arcoíris brillantes en la pared del aula o envíalos a casa para llevar un poco de sol a los espacios familiares.
Variaciones:
- Utilice materiales naturales como hojas y pétalos para crear un arcoíris con la temática del Día de la Tierra.
- Conviértalo en una versión 3D colocando capas de materiales como hilo, fieltro o botones.
- Crea mini arcoíris en platos de papel para una versión grupal más rápida.
12. Árboles de huellas dactilares

Descripción general de la actividad:
Transforma pequeñas huellas dactilares en un bosque de creatividad con esta conmovedora actividad de Árboles de Huellas Dactilares. Los niños usan las puntas de sus dedos mojadas en pintura de colores para crear hojas, flores o frutos en ramas de árboles dibujadas o impresas en papel. Cada suave presión deja una marca única, ayudándoles a explorar colores, patrones y la belleza de la individualidad, a la vez que desarrollan la coordinación motora fina y la conciencia sensorial.
Materiales:
Cartulina blanca, marcadores o crayones marrones, pintura lavable (colores de otoño o primavera), platos de papel o bandejas de pintura, toallitas o cuencos de agua para limpiar.
Cómo hacerlo:
- Prepara cartulina blanca con troncos y ramas ya dibujados, o deja que los niños los dibujen con rotuladores o crayones marrones.
- Vierte pequeñas cantidades de pintura lavable en platos de papel; elige tonos cálidos como rojo, amarillo y naranja para el otoño, o colores frescos como verde, rosa y morado para la primavera.
- Invita a los niños a meter las puntas de sus dedos en la pintura y a presionarlas a lo largo de las ramas para crear hojas o flores coloridas.
- Anímales a experimentar con diferentes colores y presiones para ver cómo cada huella dactilar luce única.
- Hablen juntos sobre las estaciones preguntando: “¿Te recuerdan estos colores al otoño o a la primavera?”
- Deja secar las pinturas y exponlas como un bosque brillante de temporada que celebra la individualidad de cada niño.
Variaciones:
- Crea cuatro árboles uno al lado del otro para representar las cuatro estaciones.
- Utilice hisopos o bastoncillos de algodón para los niños que prefieren no usar los dedos.
- Agregue hojas caídas alrededor de la base o pájaros en las ramas para obtener detalles adicionales.
13. Pintura con plástico de burbujas
Descripción general de la actividad:
Convierte el empaque ordinario en una explosión de creatividad con esta emocionante actividad de Pintura con Plástico de Burbujas. Los niños sumergen trozos de plástico de burbujas en pintura y los presionan sobre el papel para revelar patrones divertidos y texturizados que estallan con color e imaginación. Mientras exploran la superficie irregular, involucran sus sentidos, fortalecen las habilidades motoras finas y aprenden sobre textura y repetición en el arte.
Materiales:
Plástico de burbujas (cortado en hojas o formas pequeñas), pintura lavable, platos de papel (para pintar), cartulina blanca u hojas grandes de papel, cinta adhesiva (opcional), batas o delantales.
Cómo hacerlo:
- Corta el plástico de burbujas en cuadrados pequeños o formas divertidas como corazones, círculos o estrellas.
- Vierta pinturas brillantes y lavables sobre platos de papel y prepare hojas de cartulina blanca para imprimir.
- Muestre a los niños cómo sumergir el plástico de burbujas en pintura y presionarlo sobre el papel para crear coloridos patrones texturizados.
- Anímalos a probar diferentes colores y efectos de superposición, observando cómo los patrones se superponen y se mezclan.
- Habla sobre lo que ven y sienten preguntando: “¿Cómo se siente?” o “¿Qué sucede cuando se mezclan dos colores?”
- Una vez terminado, deja que la obra de arte se seque en plano; cuando la pintura se asiente, las texturas burbujeantes lucen aún más increíbles.
- Exhibe sus obras maestras en la pared o úsalas para decorar tableros de anuncios del aula con un toque vibrante de creatividad.
Variaciones:
- Pegue plástico de burbujas alrededor de un rodillo o un tubo de cartón para crear texturas con rodillos.
- Corte el plástico de burbujas en formas estacionales (por ejemplo, copos de nieve u hojas) para crear estampados temáticos.
- Combine la actividad con un libro sobre texturas o los cinco sentidos.
14. Panderetas de plato de papel
Descripción general de la actividad:
Aporta ritmo y risas al aula con esta alegre actividad de Panderetas de Plato de Papel. Los niños decoran dos platos de papel con pinturas coloridas, pegatinas o dibujos, luego los llenan con unos pocos frijoles secos o cuentas antes de sellarlos juntos. Una vez terminados, pueden agitar sus panderetas hechas a mano para hacer música alegre que llena la sala de sonoridad y sonrisas.
Materiales:
Platos de papel (2 por niño), frijoles secos o pasta, grapadora o pegamento, marcadores o crayones, pegatinas, cinta o hilo (opcional), perforadora.
Cómo hacerlo:
- Prepara dos platos de papel para cada niño y ten a mano rotuladores, pegatinas y pinturas para decorar.
- Invita a los niños a decorar la parte inferior de sus platos con colores vivos y diseños divertidos: este será su propio instrumento musical.
- Coloca un puñado pequeño de frijoles secos o pasta en un plato, luego cúbrelo con el segundo plato, con los lados decorados hacia afuera.
- Ayuda a sellar los bordes con una engrapadora o pegamento para atrapar el contenido de forma segura en el interior.
- Para mayor diversión, haz pequeños agujeros alrededor de los bordes y deja que los niños aten coloridas cintas o lana para darles movimiento y estilo.
- Una vez listos los panderos, reúne a todos para un círculo de ritmos o un mini desfile y deja que empiece la música alegre.
- Anima a los niños a experimentar con diferentes sonidos al agitar suavemente, golpear o moverse al ritmo.
Variaciones:
- Intente usar campanas o botones en el interior para obtener diferentes sonidos.
- Añade una etiqueta con tu nombre y úsala durante el tiempo que tocas música o durante las presentaciones.
- Explora las diferencias de sonido con distintos rellenos: arroz, cuentas o guijarros.
15. Marionetas de bolsas de papel
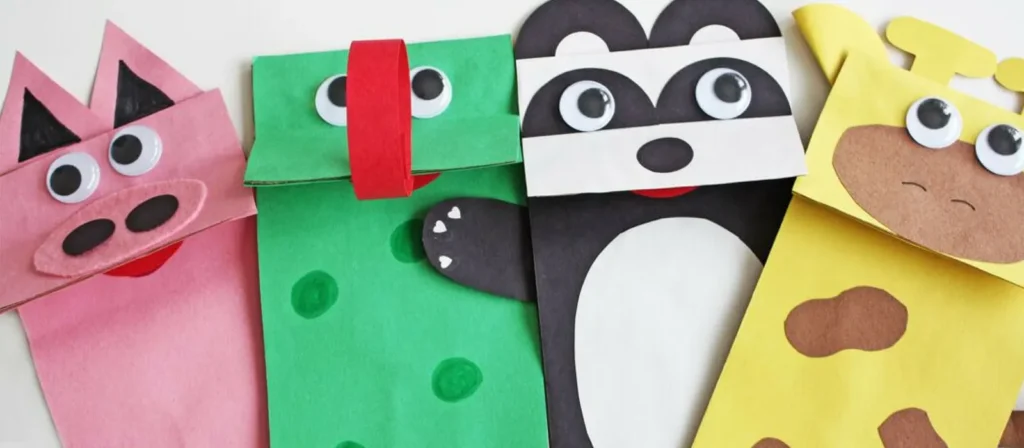
Descripción general de la actividad:
Deja que la imaginación tome el centro del escenario con esta encantadora actividad de marionetas de bolsa de papel. Los niños transforman simples bolsas de papel en personajes adorables utilizando rotuladores, lana, ojos móviles y trozos de papel de colores. Mientras diseñan sus marionetas, como animales, personas o amigos de cuentos, desarrollan la creatividad, las habilidades de narración y la coordinación motora fina, a la vez que expresan sus emociones a través del arte.
Materiales:
Bolsas de papel marrón o blanco para el almuerzo, trozos de papel de construcción, barras de pegamento, crayones o marcadores, ojos saltones, hilo, tijeras (seguras para niños), pegatinas o botones (opcional)
Cómo hacerlo:
- Prepara bolsas de papel, trozos de papel de colores, hilo, ojos móviles, pegamento y rotuladores sobre la mesa.
- Deja que los niños elijan una bolsa de papel y empiecen decorando la solapa para hacer la cara de su titiritero.
- Anímalos a añadir ojos saltones, pelo de lana y recortes de papel para bocas, orejas o sombreros.
- Decora la parte inferior de la bolsa como si fuera ropa, añadiendo detalles como botones, brazos o accesorios.
- Una vez secas, haz que los niños metan las manos en las bolsas y den vida a sus títeres a través de cuentos lúdicos.
- Empareja a los niños para que realicen mini espectáculos de títeres juntos y anímalos a ponerles voz a sus personajes.
- Crea un rincón de teatro de títeres en el aula para que sus nuevos amigos puedan protagonizar muchas aventuras futuras.
Variaciones:
- Asigna temas como animales, ayudantes de la comunidad o personajes de cuentos favoritos.
- Añade hilo o cinta de pelo para darle textura.
- Crea un rincón de teatro de marionetas usando una caja de cartón y cortinas para un juego imaginativo más prolongado.
16. Atrapasol de papel de seda

Descripción general de la actividad:
Llena el aula de color y luz con esta encantadora actividad de Atrapasoles de Papel de Seda. Los niños usan trozos de papel de seda de colores, contact paper transparente y formas sencillas como corazones, estrellas o círculos para crear hermosas artesanías para ventanas que brillan a la luz del sol. Mientras apilan y organizan los colores, aprenden sobre la transparencia, la mezcla de colores y la composición, a la vez que fortalecen sus habilidades motoras finas y visuoespaciales.
Materiales:
Papel de contacto transparente u hojas para laminar, papel de seda de varios colores (cortado en cuadrados pequeños), papel de construcción negro (para marcos), tijeras (seguras para niños), cinta adhesiva.
Cómo hacerlo:
- Prepara marcos de papel negro cortando formas sencillas como corazones, estrellas o círculos, y retira los centros.
- Retira el papel protector de un trozo de papel contact transparente y colócalo boca arriba sobre la mesa.
- Coloque el marco negro en la parte superior y presiónelo suavemente para asegurarlo en su lugar.
- Invita a los niños a rellenar el interior con cuadrados de papel de seda de colores, superponiendo las piezas para ver cómo aparecen nuevos colores.
- Una vez que su diseño esté completo, cúbralo con otra pieza de papel contact para sellar el atrapasol.
- Recorta cualquier borde extra, luego pega la obra de arte terminada en una ventana soleada.
- Observa cómo la luz del sol atraviesa, convirtiendo el aula en una galería llena de arcoíris de colores brillantes.
Variaciones:
- Utilice formas de temporada: calabazas para el otoño, huevos para la primavera o copos de nieve para el invierno.
- Deje que los niños creen diseños abstractos y de forma libre sin marco.
- Incorpora brillo o lentejuelas para darle un toque extra de brillo.
17. Huellas de manos con masa de sal
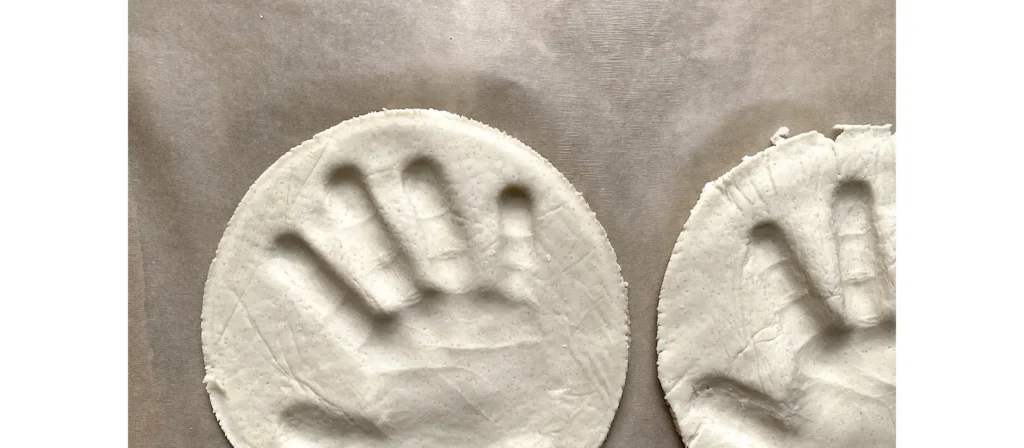
Descripción general de la actividad:
Captura un momento precioso en el tiempo con esta sincera actividad de huellas de manos en masa de sal. Los niños mezclan ingredientes sencillos como harina, sal y agua para hacer una masa suave, luego presionan sus pequeñas manos en ella para crear impresiones duraderas. Después de hornear y decorar con pintura o purpurina, cada huella se convierte en un hermoso recuerdo que celebra el crecimiento, la creatividad y la alegría de hacer algo a mano.
Materiales:
Harina, sal, agua, bol, rodillo, bandeja para hornear, pintura, pinceles, sellador transparente (opcional), cinta o cuerda (opcional para colgar)
Configuración:
- Premezcle la masa de sal o deje que los niños ayuden añadiendo 2 tazas de harina, 1 taza de sal y 1 taza de agua tibia. Mezcle y amase hasta obtener una masa suave.
- Prepare rodillos y tapetes pequeños o bandejas para trabajar.
- Precaliente el horno a 200°F (90°C) si va a hornear para que se endurezca.
Instrucciones de la actividad:
- Extienda un trozo de masa para cada niño, de aproximadamente ½ pulgada de grosor.
- Ayúdelos a presionar su mano firmemente sobre la masa para hacer una huella profunda.
- Si la pieza se va a colgar más tarde, utilice un lápiz o una pajita para hacer un pequeño agujero en la parte superior.
- Hornee durante 1 o 2 horas o deje secar al aire durante varios días.
- Una vez secas, los niños pueden pintar sus huellas de manos del color que prefieran. Si lo desean, pueden sellarlas con aerosol transparente para mayor durabilidad.
Variaciones:
- Escriba el nombre del niño y la fecha en la masa antes de hornearla para un recuerdo duradero.
- Añade pintura brillante o acabados metálicos para conseguir un efecto elegante.
- Conviértelo en un regalo para el Día de la Madre o del Padre con un mensaje como "¡Sin duda, eres el mejor!"
18. Varitas de cinta danzantes
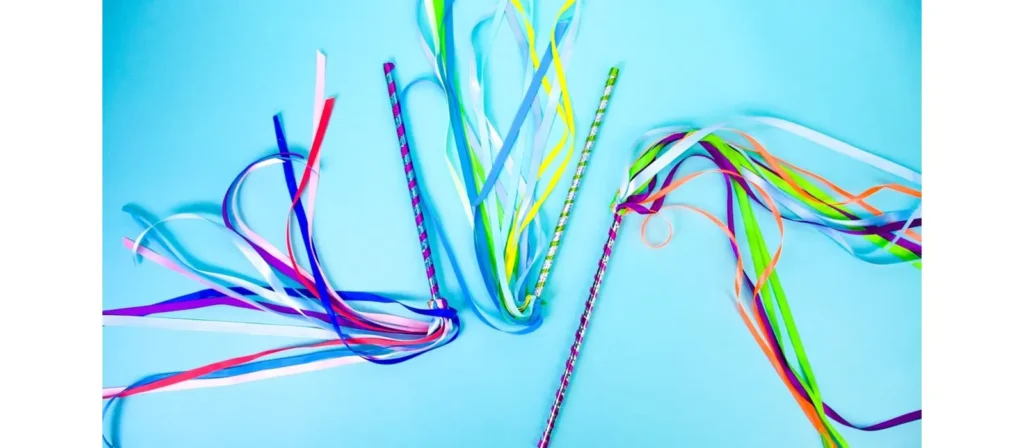
Descripción general de la actividad:
Añada movimiento, color y alegría al aula con esta animada actividad de varitas de cintas danzantes. Los niños decoran palos o varillas con cintas brillantes, serpentinas o tiras de tela, y luego giran y bailan mientras sus varitas revolotean por el aire. Al agitar y girar, fortalecen la motricidad gruesa, la coordinación y el ritmo, al tiempo que se expresan a través del movimiento y la música.
Materiales:
Pasadores de madera o palitos de manualidades, cintas o serpentinas de papel crepé (varios colores), pegamento o cinta adhesiva, tijeras (seguras para niños), pegatinas o marcadores para decorar los mangos.
Cómo hacerlo:
- Mezcla 2 tazas de harina, 1 taza de sal y 1 taza de agua tibia en un tazón hasta que la masa esté suave y fácil de amasar.
- Dele a cada niño un trozo pequeño de masa y déjelos extenderla hasta aproximadamente medio centímetro de grosor sobre una estera o bandeja.
- Ayúdales a presionar firmemente su mano en la masa para hacer una huella de mano profunda y clara.
- Si la pieza se va a colgar, usa una pajita o un lápiz para hacer un pequeño agujero cerca de la parte superior.
- Hornea las huellas de manos a 200 °F (90 °C) durante 1-2 horas, o déjalas secar al aire durante unos días hasta que estén duras.
- Una vez secos, los niños pueden pintar sus creaciones con colores brillantes, añadir purpurina para que brillen e incluso escribir sus nombres o la fecha.
- Sella con un spray transparente para darle un brillo duradero, luego ata una cinta a través del orificio para colgarlo como un recuerdo preciado o un regalo familiar.
Variaciones:
- Utilice colores de temporada para crear varitas temáticas (por ejemplo, rojo y verde para los días festivos, pasteles para la primavera).
- Añade campanas en los extremos de las cintas para añadir un elemento musical.
- Conviértalo en una actuación: cree una rutina grupal sencilla y permítales “actuar” para sus padres u otras clases.
19. Marionetas de monstruos tontos
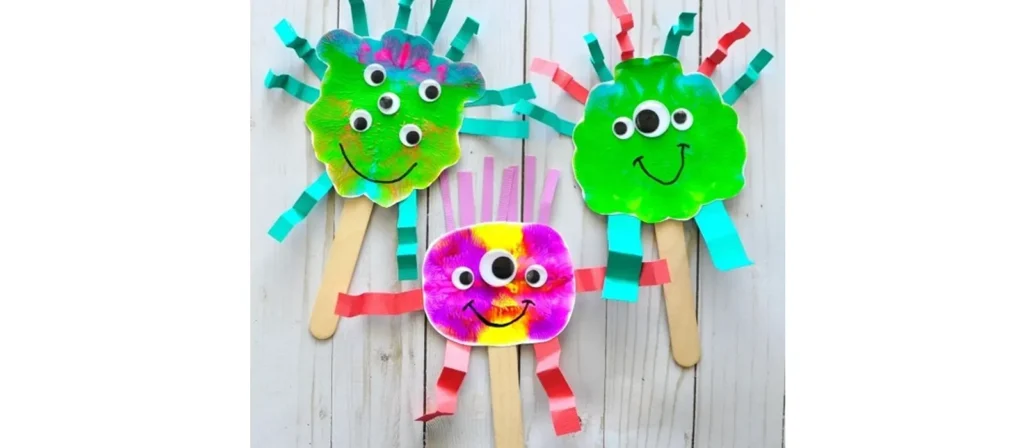
Descripción general de la actividad:
Trae risas y creatividad a la hora del arte con esta lúdica actividad de Títeres de Monstruos Divertidos. Los niños utilizan papel de colores, lana, ojos móviles y palitos de manualidades para diseñar sus propios monstruos amigables con caras graciosas, pelo puntiagudo y ojos que se tambalean. Mientras cortan, pegan y decoran, fortalecen sus habilidades motoras finas, experimentan con colores y formas, y descubren cómo la imaginación puede convertir materiales ordinarios en creaciones extraordinarias.
Materiales:
Bolsas de papel para el almuerzo, papel de construcción, barras de pegamento, marcadores o crayones, pompones, ojos saltones, hilo, tijeras (seguras para niños), formas de espuma o limpiapipas (opcional)
Cómo hacerlo:
- Prepara bolsas de papel, formas de papel de colores, ojos saltones, pompones, hilo y pegamento para cada niño.
- Muestra cómo la solapa de la bolsa de papel puede convertirse en la boca del monstruo, y luego deja que los niños empiecen a decorar.
- Anímalos a pegarles ojos en la cantidad que quieran y a añadir detalles divertidos como pelo puntiagudo, cuernos, brazos o dientes grandes.
- Que usen rotuladores o crayones para dibujarles sonrisas tontas, lenguas retorcidas o pequeñas manchas para darles más personalidad.
- Mientras trabajan, haz preguntas divertidas como “¿Cómo se llama tu monstruo?” o “¿Ruge o se ríe?”.”
- Una vez terminado, reúne al grupo para un espectáculo de títeres de monstruos donde cada niño podrá actuar con su nuevo y tonto amigo.
- Celebra su creatividad exhibiendo las marionetas o creando un muro de “Monstruo de la Semana” para presentar las creaciones de todos.
Variaciones:
- Tematizar los monstruos para lecciones específicas (por ejemplo, monstruos de emociones para el aprendizaje SEL).
- Utilice fieltro en lugar de papel para obtener una versión texturizada.
- Realiza una exhibición de pared titulada “Monstruo de la semana” donde cada niño presente su personaje.
20. Arte del planeta con filtros de café

Descripción general de la actividad:
Lleva a los jóvenes estudiantes a una aventura fuera de este mundo con esta fascinante actividad de arte de planetas con filtros de café. Los niños colorean filtros de café redondos con marcadores, luego los rocían ligeramente con agua para ver cómo los colores se mezclan y giran como galaxias reales. Una vez secos, pueden recortar y etiquetar sus coloridos “planetas”, convirtiendo materiales simples en un impresionante sistema solar lleno de imaginación y descubrimiento.
Materiales:
Filtros de café redondos, marcadores lavables, botellas rociadoras o tazas pequeñas de agua con goteros, toallas de papel, papel de aluminio o bandejas, papel de construcción negro (opcional para el fondo), pegamento
Cómo hacerlo:
- Extiende los filtros de café sobre bandejas o papel de aluminio para tenerlos listos para colorear.
- Da a los niños rotuladores lavables y deja que llenen los filtros con brillantes diseños circulares que parezcan planetas.
- Cuando termines, rocía ligeramente los filtros con agua o usa goteros para humedecer la superficie y observa cómo los colores se mezclan.
- Deja secar completamente los filtros durante una a dos horas hasta que aparezca el efecto de acuarela.
- Una vez secos, recorta los coloridos planetas y pégalos sobre papel negro para crear un mini sistema solar.
- Anima a los niños a nombrar sus planetas o a añadir estrellas y datos espaciales divertidos a su alrededor.
- Exhibe la obra de arte terminada en la pared del aula para crear una galaxia deslumbrante llena de imaginación y descubrimiento.
Variaciones:
- Conviértalo en un proyecto de sistema solar creando múltiples planetas y colocándolos en órbita.
- Utilice crayones blancos para dibujar primero sobre los filtros para lograr un efecto de “resistencia” oculto.
- Añade pegamento con brillantina para darle un brillo galáctico.
21. Mandalas de la naturaleza

Descripción general de la actividad:
Invita la paz, la concentración y la creatividad al aula con esta hermosa actividad de Mandalas de la Naturaleza. Los niños recolectan materiales naturales como hojas, pétalos, piedras y ramitas, y luego los organizan en patrones circulares para crear impresionantes mandalas que celebran el equilibrio y la armonía en la naturaleza. A medida que colocan cuidadosamente cada pieza, fortalecen la concentración, el reconocimiento de patrones y una apreciación por la belleza que se encuentra al aire libre.
Materiales:
Hojas, pétalos, palitos, piedras pequeñas, piñas, bellotas, corteza, círculos de papel o bases de cartón (opcional), pegamento (opcional para exhibición permanente)
Cómo hacerlo:
- Lleva a los niños a un paseo corto por la naturaleza para recolectar materiales seguros e interesantes como hojas, pétalos, piedras y ramitas.
- Proporcione círculos de papel o cartón como bases, o deje que los niños creen directamente en el suelo o la mesa para una sensación más natural.
- Un mandala comienza en el centro y crece hacia afuera en patrones o círculos.
- Invita a los niños a colocar un objeto en el centro, luego a construir hacia afuera organizando objetos similares en diseños repetitivos o simétricos.
- Anímalos a observar las texturas y los colores mientras trabajan preguntando: “¿Cómo se siente esta hoja?” o “¿Qué formas notas?”
- Cuando los mandalas estén terminados, expóngalos en interiores o tome fotografías antes de que la naturaleza reclame los materiales.
- Celebra su creatividad discutiendo cómo cada mandala es único, al igual que el mundo natural del que fue hecho.
Variaciones:
- Utilice materiales de temporada: flores en primavera y hojas coloridas en otoño.
- Añade toques personales como piedras pintadas o artículos etiquetados.
- Conviértalo en un proyecto de grupo: un gran mandala realizado con trabajo en equipo colectivo.
Consejos de seguridad y limpieza para la hora de hacer manualidades
Incluso las mejores manualidades para niños en edad preescolar pueden convertirse en un desastre si no estamos preparados. Con la estructura y los hábitos adecuados, puedes fomentar la creatividad sin preocuparte por derrames, manchas o dedos pegajosos.

Establecer límites antes de que comience la diversión
- Zonas de elaboración: utilice mesas dedicadas o tapetes lavables
- Delantales o camisetas viejas: un artículo imprescindible para niños en edad preescolar
- Establezca reglas de “manos limpias” antes de pegar o pintar
Uso de materiales seguros y apropiados para la edad
- Opte siempre por suministros no tóxicos y lavables.
- Evite herramientas afiladas, pequeños peligros de asfixia o materiales alergénicos.
- Guarde los materiales peligrosos fuera del alcance
Enseñar la limpieza como parte de la actividad
- Utilice contenedores codificados por colores para organizar los materiales.
- Crea canciones o rutinas divertidas en torno a la limpieza.
- Asignar mini “líderes de limpieza” para cada mesa
Cómo las artes y manualidades apoyan el aprendizaje Montessori y Reggio
Las filosofías detrás Montessori y Reggio Emilia Apoyamos firmemente las artes y manualidades para niños en edad preescolar, no solo como una forma de arte, sino como una forma de aprender, expresar y comprender el mundo.
Fomentar la independencia mediante el trabajo práctico
- Los niños eligen materiales y completan tareas a su propio ritmo.
- Los proyectos autodirigidos generan autonomía y confianza
- Las herramientas y suministros están accesibles a la altura del niño.
Fomentando la observación y la creatividad inspirada en la naturaleza
- Reggio Emilia enfatiza los materiales naturales y la exploración sensorial.
- Los paseos por la naturaleza y los juegos con piezas sueltas conectan el arte con el mundo real.
- La artesanía estacional refuerza los ritmos y ciclos de la vida.
Apoyando el desarrollo cognitivo mediante la repetición y la rutina
- La repetición de acciones motoras finas ayuda a construir vías cerebrales
- Los rituales en torno a las artes y manualidades fomentan el orden, la paciencia y la concentración.
- Los materiales Montessori pueden incluir extensiones de manualidades (por ejemplo, perforar con alfileres, trazar)
Manualidades económicas: consejos para preescolares y jardines de infancia
Las manualidades de alta calidad para niños en edad preescolar no requieren un gran presupuesto. Con un poco de creatividad y planificación, puedes brindar experiencias artísticas significativas sin gastar una fortuna.
Utilice materiales reciclados y cotidianos
- Rollos de papel higiénico, tapas de botellas, cajas de cereales y retazos de tela.
- Colaborar con los padres para crear contenedores de donaciones
- Enseñar sostenibilidad a través de la reutilización
Compre al por mayor y organícese inteligentemente
- Obtenga suministros básicos (pegamento, papel, pinceles) de vendedores mayoristas
- Almacenar por categoría y color para un acceso rápido
- Laminar plantillas de uso común para uso repetido
Planifique las unidades temáticas con antelación
- Alinee las manualidades con las estaciones, los días festivos o los temas de las lecciones.
- Reutilizar manualidades para todos los niveles de edad con ligeras variaciones.
- Mantenga una carpeta con plantillas e instrucciones imprimibles para su equipo.
Conclusión
Las manualidades para niños en edad preescolar son más que una simple actividad divertida: son esenciales para desarrollar la motricidad fina, fomentar la expresión emocional y despertar un amor por la creatividad que dure toda la vida. Ya seas profesor, director de escuela o padre, ofrecer a los niños la libertad de crear con sus manos fomenta la confianza, la conexión y la curiosidad.
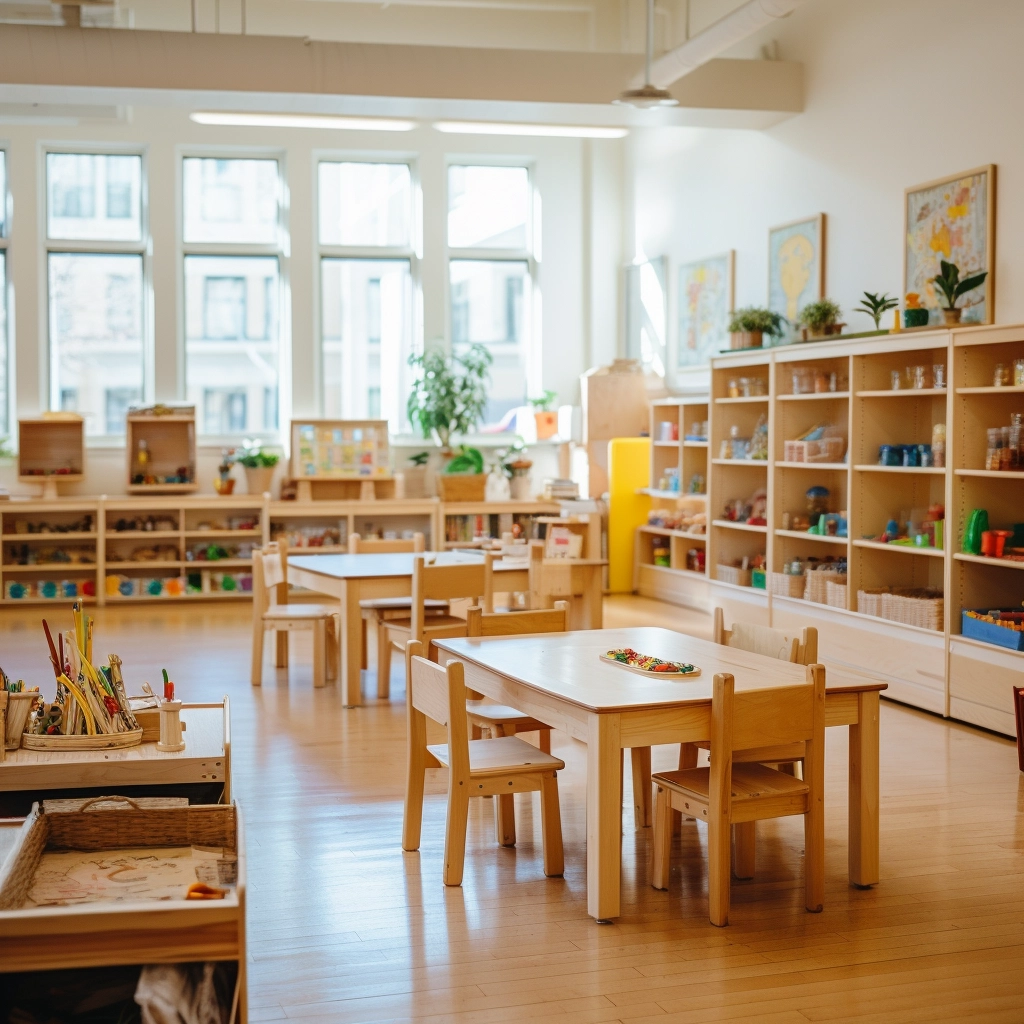
Detrás de cada espacio artesanal exitoso hay un entorno cuidadosamente diseñado. En Muebles West ShoreNos especializamos en crear esos ambientes. Con más de 20 años de experiencia en la fabricación y suministro de mobiliario preescolar, ofrecemos una solución integral.Desde la distribución del aula y la personalización del mobiliario hasta la producción, el control de calidad y la entrega, nuestra gama de productos incluye diversos muebles preescolares en diferentes estilos, materiales y tamaños para satisfacer las diversas necesidades de los espacios de aprendizaje temprano.
Cuando esté listo para mejorar sus áreas de arte o rediseñar su espacio preescolar para inspirar aún más creatividad, estamos aquí para ayudarlo, porque el entorno adecuado marca la diferencia.