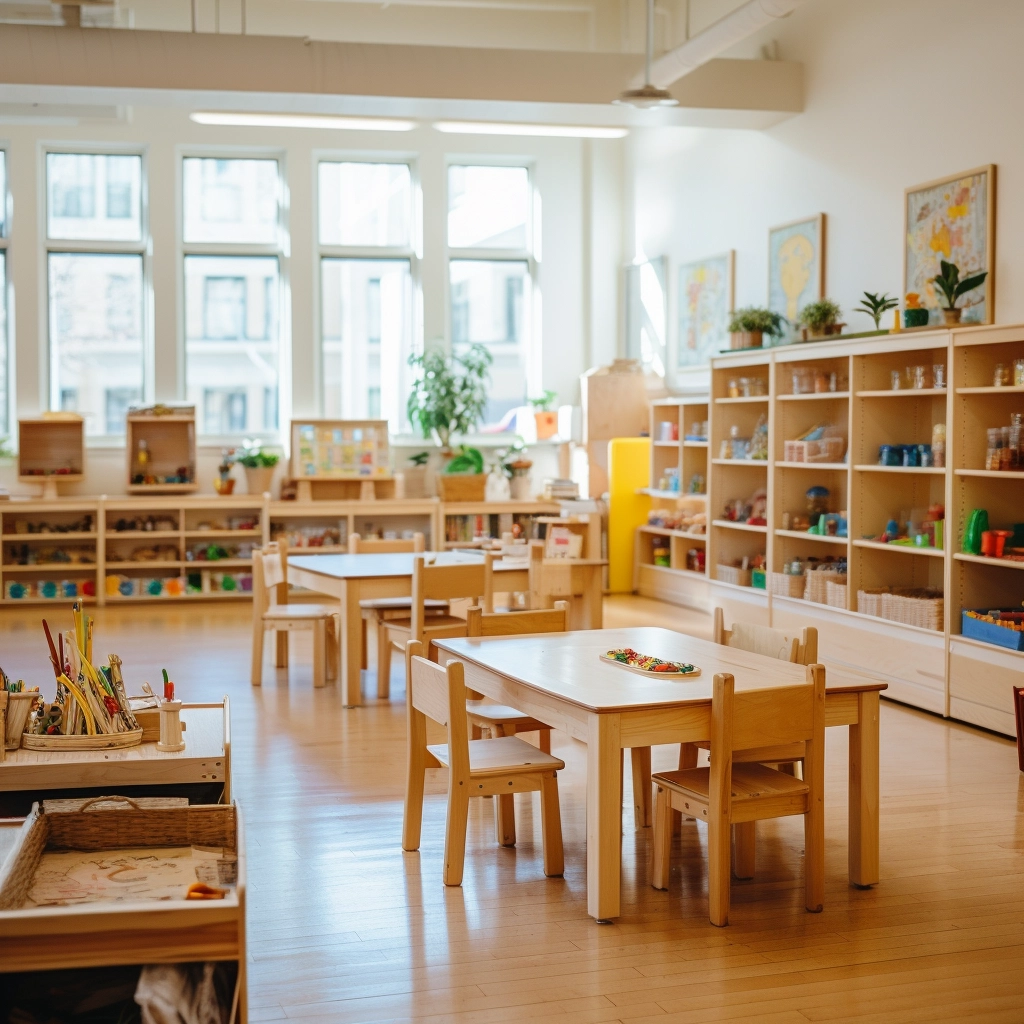
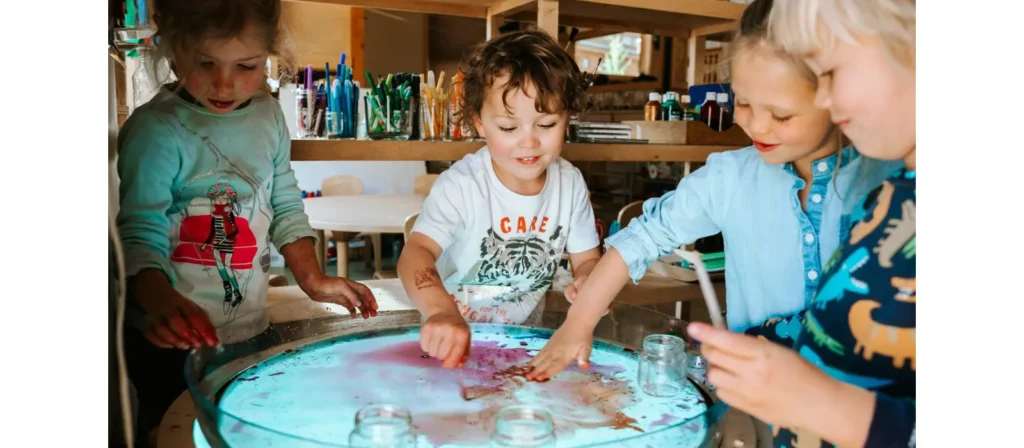
Do you know how to help preschoolers develop their artistic and creative abilities at school? One of the most popular kindergarten classes is crafts, which allows children to freely explore and create art and enjoy this special creative moment. This is where arts and crafts for preschoolers truly shine.
Through arts and crafts for preschoolers, they can explore their imaginations, improve fine motor skills, develop cognitive abilities, and express themselves creatively. Learning new skills and repeated exposure to art supplies builds confidence, which impacts future development.
In this article, I’ll show you 21 of the best preschool and daycare craft projects—easy, fun, and educational. Introducing arts and crafts for preschoolers opens up a world of imaginative and meaningful play.
Preschool Crafts: More Than Just a Fun Activity
In the preschool world, there’s often debate about whether crafts have a place in early childhood education. While it’s true that crafts and art are different—art is about open-ended creativity, while crafts typically have a set outcome—both have value in a well-rounded curriculum.
Art allows children to freely explore materials, colors, and textures without constraints, focusing on the process rather than the final product. This is essential for fostering creativity and self-expression. However, crafts offer their unique benefits. They help develop fine motor skills, reinforce concepts like color and shape recognition, and can support broader learning themes. When done at home with a caring adult, crafts become a unique bonding activity, creating meaningful memories.
Rather than viewing crafts as limiting, we should see them as complementing open-ended art experiences. A balance of both ensures that children are free to create while gaining valuable skills through structured activities.
Here, we explore the 21 Best preschool crafts perfect for little hands.
21 Best Preschool Crafts
1. Paper Plate Faces
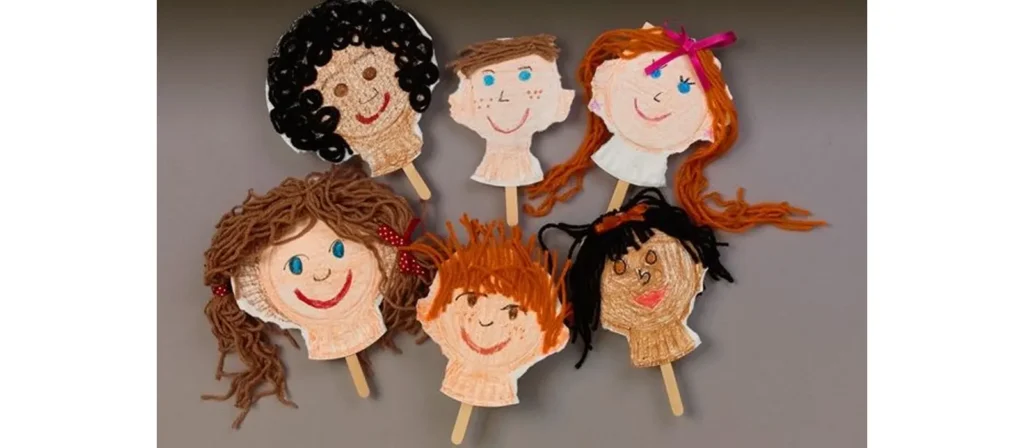
Activity Overview:
Turn ordinary paper plates into a gallery of joyful expressions with this delightful Paper Plate Faces activity. Children can draw, paint, or glue on yarn, buttons, and colored paper to create funny, happy, or even curious faces that reflect their emotions. Through this creative process, they begin to understand feelings, develop empathy, and strengthen their fine motor skills while having fun with textures and shapes.
Materials:
Paper plates, markers, yarn, glue, assorted decorations (stickers, googly eyes, pom poms)
How to Do It:
- Set up a cheerful crafting station by laying out paper plates, markers, glue, and all sorts of fun decorations within easy reach.
- Give each child their own plate and invite them to design a face that shows an emotion such as happy, silly, surprised, or sleepy.
- Show them how to draw simple features, then let them freely add yarn hair, googly eyes, or stickers to bring their creations to life.
- Chat as they work by asking questions like “What feeling does your face have?” or “Can you make that expression too?”
- When the masterpieces are dry, turn your classroom into a Face Gallery or let the children take their smiling plates home to share.
Variations:
Use plates in different sizes to build a group of expressive “face families” — a perfect addition to themed arts and crafts for preschoolers.
2. DIY Binoculars

Activity Overview:
Spark curiosity and adventure with this charming DIY Binoculars craft. Using cardboard tubes, colorful paper, string, and a touch of imagination, children can create their very own pair of pretend binoculars. As they decorate and assemble their masterpiece, they strengthen hand-eye coordination, fine motor skills, and creativity while learning about observation and exploration.
Materials:
Two empty toilet paper rolls per child, tape or glue, string or yarn, hole punch, crayons or markers, stickers, colored paper (optional)
How to Do It:
- Get your creative corner ready with cardboard tubes, colorful paper, tape, glue, and string.
- Give each child two rolls and invite them to decorate using markers, crayons, stickers, or paper wraps to make their binoculars uniquely theirs.
- Help them tape or glue the rolls together to form the binocular shape.
- Show how to thread yarn through the holes and tie knots to create a neck strap, introducing safe tool use in a fun way.
- Encourage kids to go on a pretend “explorer walk” around the classroom or playground, observing everything they can spot.
- Ask playful questions such as “What did you find?” or “Can you see something that starts with the letter B?”
- When finished, let them share their discoveries and show off their colorful binoculars to friends and family.
Variations:
- Use paper towel rolls cut in half for jumbo binoculars.
- Turn this craft into a game by creating a scavenger hunt where children must “spot” hidden objects.
- Pair with books or songs about nature or exploration to enhance thematic arts and crafts for preschoolers sessions.
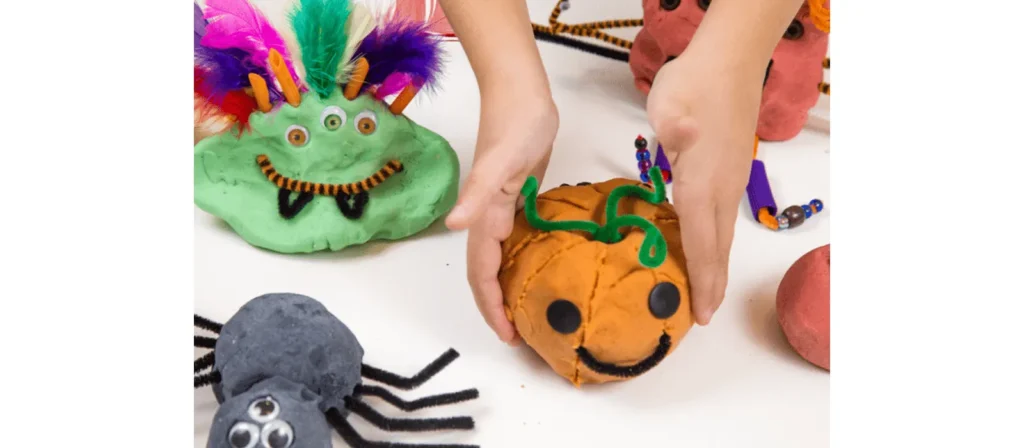
3. Easy Pumpkin Craft

Activity Overview:
Celebrate the cozy spirit of autumn with this adorable Easy Pumpkin Craft. Using orange paper, glue, and a little creativity, children can cut, roll, or layer pieces to form their own bright, cheerful pumpkins. As they work with shapes and colors, they strengthen fine motor skills, practice hand coordination, and learn basic concepts like size and pattern.
Materials:
Orange construction paper, green construction paper, scissors (child-safe), glue sticks, black markers, optional: googly eyes, yarn, glitter.
How to Do It:
- Prepare a cozy crafting table with orange and green paper, glue sticks, scissors, and fun extras like googly eyes or glitter.
- Give each child orange paper circles or strips and guide them to glue the pieces together into a round pumpkin shape.
- Show how to add a green paper stem and let them draw a face using markers.
- Encourage them to decorate their pumpkins with yarn vines, sparkly glitter, or funny eyes to make each one special.
- Chat as they create by asking, “What kind of face will your pumpkin have? Happy or spooky?”
- After drying, use their adorable pumpkins to decorate a classroom wall or create a cheerful pumpkin patch for everyone to enjoy.
Variations:
- Try using paper plates instead of construction paper for a sturdier base.
- Turn it into a name-recognition craft by having children write their names on the pumpkins.
- Make mini pumpkins and create a garland to hang around the room.
4. Turkey Headband

Activity Overview:
Nothing captures the joy of fall quite like creating a colorful Turkey Headband. In this heartwarming craft, children use simple materials such as construction paper, feathers, and glue to design their own playful turkey crowns. As they cut, paste, and arrange the feathers, little hands strengthen fine motor skills while young minds practice color recognition and creativity.
This activity naturally invites storytelling and imagination. Children love pretending to be cheerful turkeys, moving around the classroom with laughter and excitement. It is also a wonderful opportunity to talk about gratitude, sharing, and the beauty of autumn traditions.
Materials:
Brown construction paper, red, orange, and yellow construction paper, scissors (child-safe), glue or tape, crayons or markers, googly eyes (optional), stapler
How to Do It:
- Get the table ready with brown paper strips, colorful paper feathers, glue, and markers.
- Help each child fit a brown strip around their head and secure it into a circle to form the headband base.
- Invite children to color and decorate their paper feathers, then glue them to the back of the headband.
- Show how to make a turkey face using paper shapes or googly eyes, and add a beak and red wattle for fun.
- Chat about Thanksgiving and encourage each child to share one thing they are thankful for.
- When finished, let them wear their festive headbands and waddle around like cheerful turkeys during a classroom parade.
Variations:
- Add the child’s name to the front of the headband as a fun personalization element.
- Create a gratitude feather: have each child write or draw something they’re thankful for on a feather before attaching it.
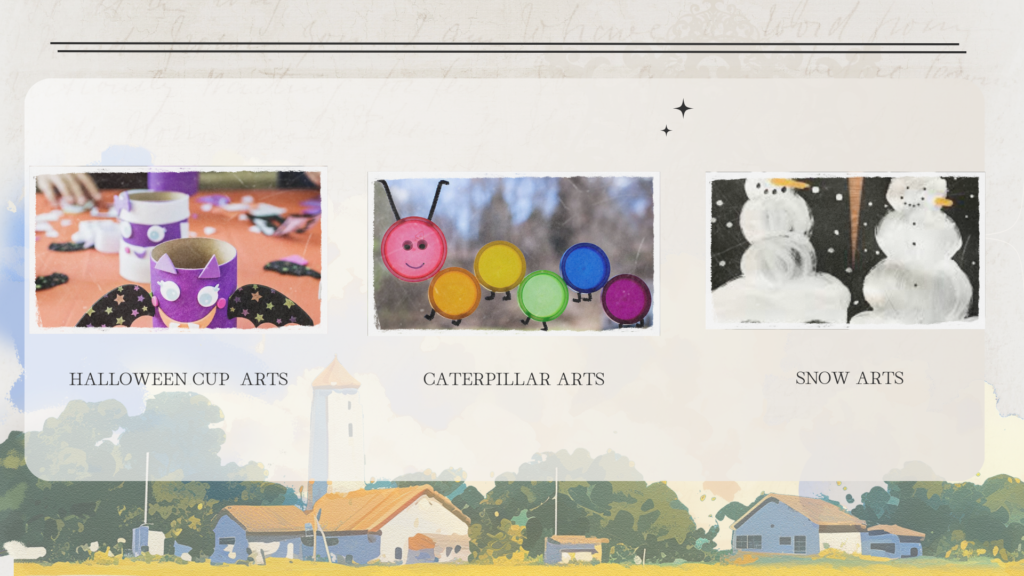
5. Paper Cup Witch

Activity Overview:
Bring a touch of Halloween magic to the classroom with this fun and imaginative Paper Cup Witch craft. Using simple materials like paper cups, construction paper, yarn, and markers, children can create their own friendly witches complete with pointy hats, bright eyes, and curly hair. As they cut, glue, and decorate, they strengthen fine motor skills and practice following steps, turning creativity into confidence.
Materials:
Paper cups (green or white), black construction paper, glue, scissors (child-safe), yarn or shredded paper (for hair), googly eyes, markers or crayons
How to Do It:
- Arrange paper cups, pre-cut witch hats, yarn hair, and black paper shapes on the table so everything is easy to reach.
- Give each child a paper cup and invite them to glue on googly eyes and draw a friendly witch face with markers.
- Help them add yarn or shredded paper hair, then top it with a pointy black hat for a magical touch.
- Wrap a small paper cape or collar around the cup to complete the witch’s outfit.
- As they create, ask fun questions such as “What kind of magic does your witch do?” or “Is your witch silly, spooky, or kind?”
- When finished, line up all the witches together for a charming Halloween display that’s full of personality.
Variations:
- Add a small broomstick using popsicle sticks and raffia or brown paper.
- Turn it into a Halloween puppet by attaching a straw or stick to the bottom of the cup.
- Encourage children to create other characters — ghosts, pumpkins, or wizards — for an entire Halloween scene.
6. Puffy Paint Ice Cream Cones
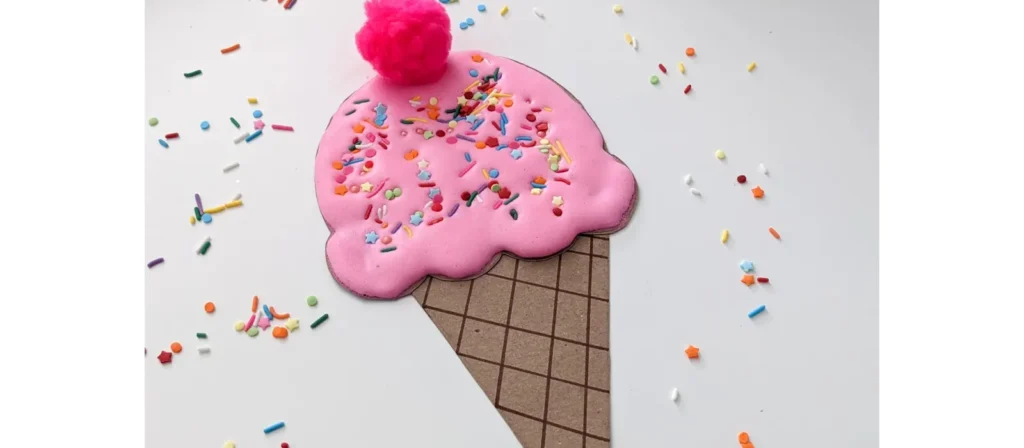
Activity Overview:
Bring a scoop of sweetness into the classroom with this delightful Puffy Paint Ice Cream Cones craft. Using homemade puffy paint made from shaving cream and glue, children can swirl and spread “ice cream” on paper cones, then top them with sprinkles, glitter, or pom-poms for extra fun. As they mix colors and textures, they explore sensory play while strengthening hand control and creativity.
Materials:
Shaving cream, white glue, food coloring or washable paint, brown construction paper (cone), white cardstock or paper (background), scissors, mixing bowls, spoons
How to Do It:
- Start by mixing equal parts shaving cream and white glue in bowls, then add a few drops of food coloring or washable paint to create colorful “ice cream” puffy paint.
- Give each child a cone cutout and a sheet of cardstock to glue it on.
- Invite them to scoop, swirl, and spread the puffy paint above the cone to make their ice cream scoops.
- Encourage creativity by mixing colors, stacking tall cones, and talking about pretend flavors like strawberry, mint, or rainbow swirl.
- Let them sprinkle glitter, tiny paper dots, or pom-poms for extra toppings.
- Allow the artwork to dry overnight so the puffy texture stays firm, leaving behind a sweet, fluffy masterpiece that looks good enough to eat.
Variations:
- Add sprinkles using glitter or small cut paper dots.
- Turn the finished cones into a wall display called “Our Sweetest Ideas!”
- Use scented shaving cream or add a drop of vanilla for a multisensory twist.
7. Leaf Rubbing Art
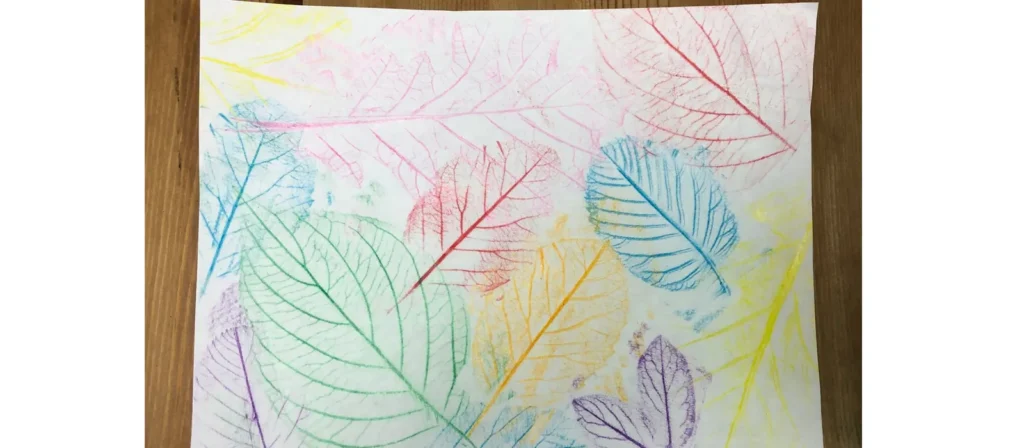
Activity Overview:
Celebrate the beauty of nature with this enchanting Leaf Rubbing Art activity. Children can collect leaves of different shapes and sizes, place them under a sheet of paper, and gently rub crayons or colored pencils over the surface to reveal the delicate patterns and veins. As the hidden designs appear, little learners experience the wonder of discovery while developing fine motor control and observational skills.
Materials:
Various leaves (different shapes/sizes), white paper, crayons (with wrappers removed), tape (optional), clipboards or flat work surface
How to Do It:
- Take children outside to collect leaves of different shapes and sizes, or provide a set of pre-collected leaves at the table.
- Give each child a few leaves and show them how to place them vein-side up on a flat surface or clipboard.
- Lay a sheet of white paper over the leaves and demonstrate how to gently rub the side of a crayon to reveal the patterns beneath.
- Encourage kids to try different colors and leaf types, comparing the shapes and textures they uncover.
- Chat about nature as they work by asking, “What kind of tree do you think this leaf came from?” or “Why do leaves change color in fall?”
- Display their colorful rubbings around the classroom or turn them into bookmarks and greeting cards to celebrate the beauty of the season.
Variations:
- Turn the finished rubbings into greeting cards, bookmarks, or seasonal decorations.
- Use black paper and light-colored crayons for a dramatic effect.
- Pair with a simple nature walk and a leaf scavenger hunt for a full-themed day.
8. Homemade Playdough Creations
Activity Overview:
There’s something truly magical about molding, rolling, and shaping with soft, colorful dough. In this joyful Homemade Playdough Creations activity, children make their own playdough using simple ingredients like flour, salt, and water, then use it to sculpt anything their imagination can dream up such as animals, food, or playful patterns. The process engages all their senses while building fine motor strength, creativity, and focus.
Materials:
Flour, salt, cream of tartar, water, vegetable oil, food coloring (or pre-made playdough), mixing bowls, spoons, child-safe sculpting tools (plastic knives, cookie cutters, rolling pins)
How to Do It:
- Prepare colorful playdough ahead of time or let children join in the fun of making it themselves by mixing flour, salt, water, oil, and food coloring.
- Once the dough is ready and cool, divide it into different colors and place it on trays or mats for easy shaping.
- Provide rolling pins, cookie cutters, and plastic tools so children can mold animals, letters, or their favorite foods.
- Encourage creativity by asking playful questions such as “What are you making today?” or “Can you shape your name out of dough?”
- Let them explore textures, colors, and shapes freely, building both imagination and fine motor skills along the way.
- When finished, store the dough in sealed containers so it can be used again for more creative sessions throughout the week.
Variations:
- Add essential oils (like lavender or peppermint) for a calming sensory twist.
- Incorporate natural elements like twigs, stones, or leaves for a nature-based theme.
- Use shape cutters to connect the activity with early math concepts like patterns or geometry.
9. The Very Hungry Caterpillar Craft
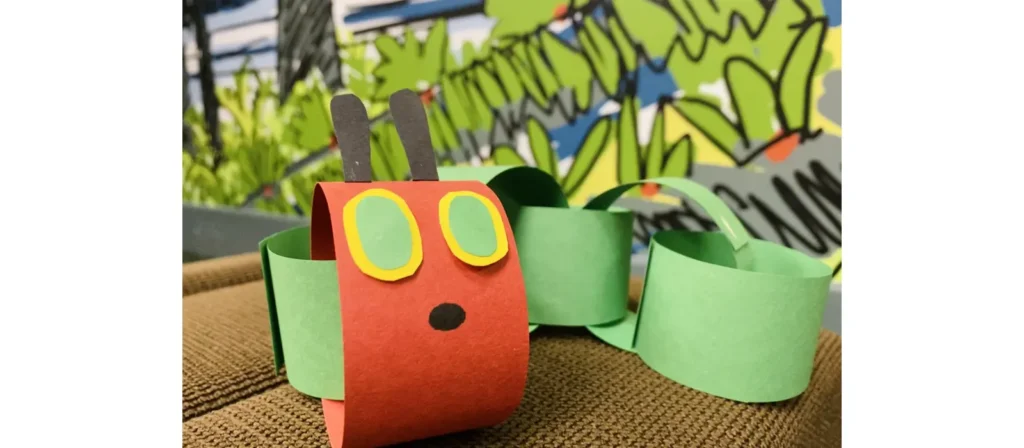
Activity Overview:
Bring Eric Carle’s beloved story to life with this charming The Very Hungry Caterpillar Craft. Using colorful paper circles, glue, and googly eyes, children can create their own friendly caterpillar while recalling each part of the story. As they cut, count, and arrange the pieces, they strengthen fine motor skills, practice sequencing, and develop early literacy through storytelling connections.
Materials:
Colored construction paper (red and green), glue sticks, scissors (child-safe), black marker, googly eyes, paper plates (optional for display), copies of the book (optional)
How to Do It:
- Begin by reading The Very Hungry Caterpillar together or watching a short video version to spark children’s imagination.
- Give each child a set of green circles for the body and one red circle for the head.
- Show them how to glue the circles in a line to form the caterpillar, then add googly eyes, a smile, and antennae using a marker or paper strips.
- Encourage counting and sequencing by asking, “How many green circles did you use?” or “What did the caterpillar eat first?”
- Once finished, display the adorable caterpillars on a bulletin board or let children take them home as a fun reminder of the story.
- For added creativity, invite them to make the butterfly stage next, connecting art with storytelling and learning.
Variations:
- Add a counting element by numbering each green circle.
- Create a lifecycle mural with caterpillar, cocoon, and butterfly stages.
- Use cotton balls instead of paper circles for a fluffier look.
10. Handprint Sunflowers
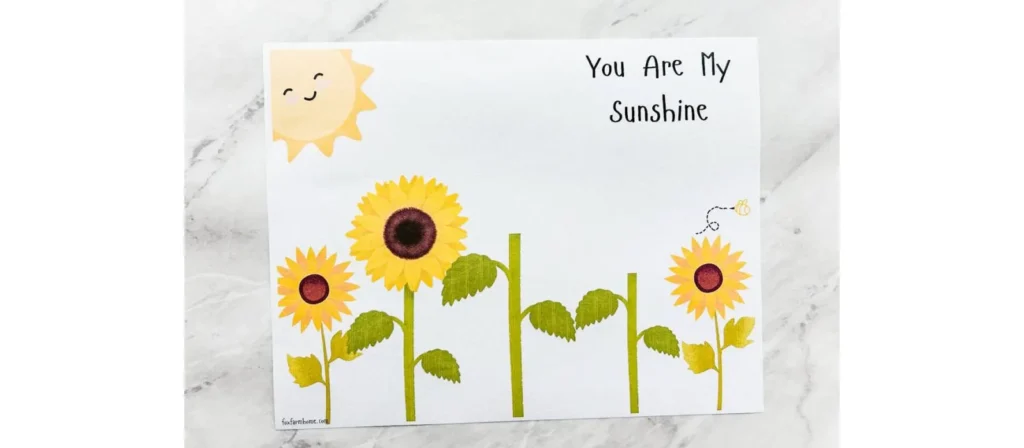
Activity Overview:
Fill the classroom with sunshine and smiles through this beautiful Handprint Sunflowers activity. Children trace and paint their hands to form bright yellow petals, then add a brown center and a green stem to complete their cheerful sunflowers. As they press their colorful handprints onto the paper, they build fine motor strength, explore symmetry and color blending, and experience the joy of creating something uniquely their own.
Materials:
Yellow and green construction paper, brown paper circles (or cupcake liners), glue, scissors (child-safe), pencil, black marker, optional: real sunflower seeds
How to Do It:
- Get your table ready with yellow, green, and brown paper, glue, pencils, and scissors.
- Help children trace their hands several times on yellow paper and cut them out to form bright sunflower petals.
- Glue a brown circle or cupcake liner in the center of the page to make the flower’s middle.
- Invite kids to arrange and glue their handprint petals around the center to create a full, sunny bloom.
- Add a green stem and leaves to finish the sunflower.
- For extra fun, glue real sunflower seeds in the middle to give it a textured look.
- When all the flowers are done, display them together to form a cheerful classroom “garden” that shines with creativity and color.
Variations:
- Write each child’s name on a petal and turn it into a “class garden” display.
- Use paint to make handprint petals for a messier, more tactile version.
- Create a counting activity by asking children to count the petals they used.
11. Rainbow Collage
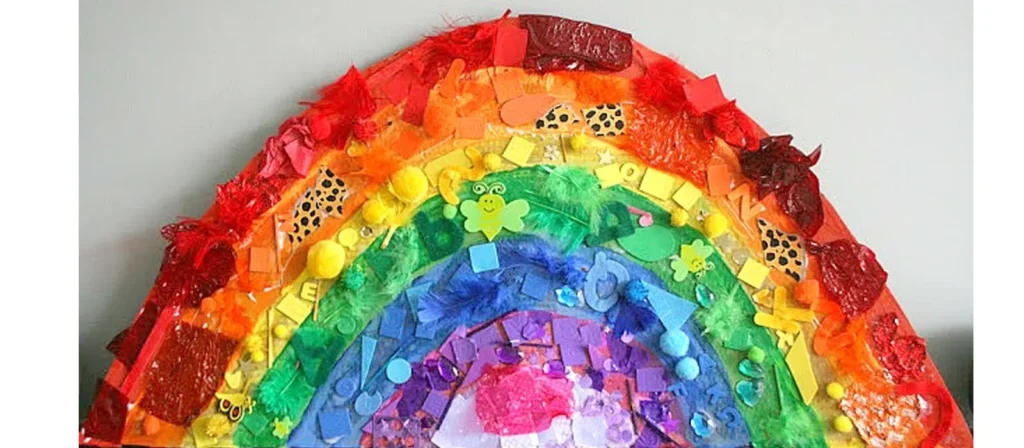
Activity Overview:
Brighten the classroom with color and creativity through this joyful Rainbow Collage activity. Children use scraps of paper, tissue, fabric, or any colorful materials to build their very own rainbows. As they sort, cut, and glue each color into place, they practice fine motor coordination, color recognition, and sequencing while expressing their individual creativity in a vibrant way.
Materials:
Colored construction paper scraps (or tissue paper), glue sticks, white paper or cardstock, cotton balls, scissors (child-safe), crayons or markers (optional)
How to Do It:
- Get the table ready with sorted paper scraps or tissue pieces in rainbow color order, along with glue sticks, scissors, and cotton balls.
- Give each child a rainbow outline or let them draw their own on white paper or cardstock.
- Invite them to glue colorful scraps one by one, following the rainbow order and naming each color as they go.
- Add cotton balls at both ends to make soft, fluffy clouds that complete the rainbow.
- Encourage conversation by asking questions like “What comes after yellow?” or “Which color is your favorite?”
- Once dry, display the bright rainbows on a classroom wall or send them home to bring a little sunshine to family spaces.
Variations:
- Use natural materials like leaves and petals for an Earth Day-themed rainbow.
- Turn it into a 3D version by layering materials like yarn, felt, or buttons.
- Create mini rainbows on paper plates for a faster group version.
12. Fingerprint Trees

Activity Overview:
Turn tiny fingerprints into a forest of creativity with this heartwarming Fingerprint Trees activity. Children use their fingertips dipped in colorful paint to create leaves, blossoms, or fruits on tree branches drawn or printed on paper. Each gentle press leaves a unique mark, helping them explore colors, patterns, and the beauty of individuality while developing fine motor coordination and sensory awareness.
Materials:
White cardstock, brown markers or crayons, washable paint (fall or spring colors), paper plates or paint trays, wipes or water bowls for cleanup
How to Do It:
- Prepare white cardstock with tree trunks and branches already drawn, or let children sketch their own using brown markers or crayons.
- Pour small amounts of washable paint onto paper plates—choose warm tones like red, yellow, and orange for fall, or fresh colors like green, pink, and purple for spring.
- Invite children to dip their fingertips lightly into the paint and press them along the branches to create colorful leaves or blossoms.
- Encourage them to experiment with different colors and pressure to see how each fingerprint looks unique.
- Talk together about the seasons by asking, “Do these colors remind you of autumn or spring?”
- Let the paintings dry and display them as a bright seasonal forest that celebrates every child’s individuality.
Variations:
- Create four trees side by side to represent all four seasons.
- Use Q-tips or cotton swabs for kids who prefer not to use their fingers.
- Add falling leaves around the base or birds in the branches for extra detail.
13. Bubble Wrap Painting
Activity Overview:
Turn ordinary packaging into a burst of creativity with this exciting Bubble Wrap Painting activity. Children dip pieces of bubble wrap into paint and press them onto paper to reveal fun, textured patterns that pop with color and imagination. As they explore the bumpy surface, they engage their senses, strengthen fine motor skills, and learn about texture and repetition in art.
Materials:
Bubble wrap (cut into small sheets or shapes), washable paint, paper plates (for paint), white cardstock or large sheets of paper, tape (optional), smocks or aprons
How to Do It:
- Cut bubble wrap into small squares or fun shapes like hearts, circles, or stars.
- Pour bright washable paints onto paper plates and set out sheets of white cardstock for printing.
- Show children how to dip the bubble wrap into paint and press it onto the paper to make colorful textured patterns.
- Encourage them to try different colors and layering effects, watching how patterns overlap and blend.
- Talk about what they see and feel by asking, “What does it feel like?” or “What happens when two colors mix?”
- Once finished, let the artwork dry flat—when the paint sets, the bubbly textures look even more amazing.
- Display their masterpieces on the wall or use them to decorate classroom bulletin boards for a vibrant touch of creativity.
Variations:
- Tape bubble wrap around a rolling pin or cardboard tube for rolling textures.
- Cut bubble wrap into seasonal shapes (e.g., snowflakes or leaves) for themed prints.
- Pair the activity with a book about textures or the five senses.
14. Paper Plate Tambourines
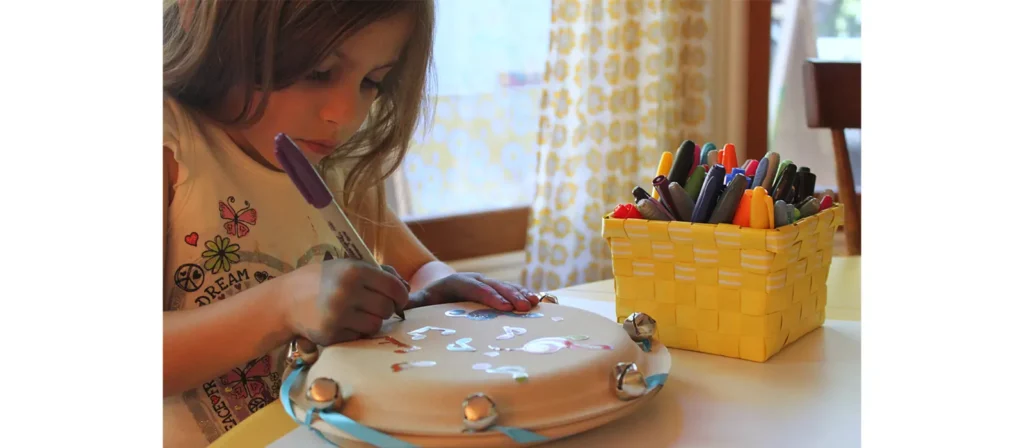
Activity Overview:
Bring rhythm and laughter to the classroom with this joyful Paper Plate Tambourines activity. Children decorate two paper plates with colorful paints, stickers, or drawings, then fill them with a few dried beans or beads before sealing them together. Once finished, they can shake their handmade tambourines to make cheerful music that fills the room with sound and smiles.
Materials:
Paper plates (2 per child), dry beans or pasta, stapler or glue, markers or crayons, stickers, ribbon or yarn (optional), hole punch
How to Do It:
- Prepare two paper plates for each child and set out markers, stickers, and paints for decoration.
- Invite children to decorate the bottom sides of their plates with bright colors and fun designs—this is their very own musical instrument.
- Place a small handful of dried beans or pasta on one plate, then cover it with the second plate, decorated sides facing out.
- Help seal the edges with a stapler or glue to trap the contents securely inside.
- For extra fun, punch small holes around the edges and let children tie colorful ribbons or yarn for movement and flair.
- Once the tambourines are ready, gather everyone for a rhythm circle or mini parade and let the joyful music begin.
- Encourage kids to experiment with different sounds by shaking gently, tapping, or moving to the beat.
Variations:
- Try using bells or buttons inside for different sounds.
- Add a name label and use it during music time or performances.
- Explore sound differences with various fillings — rice, beads, or pebbles.
15. Paper Bag Puppets
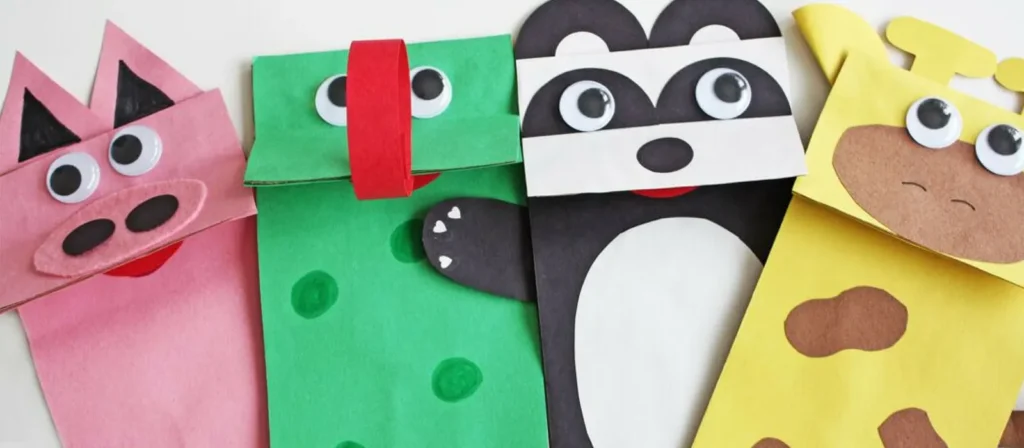
Activity Overview:
Let imagination take center stage with this delightful Paper Bag Puppets activity. Children turn simple paper bags into charming characters using markers, yarn, googly eyes, and bits of colored paper. As they design their puppets such as animals, people, or storybook friends, they develop creativity, storytelling skills, and fine motor coordination while expressing their emotions through art.
Materials:
Brown or white paper lunch bags, construction paper scraps, glue sticks, crayons or markers, googly eyes, yarn, scissors (child-safe), stickers or buttons (optional)
How to Do It:
- Prepare paper bags, colorful paper scraps, yarn, googly eyes, glue, and markers on the table.
- Let children choose a paper bag and start by decorating the flap to make their puppet’s face.
- Encourage them to add googly eyes, yarn hair, and paper cutouts for mouths, ears, or hats.
- Decorate the lower part of the bag as clothing, adding details like buttons, arms, or accessories.
- Once dry, have children slip their hands inside the bags and bring their puppets to life through playful storytelling.
- Pair children to perform mini puppet shows together and encourage them to give voices to their characters.
- Create a classroom puppet theater corner so their new friends can star in many future adventures.
Variations:
- Assign themes like animals, community helpers, or favorite storybook characters.
- Add yarn or ribbon hair for texture.
- Create a puppet theater corner using a cardboard box and curtains for extended imaginative play.
16. Tissue Paper Suncatchers

Activity Overview:
Fill the classroom with color and light through this enchanting Tissue Paper Suncatchers activity. Children use pieces of colorful tissue paper, clear contact paper, and simple shapes like hearts, stars, or circles to create beautiful window art that glows in the sunlight. As they layer and arrange the colors, they learn about transparency, color blending, and composition while strengthening their fine motor and visual-spatial skills.
Materials:
Clear contact paper or laminating sheets, tissue paper in various colors (cut into small squares), black construction paper (for frames), scissors (child-safe), tape
How to Do It:
- Prepare black paper frames by cutting simple shapes like hearts, stars, or circles, and remove the centers.
- Peel the backing off a piece of clear contact paper and place it sticky-side up on the table.
- Position the black frame on top and press it gently to secure it in place.
- Invite children to fill the inside with colorful tissue paper squares, overlapping the pieces to see how new colors appear.
- Once their design is complete, cover it with another piece of contact paper to seal the suncatcher.
- Trim any extra edges, then tape the finished artwork to a sunny window.
- Watch as sunlight shines through, turning the classroom into a rainbow-filled gallery of glowing colors.
Variations:
- Use seasonal shapes — pumpkins for fall, eggs for spring, or snowflakes for winter.
- Let kids create abstract, free-form designs without a frame.
- Incorporate glitter or sequins for extra sparkle.
17. Salt Dough Handprints
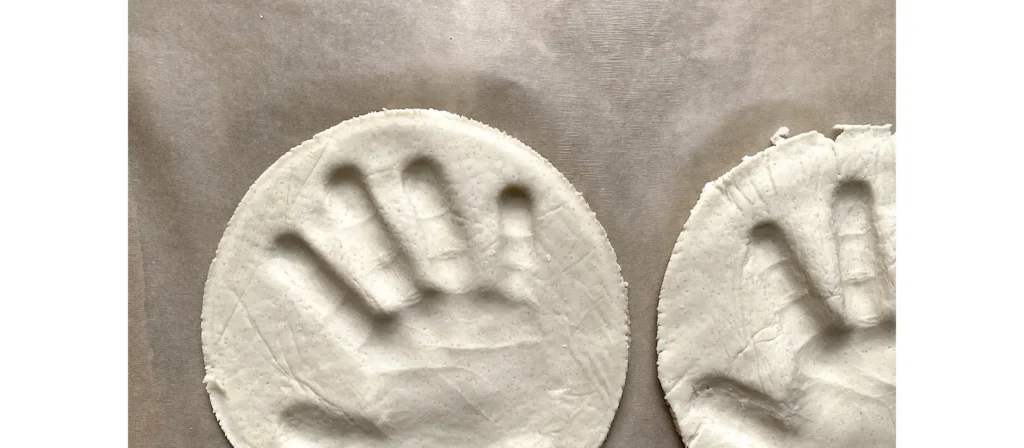
Activity Overview:
Capture a precious moment in time with this heartfelt Salt Dough Handprints activity. Children mix simple ingredients like flour, salt, and water to make soft dough, then press their tiny hands into it to create lasting impressions. After baking and decorating with paint or glitter, each handprint becomes a beautiful keepsake that celebrates growth, creativity, and the joy of making something by hand.
Materials:
Flour, salt, water, mixing bowl, rolling pin, baking tray, paint, paintbrushes, clear sealant (optional), ribbon or string (optional for hanging)
Setup:
- Pre-mix the salt dough or let the children help by putting in 2 cups flour, 1 cup salt, and 1 cup warm water. Mix and knead until smooth.
- Set out rolling pins and small mats or trays to work on.
- Preheat oven to 200°F (90°C) if baking to harden.
Activity Instructions:
- Roll out a piece of dough for each child, about ½ inch thick.
- Help them press their hand firmly into the dough to make a deep handprint.
- If the piece will be hung later, use a pencil or straw to make a small hole at the top.
- Bake for 1–2 hours or let air dry over several days.
- Once dry, children can paint their handprints in any color they like. Seal with clear spray for durability if desired.
Variations:
- Write the child’s name and date in the dough before baking for a lasting memory.
- Add glitter paint or metallic finishes for a fancy effect.
- Turn it into a gift for Mother’s or Father’s Day with a message like “Hands Down, You’re the Best!”
18. Dancing Ribbon Wands
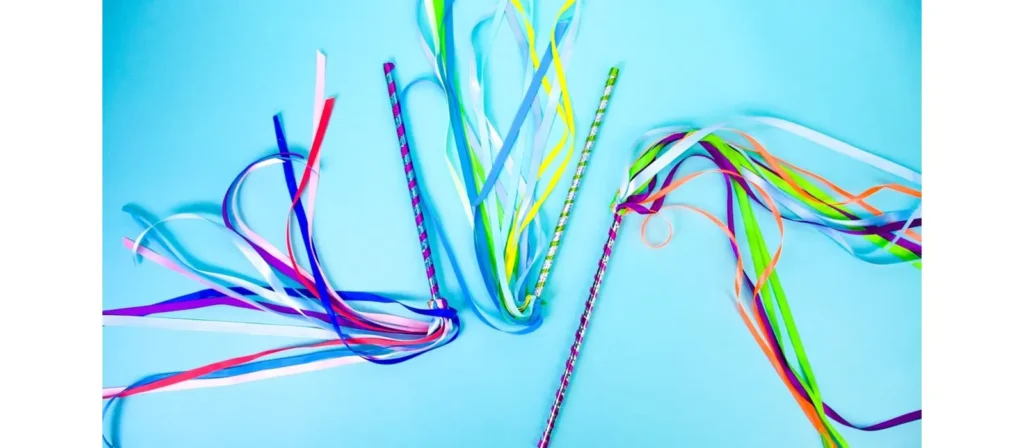
Activity Overview:
Add movement, color, and joy to the classroom with this lively Dancing Ribbon Wands activity. Children decorate sticks or dowels with bright ribbons, streamers, or fabric strips, then twirl and dance as their wands flutter through the air. As they wave and spin, they strengthen gross motor skills, coordination, and rhythm while expressing themselves through motion and music.
Materials:
Wooden dowels or craft sticks, ribbon or crepe paper streamers (various colors), glue or tape, scissors (child-safe), stickers or markers for decorating handles
How to Do It:
- Mix 2 cups of flour, 1 cup of salt, and 1 cup of warm water in a bowl until the dough is smooth and easy to knead.
- Give each child a small piece of dough and let them roll it out to about half an inch thick on a mat or tray.
- Help them press their hand firmly into the dough to make a deep, clear handprint.
- If the piece will be hung, use a straw or pencil to poke a small hole near the top.
- Bake the handprints at 200°F (90°C) for 1–2 hours, or let them air dry over a few days until hard.
- Once dry, children can paint their creations with bright colors, add glitter for sparkle, and even write their names or the date.
- Seal with a clear spray for lasting shine, then tie a ribbon through the hole to hang it as a precious keepsake or family gift.
Variations:
- Use seasonal colors to create themed wands (e.g., red and green for holidays, pastels for spring).
- Add bells to the ends of the ribbons for a musical element.
- Turn it into a performance: create a simple group routine and let them “perform” for parents or other classes.
19. Silly Monster Puppets
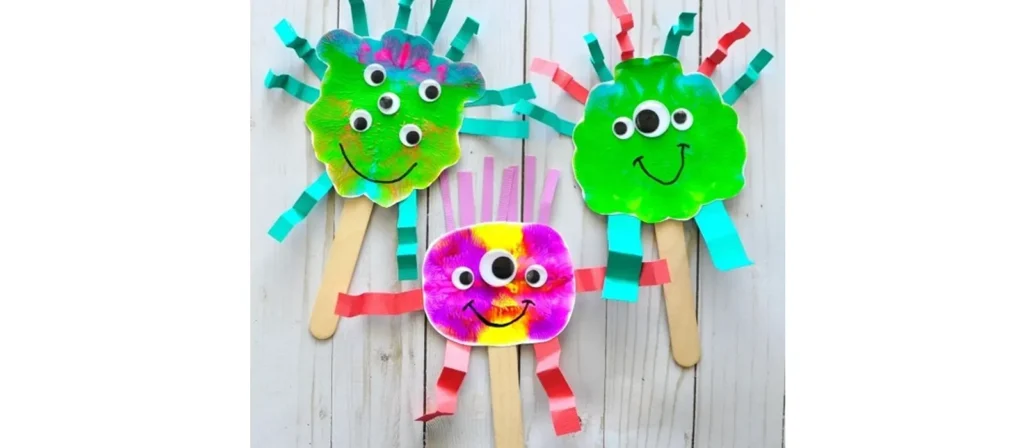
Activity Overview:
Bring giggles and creativity to art time with this playful Silly Monster Puppets activity. Children use colorful paper, yarn, googly eyes, and craft sticks to design their own friendly monsters with funny faces, spiky hair, and wobbly eyes. As they cut, glue, and decorate, they strengthen fine motor skills, experiment with colors and shapes, and discover how imagination can turn ordinary materials into extraordinary creations.
Materials:
Paper lunch bags, construction paper, glue sticks, markers or crayons, pom poms, googly eyes, yarn, scissors (child-safe), foam shapes or pipe cleaners (optional)
How to Do It:
- Prepare paper bags, colorful paper shapes, googly eyes, pom poms, yarn, and glue for each child.
- Show how the flap of the paper bag can become the monster’s mouth, then let children start decorating.
- Encourage them to glue on eyes in any number they like and add fun details like spiky hair, horns, arms, or big teeth.
- Let them use markers or crayons to draw silly smiles, wiggly tongues, or tiny spots for extra personality.
- As they work, ask fun questions such as “What’s your monster’s name?” or “Does it roar or laugh?”
- Once finished, gather the group for a monster puppet show where each child can perform with their silly new friend.
- Celebrate their creativity by displaying the puppets or creating a “Monster of the Week” wall to introduce everyone’s creations.
Variations:
- Theme the monsters for specific lessons (e.g., emotion monsters for SEL learning).
- Use felt instead of paper for a textured version.
- Make a “Monster of the Week” wall display where each child introduces their character.
20. Coffee Filter Planet Art

Activity Overview:
Take young learners on an out-of-this-world adventure with this mesmerizing Coffee Filter Planet Art activity. Children color round coffee filters with markers, then lightly mist them with water to watch the colors blend and swirl like real galaxies. Once dry, they can cut out and label their colorful “planets,” turning simple materials into a stunning solar system full of imagination and discovery.
Materials:
Round coffee filters, washable markers, spray bottles or small cups of water with droppers, paper towels, foil or trays, black construction paper (optional for background), glue
How to Do It:
- Flatten coffee filters on trays or foil so they are ready for coloring.
- Give children washable markers and let them fill the filters with bright circular designs that look like planets.
- When finished, spray the filters lightly with water or use droppers to wet the surface and watch the colors swirl together.
- Allow the filters to dry completely for one to two hours until the watercolor effect appears.
- Once dry, cut out the colorful planets and glue them onto black paper to create a mini solar system.
- Encourage children to name their planets or add stars and fun space facts around them.
- Display the finished artwork on the classroom wall to create a dazzling galaxy full of imagination and discovery.
Variations:
- Turn it into a solar system project by making multiple planets and placing them in orbit.
- Use white crayons to draw on the filters first for a hidden “resist” effect.
- Add glitter glue for a galaxy sparkle.
21. Nature Mandalas

Activity Overview:
Invite peace, focus, and creativity into the classroom with this beautiful Nature Mandalas activity. Children gather natural materials such as leaves, petals, stones, and twigs, then arrange them in circular patterns to create stunning mandalas that celebrate balance and harmony in nature. As they carefully place each piece, they strengthen concentration, pattern recognition, and an appreciation for the beauty found outdoors.
Materials:
Leaves, petals, sticks, small stones, pinecones, acorns, bark, paper circles or cardboard bases (optional), glue (optional for permanent display)
How to Do It:
- Take children on a short nature walk to collect safe and interesting materials such as leaves, petals, stones, and twigs.
- Provide paper or cardboard circles as bases, or let children create directly on the ground or table for a more natural feel.
- Explain that a mandala begins in the center and grows outward in patterns or circles.
- Invite children to place one object in the center, then build outward by arranging similar items in repeating or symmetrical designs.
- Encourage them to observe textures and colors while working by asking, “How does this leaf feel?” or “What shapes do you notice?”
- When the mandalas are finished, display them indoors or take photos before nature reclaims the materials.
- Celebrate their creativity by discussing how each mandala is unique, just like the natural world it was made from.
Variations:
- Use seasonal materials — flowers in spring and colorful leaves in autumn.
- Add personal touches like painted rocks or labeled items.
- Turn into a group project: one large mandala made with collective teamwork.
Safety and Clean-Up Tips for Craft Time
Even the best arts and crafts for preschoolers can turn into a mess if we’re not prepared. With the proper structure and habits, you can encourage creativity without worrying about spills, stains, or sticky fingers.

Setting Boundaries Before the Fun Begins
- Crafting zones: Use dedicated tables or washable mats
- Aprons or old T-shirts: A must-have for preschoolers
- Establish “clean hands” rules before glue or paint
Using Safe, Age-Appropriate Materials
- Always opt for non-toxic, washable supplies
- Avoid sharp tools, minor choking hazards, or allergenic materials
- Store hazardous materials out of reach
Teaching Clean-Up as Part of the Activity
- Use color-coded bins for organizing materials
- Create fun songs or routines around cleaning
- Assign mini “clean-up leaders” for each table
How Arts and Crafts Support Montessori & Reggio Learning
The philosophies behind Montessori and Reggio Emilia strongly support arts and crafts for preschoolers — not just as an art form but as a way of learning, expressing, and understanding the world.
Fostering Independence Through Hands-On Work
- Children choose materials and complete tasks at their own pace
- Self-directed projects build autonomy and confidence
- Tools and supplies are accessible at the child’s height
Encouraging Observation and Nature-Inspired Creativity
- Reggio Emilia emphasizes natural materials and sensory exploration
- Nature walks, and loose-part play connect art to the real world
- Seasonal crafting reinforces rhythms and cycles of life
Supporting Cognitive Development Through Repetition and Routine
- Repetition of fine motor actions helps build brain pathways
- Rituals around arts and crafts build order, patience, and focus
- Montessori materials can include craft extensions (e.g., pin-punching, tracing)
Budget-Friendly Crafting: Tips for Preschools and Kindergartens
High-quality arts and crafts for preschoolers don’t require a big budget. With a bit of creativity and planning, you can provide meaningful art experiences without breaking the bank.
Use Recycled and Everyday Materials
- Toilet paper rolls, bottle caps, cereal boxes, and fabric scraps
- Partner with parents for donation bins
- Teach sustainability through reuse
Buy in Bulk and Organize Smartly
- Source basic supplies (glue, paper, brushes) from wholesale vendors
- Store by category and color for quick access
- Laminate commonly used templates for repeat use
Plan Thematic Units in Advance
- Align crafts with seasons, holidays, or lesson topics
- Reuse crafts across age levels with slight variations
- Keep a binder of printable templates and instructions for your team
Conclusion
Arts and crafts for preschoolers are more than just a fun part of the day — they are essential for developing fine motor skills, encouraging emotional expression, and sparking a lifelong love of creativity. Whether you’re a teacher, school owner, or parent, offering children the freedom to create with their hands builds confidence, connection, and curiosity.
Behind every successful craft space is a thoughtfully designed environment. At West Shore Furniture, we specialize in creating those environments. With over 20 years of experience in preschool furniture manufacturing and supply, we offer a full-service solution—from classroom layout and furniture customization to production, quality control, and delivery. Our product range includes various preschool furniture in different styles, materials, and sizes to meet the diverse needs of early learning spaces.
When you’re ready to elevate your art areas or redesign your preschool space to inspire even more creativity, we’re here to help — because the right environment makes all the difference.