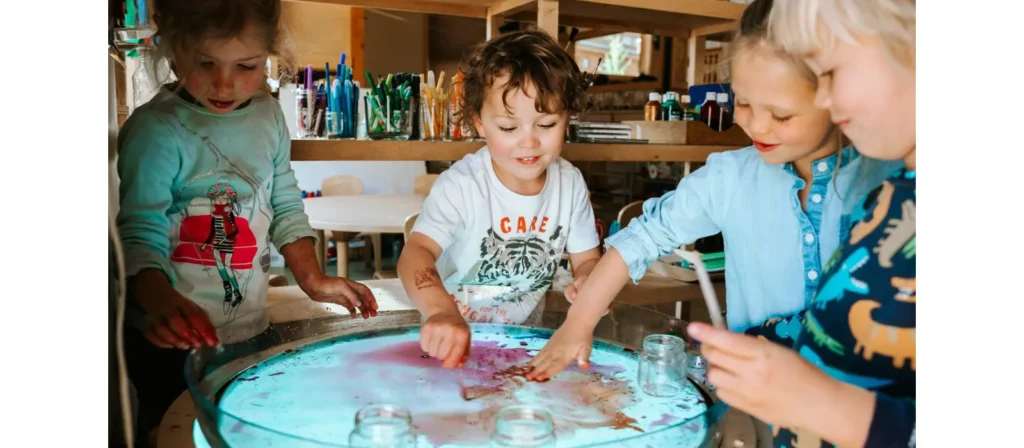
Do you know how to help preschoolers develop their artistic and creative abilities at school? One of the most popular kindergarten classes is crafts, which allows children to freely explore and create art and enjoy this special creative moment. This is where arts and crafts for preschoolers truly shine.
Through arts and crafts for preschoolers, they can explore their imaginations, improve fine motor skills, develop cognitive abilities, and express themselves creatively. Learning new skills and repeated exposure to art supplies builds confidence, which impacts future development.
In this article, I’ll show you 21 of the best preschool and daycare craft projects—easy, fun, and educational. Introducing arts and crafts for preschoolers opens up a world of imaginative and meaningful play.
Lavoretti per la scuola materna: più di una semplice attività divertente
Nel mondo prescolare, si discute spesso se l'artigianato abbia un ruolo nell'educazione della prima infanzia. È vero che l'artigianato e l'arte sono diverse, ma l'arte riguarda creatività aperta, mentre l'artigianato in genere ha un risultato prefissato, entrambi hanno valore in un curriculum completo.
L'arte permette ai bambini di esplorare liberamente materiali, colori e texture senza vincoli, concentrandosi sul processo piuttosto che sul prodotto finale. Questo è essenziale per promuovere la creatività e l'espressione di sé. Tuttavia, l'artigianato offre i suoi vantaggi unici. Aiuta a sviluppare le capacità motorie fini e a rafforzare concetti come riconoscimento di colori e forme, e può supportare temi di apprendimento più ampi. Se svolti a casa con un adulto attento, i lavoretti diventano un'attività unica che crea legami, creando ricordi significativi.
Rather than viewing crafts as limiting, we should see them as complementing open-ended art experiences. A balance of both ensures that children are free to create while gaining valuable skills through structured activities.
Qui esploriamo i 21 migliori lavoretti per la scuola materna, perfetti per le manine dei più piccoli.
21 migliori lavoretti per la scuola materna
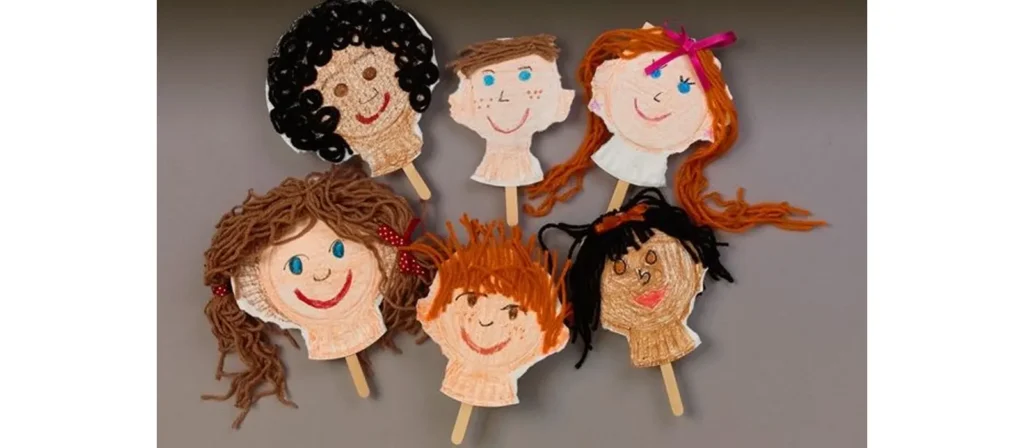
1. Facce di piatti di carta
Panoramica delle attività:
Turn ordinary paper plates into a gallery of joyful expressions with this delightful Paper Plate Faces activity. Children can draw, paint, or glue on yarn, buttons, and colored paper to create funny, happy, or even curious faces that reflect their emotions. Through this creative process, they begin to understand feelings, develop empathy, and strengthen their fine motor skills while having fun with textures and shapes.
Materiali:
Piatti di carta, pennarelli, filato, colla, decorazioni assortite (adesivi, occhietti finti, pompon)
Come farlo:
- Set up a cheerful crafting station by laying out paper plates, markers, glue, and all sorts of fun decorations within easy reach.
- Give each child their own plate and invite them to design a face that shows an emotion such as happy, silly, surprised, or sleepy.
- Show them how to draw simple features, then let them freely add yarn hair, googly eyes, or stickers to bring their creations to life.
- Chat as they work by asking questions like “What feeling does your face have?” or “Can you make that expression too?”
- When the masterpieces are dry, turn your classroom into a Face Gallery or let the children take their smiling plates home to share.
Varianti:
Utilizza piatti di diverse dimensioni per creare un gruppo di "famiglie di volti" espressive: un'aggiunta perfetta alle attività artistiche e artigianali a tema per i bambini in età prescolare.
2. Binocolo fai da te

Panoramica delle attività:
Spark curiosity and adventure with this charming DIY Binoculars craft. Using cardboard tubes, colorful paper, string, and a touch of imagination, children can create their very own pair of pretend binoculars. As they decorate and assemble their masterpiece, they strengthen hand-eye coordination, fine motor skills, and creativity while learning about observation and exploration.
Materiali:
Due rotoli di carta igienica vuoti per bambino, nastro adesivo o colla, spago o filo, perforatrice, pastelli o pennarelli, adesivi, carta colorata (facoltativo)
Come farlo:
- Get your creative corner ready with cardboard tubes, colorful paper, tape, glue, and string.
- Give each child two rolls and invite them to decorate using markers, crayons, stickers, or paper wraps to make their binoculars uniquely theirs.
- Help them tape or glue the rolls together to form the binocular shape.
- Show how to thread yarn through the holes and tie knots to create a neck strap, introducing safe tool use in a fun way.
- Encourage kids to go on a pretend “explorer walk” around the classroom or playground, observing everything they can spot.
- Ask playful questions such as “What did you find?” or “Can you see something that starts with the letter B?”
- When finished, let them share their discoveries and show off their colorful binoculars to friends and family.
Varianti:
- Per i binocoli giganti, utilizzare rotoli di carta assorbente tagliati a metà.
- Trasforma questo lavoretto in un gioco organizzando una caccia al tesoro in cui i bambini devono "individuare" gli oggetti nascosti.
- Abbinalo a libri o canzoni sulla natura o sull'esplorazione per arricchire le sessioni artistiche e artigianali tematiche per i bambini in età prescolare.
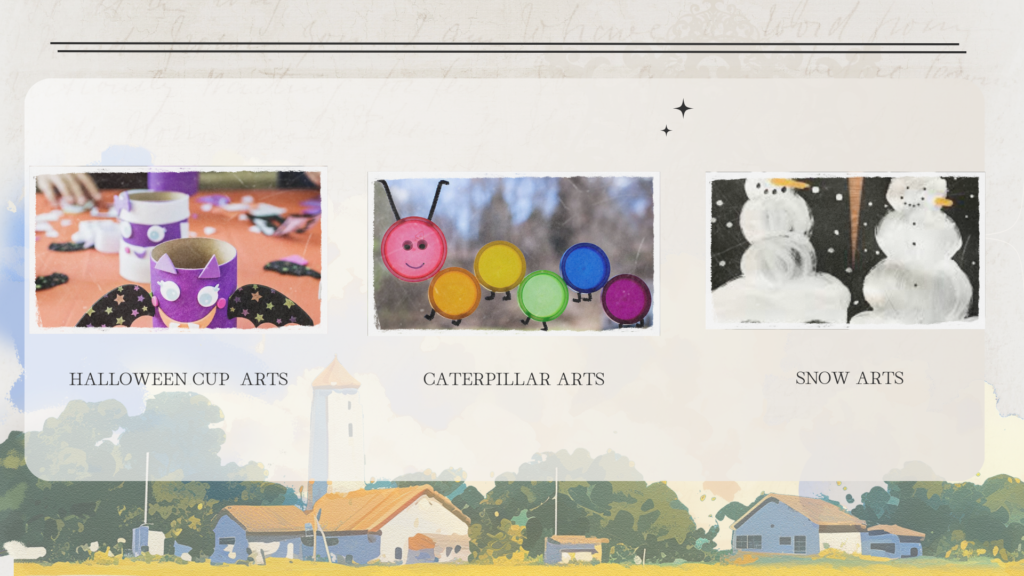
3. Facile lavoretto con la zucca

Panoramica delle attività:
Celebrate the cozy spirit of autumn with this adorable Easy Pumpkin Craft. Using orange paper, glue, and a little creativity, children can cut, roll, or layer pieces to form their own bright, cheerful pumpkins. As they work with shapes and colors, they strengthen fine motor skills, practice hand coordination, and learn basic concepts like size and pattern.
Materiali:
Orange construction paper, green construction paper, scissors (child-safe), glue sticks, black markers, optional: googly eyes, yarn, glitter.
Come farlo:
- Prepare a cozy crafting table with orange and green paper, glue sticks, scissors, and fun extras like googly eyes or glitter.
- Give each child orange paper circles or strips and guide them to glue the pieces together into a round pumpkin shape.
- Show how to add a green paper stem and let them draw a face using markers.
- Encourage them to decorate their pumpkins with yarn vines, sparkly glitter, or funny eyes to make each one special.
- Chat as they create by asking, “What kind of face will your pumpkin have? Happy or spooky?”
- After drying, use their adorable pumpkins to decorate a classroom wall or create a cheerful pumpkin patch for everyone to enjoy.
Varianti:
- Per ottenere una base più solida, prova a usare piatti di carta al posto del cartoncino.
- Trasformatelo in un lavoretto per insegnare ai bambini a riconoscere i loro nomi sulle zucche.
- Realizza delle mini zucche e crea una ghirlanda da appendere nella stanza.
4. Fascia per capelli a forma di tacchino

Panoramica delle attività:
Nothing captures the joy of fall quite like creating a colorful Turkey Headband. In this heartwarming craft, children use simple materials such as construction paper, feathers, and glue to design their own playful turkey crowns. As they cut, paste, and arrange the feathers, little hands strengthen fine motor skills while young minds practice color recognition and creativity.
This activity naturally invites storytelling and imagination. Children love pretending to be cheerful turkeys, moving around the classroom with laughter and excitement. It is also a wonderful opportunity to talk about gratitude, sharing, and the beauty of autumn traditions.
Materiali:
Cartoncino marrone, cartoncino rosso, arancione e giallo, forbici (sicure per bambini), colla o nastro adesivo, pastelli o pennarelli, occhietti finti (facoltativo), spillatrice
Come farlo:
- Get the table ready with brown paper strips, colorful paper feathers, glue, and markers.
- Help each child fit a brown strip around their head and secure it into a circle to form the headband base.
- Invite children to color and decorate their paper feathers, then glue them to the back of the headband.
- Show how to make a turkey face using paper shapes or googly eyes, and add a beak and red wattle for fun.
- Chat about Thanksgiving and encourage each child to share one thing they are thankful for.
- When finished, let them wear their festive headbands and waddle around like cheerful turkeys during a classroom parade.
Varianti:
- Aggiungi il nome del bambino sulla parte anteriore della fascia come divertente elemento di personalizzazione.
- Crea una piuma della gratitudine: chiedi a ogni bambino di scrivere o disegnare qualcosa per cui è grato su una piuma prima di attaccarla.
5. Strega della tazza di carta

Panoramica delle attività:
Bring a touch of Halloween magic to the classroom with this fun and imaginative Paper Cup Witch craft. Using simple materials like paper cups, construction paper, yarn, and markers, children can create their own friendly witches complete with pointy hats, bright eyes, and curly hair. As they cut, glue, and decorate, they strengthen fine motor skills and practice following steps, turning creativity into confidence.
Materiali:
Bicchieri di carta (verdi o bianchi), carta da costruzione nera, colla, forbici (sicure per bambini), filo o carta triturata (per i capelli), occhi finti, pennarelli o pastelli
Come farlo:
- Arrange paper cups, pre-cut witch hats, yarn hair, and black paper shapes on the table so everything is easy to reach.
- Give each child a paper cup and invite them to glue on googly eyes and draw a friendly witch face with markers.
- Help them add yarn or shredded paper hair, then top it with a pointy black hat for a magical touch.
- Wrap a small paper cape or collar around the cup to complete the witch’s outfit.
- As they create, ask fun questions such as “What kind of magic does your witch do?” or “Is your witch silly, spooky, or kind?”
- When finished, line up all the witches together for a charming Halloween display that’s full of personality.
Varianti:
- Aggiungere un piccolo manico di scopa utilizzando bastoncini di ghiacciolo e rafia o carta marrone.
- Trasformalo in un pupazzo di Halloween attaccando una cannuccia o un bastoncino al fondo della tazza.
- Incoraggiate i bambini a creare altri personaggi (fantasmi, zucche o maghi) per un'intera scena di Halloween.
6. Coni gelato con vernice gonfia
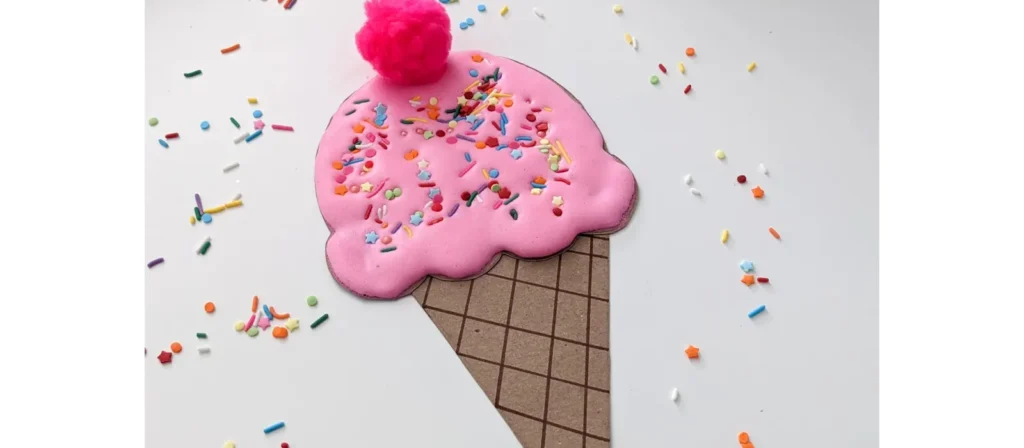
Panoramica delle attività:
Bring a scoop of sweetness into the classroom with this delightful Puffy Paint Ice Cream Cones craft. Using homemade puffy paint made from shaving cream and glue, children can swirl and spread “ice cream” on paper cones, then top them with sprinkles, glitter, or pom-poms for extra fun. As they mix colors and textures, they explore sensory play while strengthening hand control and creativity.
Materiali:
Schiuma da barba, colla bianca, colorante alimentare o vernice lavabile, carta da costruzione marrone (cono), cartoncino o carta bianca (sfondo), forbici, ciotole per mescolare, cucchiai
Come farlo:
- Start by mixing equal parts shaving cream and white glue in bowls, then add a few drops of food coloring or washable paint to create colorful “ice cream” puffy paint.
- Give each child a cone cutout and a sheet of cardstock to glue it on.
- Invite them to scoop, swirl, and spread the puffy paint above the cone to make their ice cream scoops.
- Encourage creativity by mixing colors, stacking tall cones, and talking about pretend flavors like strawberry, mint, or rainbow swirl.
- Let them sprinkle glitter, tiny paper dots, or pom-poms for extra toppings.
- Allow the artwork to dry overnight so the puffy texture stays firm, leaving behind a sweet, fluffy masterpiece that looks good enough to eat.
Varianti:
- Aggiungere granelli di polvere utilizzando brillantini o piccoli puntini di carta ritagliati.
- Trasforma i coni finiti in un'esposizione da parete chiamata "Le nostre idee più dolci!"
- Utilizzate una schiuma da barba profumata o aggiungete una goccia di vaniglia per un tocco multisensoriale.
7. Arte dello sfregamento delle foglie
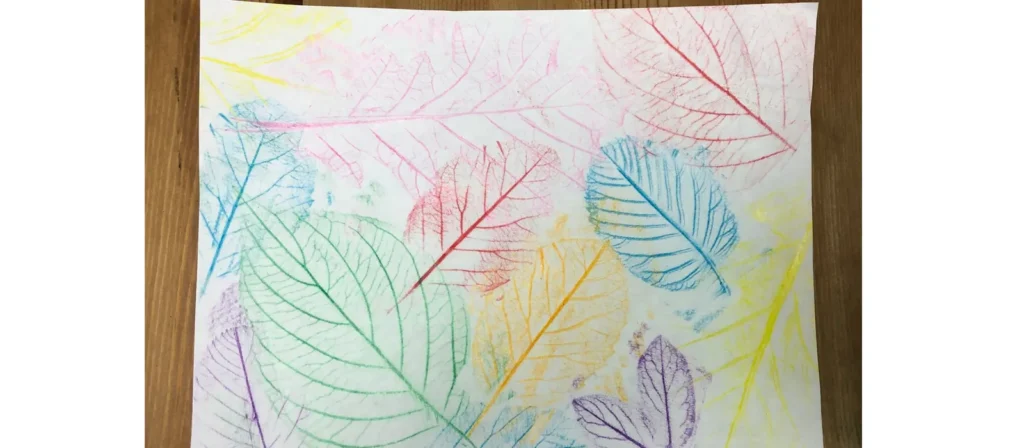
Panoramica delle attività:
Celebrate the beauty of nature with this enchanting Leaf Rubbing Art activity. Children can collect leaves of different shapes and sizes, place them under a sheet of paper, and gently rub crayons or colored pencils over the surface to reveal the delicate patterns and veins. As the hidden designs appear, little learners experience the wonder of discovery while developing fine motor control and observational skills.
Materiali:
Varie foglie (forme/dimensioni diverse), carta bianca, pastelli (con involucro rimosso), nastro adesivo (facoltativo), lavagne o superficie di lavoro piana
Come farlo:
- Take children outside to collect leaves of different shapes and sizes, or provide a set of pre-collected leaves at the table.
- Give each child a few leaves and show them how to place them vein-side up on a flat surface or clipboard.
- Lay a sheet of white paper over the leaves and demonstrate how to gently rub the side of a crayon to reveal the patterns beneath.
- Encourage kids to try different colors and leaf types, comparing the shapes and textures they uncover.
- Chat about nature as they work by asking, “What kind of tree do you think this leaf came from?” or “Why do leaves change color in fall?”
- Display their colorful rubbings around the classroom or turn them into bookmarks and greeting cards to celebrate the beauty of the season.
Varianti:
- Trasforma i calchi finiti in biglietti di auguri, segnalibri o decorazioni stagionali.
- Per un effetto più spettacolare, usate carta nera e pastelli chiari.
- Abbinalo a una semplice passeggiata nella natura e a una caccia al tesoro tra le foglie per una giornata a tema.
8. Creazioni fatte in casa con la pasta modellabile
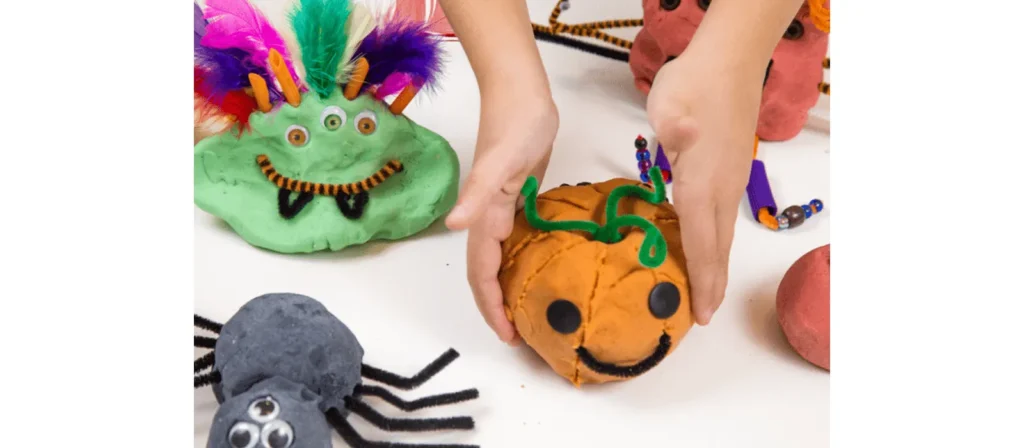
Panoramica delle attività:
There’s something truly magical about molding, rolling, and shaping with soft, colorful dough. In this joyful Homemade Playdough Creations activity, children make their own playdough using simple ingredients like flour, salt, and water, then use it to sculpt anything their imagination can dream up such as animals, food, or playful patterns. The process engages all their senses while building fine motor strength, creativity, and focus.
Materiali:
Farina, sale, cremor tartaro, acqua, olio vegetale, colorante alimentare (o pasta modellabile già pronta), ciotole, cucchiai, strumenti per modellare adatti ai bambini (coltelli di plastica, formine per biscotti, mattarelli)
Come farlo:
- Prepare colorful playdough ahead of time or let children join in the fun of making it themselves by mixing flour, salt, water, oil, and food coloring.
- Once the dough is ready and cool, divide it into different colors and place it on trays or mats for easy shaping.
- Provide rolling pins, cookie cutters, and plastic tools so children can mold animals, letters, or their favorite foods.
- Encourage creativity by asking playful questions such as “What are you making today?” or “Can you shape your name out of dough?”
- Let them explore textures, colors, and shapes freely, building both imagination and fine motor skills along the way.
- When finished, store the dough in sealed containers so it can be used again for more creative sessions throughout the week.
Varianti:
- Aggiungi oli essenziali (come lavanda o menta piperita) per un tocco sensoriale rilassante.
- Per un tema incentrato sulla natura, inserite elementi naturali come ramoscelli, pietre o foglie.
- Utilizzate ritagliatori per collegare l'attività ai primi concetti matematici come modelli o geometria.
9. Il bruco mai sazio
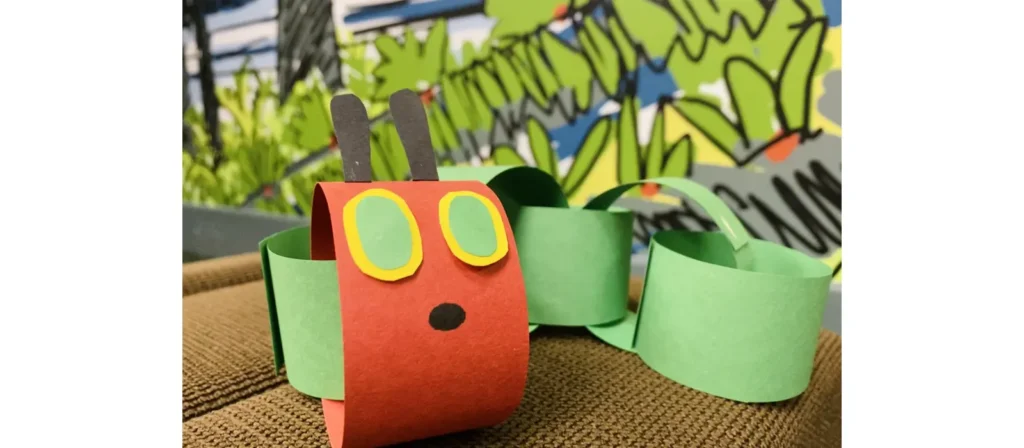
Panoramica delle attività:
Bring Eric Carle’s beloved story to life with this charming The Very Hungry Caterpillar Craft. Using colorful paper circles, glue, and googly eyes, children can create their own friendly caterpillar while recalling each part of the story. As they cut, count, and arrange the pieces, they strengthen fine motor skills, practice sequencing, and develop early literacy through storytelling connections.
Materiali:
Cartoncino colorato (rosso e verde), stick di colla, forbici (sicure per bambini), pennarello nero, occhietti finti, piatti di carta (facoltativi per l'esposizione), copie del libro (facoltative)
Come farlo:
- Begin by reading Il bruco molto affamato together or watching a short video version to spark children’s imagination.
- Give each child a set of green circles for the body and one red circle for the head.
- Show them how to glue the circles in a line to form the caterpillar, then add googly eyes, a smile, and antennae using a marker or paper strips.
- Encourage counting and sequencing by asking, “How many green circles did you use?” or “What did the caterpillar eat first?”
- Once finished, display the adorable caterpillars on a bulletin board or let children take them home as a fun reminder of the story.
- For added creativity, invite them to make the butterfly stage next, connecting art with storytelling and learning.
Varianti:
- Aggiungere un elemento di conteggio numerando ogni cerchio verde.
- Crea un murale sul ciclo di vita con gli stadi del bruco, del bozzolo e della farfalla.
- Per un aspetto più soffice, usate batuffoli di cotone al posto dei cerchi di carta.
10. Girasoli con impronte di mani
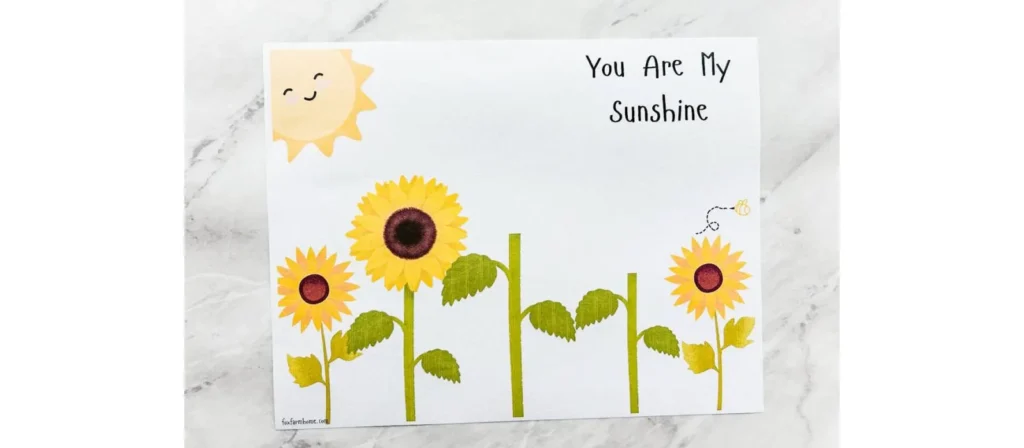
Panoramica delle attività:
Fill the classroom with sunshine and smiles through this beautiful Handprint Sunflowers activity. Children trace and paint their hands to form bright yellow petals, then add a brown center and a green stem to complete their cheerful sunflowers. As they press their colorful handprints onto the paper, they build fine motor strength, explore symmetry and color blending, and experience the joy of creating something uniquely their own.
Materiali:
Cartoncino giallo e verde, cerchi di carta marrone (o pirottini per cupcake), colla, forbici (sicure per bambini), matita, pennarello nero, facoltativo: veri semi di girasole
Come farlo:
- Get your table ready with yellow, green, and brown paper, glue, pencils, and scissors.
- Help children trace their hands several times on yellow paper and cut them out to form bright sunflower petals.
- Glue a brown circle or cupcake liner in the center of the page to make the flower’s middle.
- Invite kids to arrange and glue their handprint petals around the center to create a full, sunny bloom.
- Add a green stem and leaves to finish the sunflower.
- For extra fun, glue real sunflower seeds in the middle to give it a textured look.
- When all the flowers are done, display them together to form a cheerful classroom “garden” that shines with creativity and color.
Varianti:
- Scrivi il nome di ogni bambino su un petalo e trasformalo in un'esposizione di "orto di classe".
- Per una versione più disordinata e tattile, usa la vernice per creare dei petali con le impronte delle mani.
- Create un'attività di conteggio chiedendo ai bambini di contare i petali utilizzati.
11. Collage arcobaleno
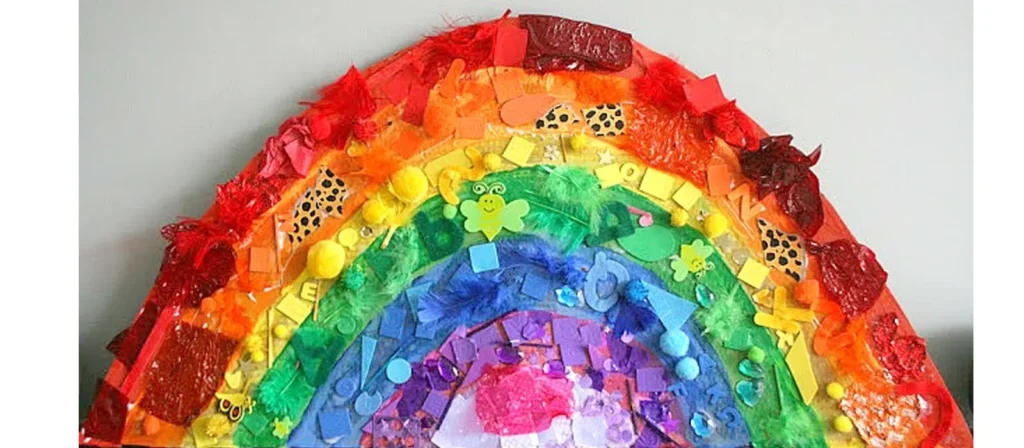
Panoramica delle attività:
Brighten the classroom with color and creativity through this joyful Rainbow Collage activity. Children use scraps of paper, tissue, fabric, or any colorful materials to build their very own rainbows. As they sort, cut, and glue each color into place, they practice fine motor coordination, color recognition, and sequencing while expressing their individual creativity in a vibrant way.
Materiali:
Ritagli di carta da costruzione colorata (o carta velina), stick di colla, carta bianca o cartoncino, batuffoli di cotone, forbici (sicure per i bambini), pastelli o pennarelli (facoltativo)
Come farlo:
- Get the table ready with sorted paper scraps or tissue pieces in rainbow color order, along with glue sticks, scissors, and cotton balls.
- Give each child a rainbow outline or let them draw their own on white paper or cardstock.
- Invite them to glue colorful scraps one by one, following the rainbow order and naming each color as they go.
- Add cotton balls at both ends to make soft, fluffy clouds that complete the rainbow.
- Encourage conversation by asking questions like “What comes after yellow?” or “Which color is your favorite?”
- Once dry, display the bright rainbows on a classroom wall or send them home to bring a little sunshine to family spaces.
Varianti:
- Per creare un arcobaleno a tema Giornata della Terra, usate materiali naturali come foglie e petali.
- Trasformalo in una versione 3D sovrapponendo materiali come filato, feltro o bottoni.
- Per una versione di gruppo più veloce, create dei mini arcobaleni su piatti di carta.
12. Alberi di impronte digitali

Panoramica delle attività:
Turn tiny fingerprints into a forest of creativity with this heartwarming Fingerprint Trees activity. Children use their fingertips dipped in colorful paint to create leaves, blossoms, or fruits on tree branches drawn or printed on paper. Each gentle press leaves a unique mark, helping them explore colors, patterns, and the beauty of individuality while developing fine motor coordination and sensory awareness.
Materiali:
Cartoncino bianco, pennarelli o pastelli marroni, vernice lavabile (colori autunnali o primaverili), piatti di carta o vassoi per vernice, salviette o ciotole per l'acqua per la pulizia
Come farlo:
- Prepare white cardstock with tree trunks and branches already drawn, or let children sketch their own using brown markers or crayons.
- Pour small amounts of washable paint onto paper plates—choose warm tones like red, yellow, and orange for fall, or fresh colors like green, pink, and purple for spring.
- Invite children to dip their fingertips lightly into the paint and press them along the branches to create colorful leaves or blossoms.
- Encourage them to experiment with different colors and pressure to see how each fingerprint looks unique.
- Talk together about the seasons by asking, “Do these colors remind you of autumn or spring?”
- Let the paintings dry and display them as a bright seasonal forest that celebrates every child’s individuality.
Varianti:
- Crea quattro alberi uno accanto all'altro per rappresentare le quattro stagioni.
- Per i bambini che preferiscono non usare le dita, usare cotton fioc o bastoncini di cotone.
- Per un dettaglio in più, aggiungi foglie che cadono attorno alla base o uccelli sui rami.
13. Dipingere con la pellicola a bolle
Panoramica delle attività:
Turn ordinary packaging into a burst of creativity with this exciting Bubble Wrap Painting activity. Children dip pieces of bubble wrap into paint and press them onto paper to reveal fun, textured patterns that pop with color and imagination. As they explore the bumpy surface, they engage their senses, strengthen fine motor skills, and learn about texture and repetition in art.
Materiali:
Pluriball (tagliato in piccoli fogli o forme), vernice lavabile, piatti di carta (per la vernice), cartoncino bianco o grandi fogli di carta, nastro adesivo (facoltativo), grembiuli o camice
Come farlo:
- Cut bubble wrap into small squares or fun shapes like hearts, circles, or stars.
- Pour bright washable paints onto paper plates and set out sheets of white cardstock for printing.
- Show children how to dip the bubble wrap into paint and press it onto the paper to make colorful textured patterns.
- Encourage them to try different colors and layering effects, watching how patterns overlap and blend.
- Talk about what they see and feel by asking, “What does it feel like?” or “What happens when two colors mix?”
- Once finished, let the artwork dry flat—when the paint sets, the bubbly textures look even more amazing.
- Display their masterpieces on the wall or use them to decorate classroom bulletin boards for a vibrant touch of creativity.
Varianti:
- Per creare delle texture, avvolgere il pluriball attorno a un mattarello o a un tubo di cartone.
- Tagliare il pluriball in forme stagionali (ad esempio fiocchi di neve o foglie) per ottenere stampe a tema.
- Abbina l'attività a un libro sulle texture o sui cinque sensi.
14. Tamburelli di piatti di carta
Panoramica delle attività:
Bring rhythm and laughter to the classroom with this joyful Paper Plate Tambourines activity. Children decorate two paper plates with colorful paints, stickers, or drawings, then fill them with a few dried beans or beads before sealing them together. Once finished, they can shake their handmade tambourines to make cheerful music that fills the room with sound and smiles.
Materiali:
Piatti di carta (2 per bambino), fagioli secchi o pasta, spillatrice o colla, pennarelli o pastelli, adesivi, nastro o filo (facoltativo), perforatrice
Come farlo:
- Prepare two paper plates for each child and set out markers, stickers, and paints for decoration.
- Invite children to decorate the bottom sides of their plates with bright colors and fun designs—this is their very own musical instrument.
- Place a small handful of dried beans or pasta on one plate, then cover it with the second plate, decorated sides facing out.
- Help seal the edges with a stapler or glue to trap the contents securely inside.
- For extra fun, punch small holes around the edges and let children tie colorful ribbons or yarn for movement and flair.
- Once the tambourines are ready, gather everyone for a rhythm circle or mini parade and let the joyful music begin.
- Encourage kids to experiment with different sounds by shaking gently, tapping, or moving to the beat.
Varianti:
- Prova a usare campanelli o pulsanti all'interno per ottenere suoni diversi.
- Add a name label and use it during music time or performances.
- Esplora le differenze sonore con vari ripieni: riso, perline o sassolini.
15. Burattini di carta
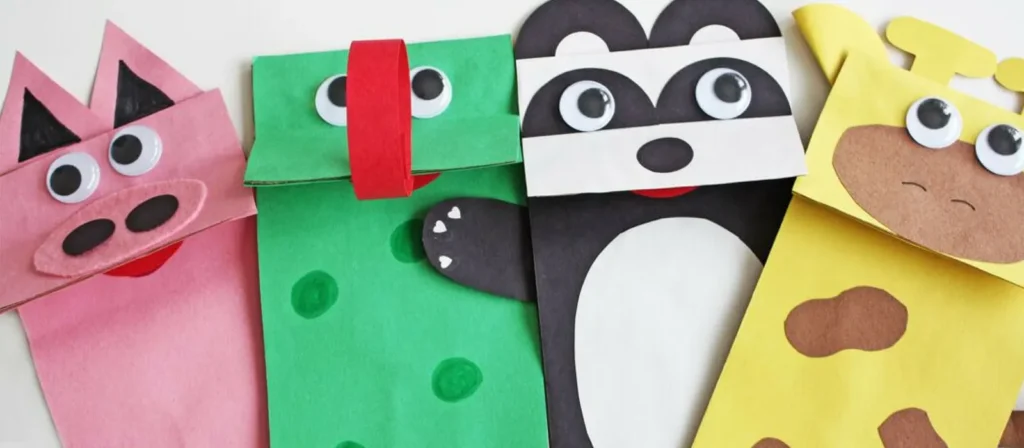
Panoramica delle attività:
Let imagination take center stage with this delightful Paper Bag Puppets activity. Children turn simple paper bags into charming characters using markers, yarn, googly eyes, and bits of colored paper. As they design their puppets such as animals, people, or storybook friends, they develop creativity, storytelling skills, and fine motor coordination while expressing their emotions through art.
Materiali:
Sacchetti per il pranzo in carta marrone o bianca, ritagli di carta da costruzione, stick di colla, pastelli o pennarelli, occhietti finti, filato, forbici (sicure per i bambini), adesivi o bottoni (facoltativo)
Come farlo:
- Prepare paper bags, colorful paper scraps, yarn, googly eyes, glue, and markers on the table.
- Let children choose a paper bag and start by decorating the flap to make their puppet’s face.
- Encourage them to add googly eyes, yarn hair, and paper cutouts for mouths, ears, or hats.
- Decorate the lower part of the bag as clothing, adding details like buttons, arms, or accessories.
- Once dry, have children slip their hands inside the bags and bring their puppets to life through playful storytelling.
- Pair children to perform mini puppet shows together and encourage them to give voices to their characters.
- Create a classroom puppet theater corner so their new friends can star in many future adventures.
Varianti:
- Assegna temi come animali, aiutanti della comunità o personaggi preferiti dei libri di fiabe.
- Aggiungere filato o nastri per capelli per dare consistenza.
- Crea un angolo dedicato al teatro delle marionette utilizzando una scatola di cartone e delle tende per prolungare il gioco di fantasia.
16. Acchiappasole di carta velina

Panoramica delle attività:
Fill the classroom with color and light through this enchanting Tissue Paper Suncatchers activity. Children use pieces of colorful tissue paper, clear contact paper, and simple shapes like hearts, stars, or circles to create beautiful window art that glows in the sunlight. As they layer and arrange the colors, they learn about transparency, color blending, and composition while strengthening their fine motor and visual-spatial skills.
Materiali:
Carta adesiva trasparente o fogli per laminazione, carta velina di vari colori (tagliata in piccoli quadrati), carta da costruzione nera (per cornici), forbici (sicure per bambini), nastro adesivo
Come farlo:
- Prepare black paper frames by cutting simple shapes like hearts, stars, or circles, and remove the centers.
- Peel the backing off a piece of clear contact paper and place it sticky-side up on the table.
- Position the black frame on top and press it gently to secure it in place.
- Invite children to fill the inside with colorful tissue paper squares, overlapping the pieces to see how new colors appear.
- Once their design is complete, cover it with another piece of contact paper to seal the suncatcher.
- Trim any extra edges, then tape the finished artwork to a sunny window.
- Watch as sunlight shines through, turning the classroom into a rainbow-filled gallery of glowing colors.
Varianti:
- Utilizza forme stagionali: zucche per l'autunno, uova per la primavera o fiocchi di neve per l'inverno.
- Lasciate che i bambini creino disegni astratti e liberi, senza cornice.
- Per un effetto extra-luccicante, aggiungi glitter o paillettes.
17. Impronte di mani in pasta di sale
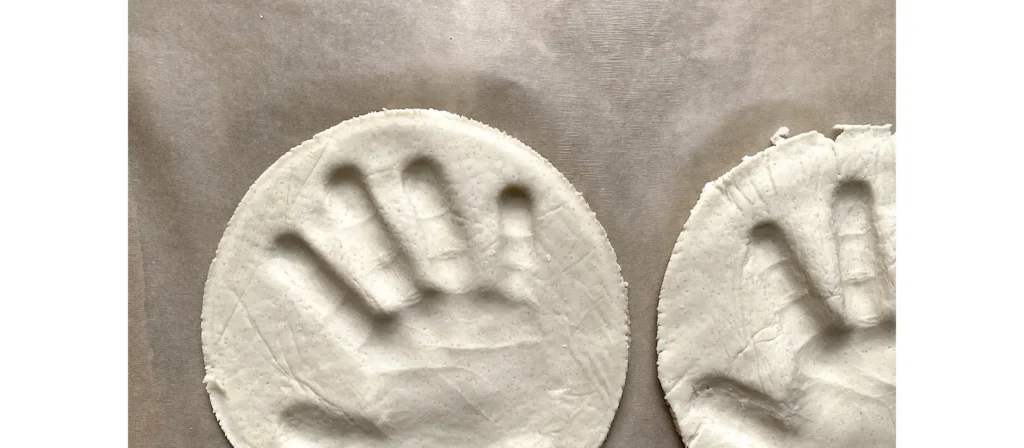
Panoramica delle attività:
Capture a precious moment in time with this heartfelt Salt Dough Handprints activity. Children mix simple ingredients like flour, salt, and water to make soft dough, then press their tiny hands into it to create lasting impressions. After baking and decorating with paint or glitter, each handprint becomes a beautiful keepsake that celebrates growth, creativity, and the joy of making something by hand.
Materiali:
Farina, sale, acqua, ciotola, mattarello, teglia, vernice, pennelli, sigillante trasparente (facoltativo), nastro o spago (facoltativo per appendere)
Impostare:
- Pre-impastare l'impasto di sale o lasciare che i bambini aiutino aggiungendo 2 tazze di farina, 1 tazza di sale e 1 tazza di acqua tiepida. Mescolare e impastare fino a ottenere un composto liscio.
- Preparate mattarelli e piccoli tappetini o vassoi su cui lavorare.
- Preriscaldare il forno a 90°C (200°F) se si desidera cuocerlo per farlo indurire.
Istruzioni per l'attività:
- Stendete un pezzo di pasta per ogni bambino, spesso circa 1,2 cm.
- Aiutali a premere con decisione la mano sull'impasto per lasciare un'impronta profonda.
- Se il pezzo verrà appeso in seguito, utilizzare una matita o una cannuccia per fare un piccolo foro nella parte superiore.
- Cuocere in forno per 1-2 ore o lasciare asciugare all'aria per diversi giorni.
- Una volta asciutte, le impronte delle mani dei bambini possono essere dipinte con qualsiasi colore a loro piacimento. Se lo si desidera, è possibile sigillarle con uno spray trasparente per una maggiore durata.
Varianti:
- Prima di infornare, scrivi il nome e la data del bambino sull'impasto per conservarne un ricordo duraturo.
- Per un effetto più elaborato, aggiungi vernice glitterata o finiture metalliche.
- Trasformalo in un regalo per la festa della mamma o del papà con un messaggio come "Senza dubbio, sei il migliore!"
18. Bacchette con nastro danzante
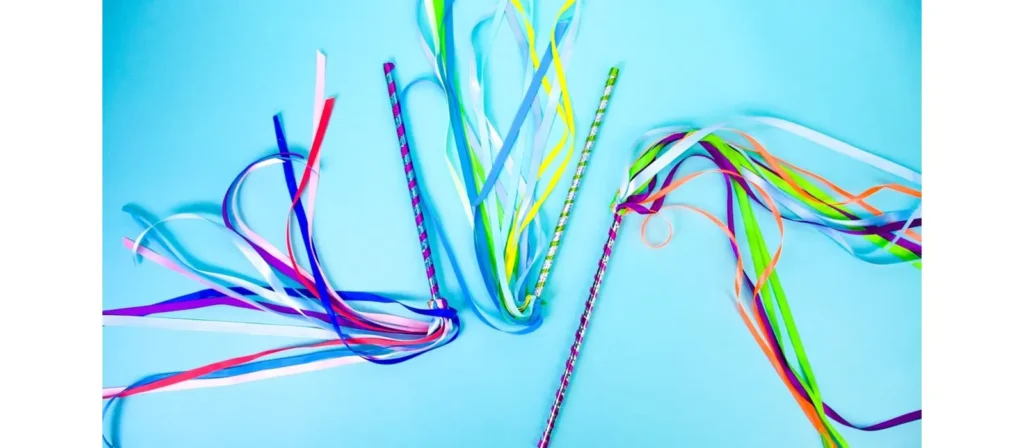
Panoramica delle attività:
Add movement, color, and joy to the classroom with this lively Dancing Ribbon Wands activity. Children decorate sticks or dowels with bright ribbons, streamers, or fabric strips, then twirl and dance as their wands flutter through the air. As they wave and spin, they strengthen gross motor skills, coordination, and rhythm while expressing themselves through motion and music.
Materiali:
Tasselli di legno o bastoncini per bricolage, nastri o festoni di carta crespa (di vari colori), colla o nastro adesivo, forbici (sicure per bambini), adesivi o pennarelli per decorare le maniglie
Come farlo:
- Mix 2 cups of flour, 1 cup of salt, and 1 cup of warm water in a bowl until the dough is smooth and easy to knead.
- Give each child a small piece of dough and let them roll it out to about half an inch thick on a mat or tray.
- Help them press their hand firmly into the dough to make a deep, clear handprint.
- If the piece will be hung, use a straw or pencil to poke a small hole near the top.
- Bake the handprints at 200°F (90°C) for 1–2 hours, or let them air dry over a few days until hard.
- Once dry, children can paint their creations with bright colors, add glitter for sparkle, and even write their names or the date.
- Seal with a clear spray for lasting shine, then tie a ribbon through the hole to hang it as a precious keepsake or family gift.
Varianti:
- Per creare bacchette a tema, usate colori stagionali (ad esempio, rosso e verde per le festività, colori pastello per la primavera).
- Add bells to the ends of the ribbons for a musical element.
- Trasformalo in uno spettacolo: crea una semplice routine di gruppo e lascia che i bambini si "esibiscano" per i genitori o per altre classi.
19. Burattini mostruosi e sciocchi
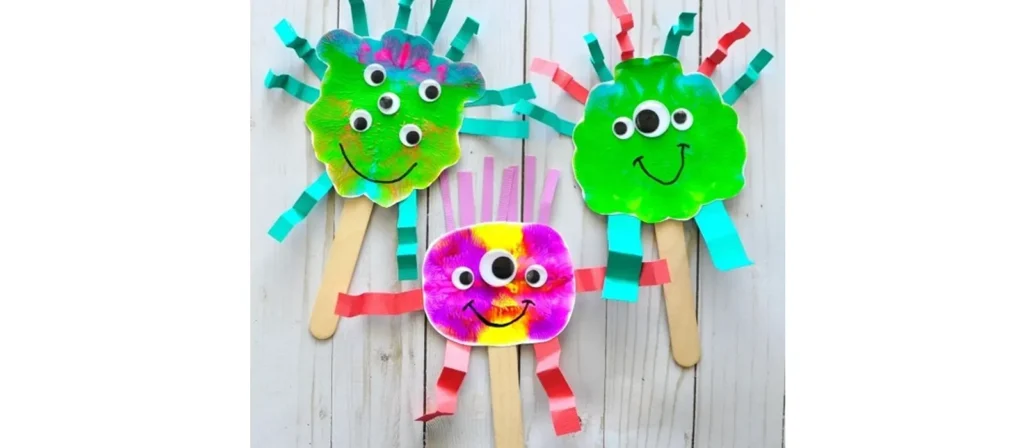
Panoramica delle attività:
Bring giggles and creativity to art time with this playful Silly Monster Puppets activity. Children use colorful paper, yarn, googly eyes, and craft sticks to design their own friendly monsters with funny faces, spiky hair, and wobbly eyes. As they cut, glue, and decorate, they strengthen fine motor skills, experiment with colors and shapes, and discover how imagination can turn ordinary materials into extraordinary creations.
Materiali:
Sacchetti di carta per il pranzo, cartoncino, stick di colla, pennarelli o pastelli, pompon, occhietti finti, filato, forbici (sicure per i bambini), forme di gommapiuma o scovolini (facoltativo)
Come farlo:
- Prepare paper bags, colorful paper shapes, googly eyes, pom poms, yarn, and glue for each child.
- Show how the flap of the paper bag can become the monster’s mouth, then let children start decorating.
- Encourage them to glue on eyes in any number they like and add fun details like spiky hair, horns, arms, or big teeth.
- Let them use markers or crayons to draw silly smiles, wiggly tongues, or tiny spots for extra personality.
- As they work, ask fun questions such as “What’s your monster’s name?” or “Does it roar or laugh?”
- Once finished, gather the group for a monster puppet show where each child can perform with their silly new friend.
- Celebrate their creativity by displaying the puppets or creating a “Monster of the Week” wall to introduce everyone’s creations.
Varianti:
- Assegna un tema ai mostri per lezioni specifiche (ad esempio, mostri delle emozioni per l'apprendimento SEL).
- Per una versione strutturata, usate il feltro al posto della carta.
- Crea una parete espositiva con il tema "Mostro della settimana" in cui ogni bambino presenta il proprio personaggio.
20. Filtro per caffè Planet Art

Panoramica delle attività:
Take young learners on an out-of-this-world adventure with this mesmerizing Coffee Filter Planet Art activity. Children color round coffee filters with markers, then lightly mist them with water to watch the colors blend and swirl like real galaxies. Once dry, they can cut out and label their colorful “planets,” turning simple materials into a stunning solar system full of imagination and discovery.
Materiali:
Filtri da caffè rotondi, pennarelli lavabili, bottiglie spray o piccole tazze d'acqua con contagocce, tovaglioli di carta, fogli di alluminio o vassoi, carta da costruzione nera (facoltativo per lo sfondo), colla
Come farlo:
- Flatten coffee filters on trays or foil so they are ready for coloring.
- Give children washable markers and let them fill the filters with bright circular designs that look like planets.
- When finished, spray the filters lightly with water or use droppers to wet the surface and watch the colors swirl together.
- Allow the filters to dry completely for one to two hours until the watercolor effect appears.
- Once dry, cut out the colorful planets and glue them onto black paper to create a mini solar system.
- Encourage children to name their planets or add stars and fun space facts around them.
- Display the finished artwork on the classroom wall to create a dazzling galaxy full of imagination and discovery.
Varianti:
- Trasformalo in un progetto sul sistema solare creando più pianeti e posizionandoli in orbita.
- Per prima cosa, usa dei pastelli bianchi per disegnare sui filtri e ottenere un effetto "resistenza" nascosto.
- Aggiungi la colla glitterata per un effetto scintillante come una galassia.
21. Mandala della natura

Panoramica delle attività:
Invite peace, focus, and creativity into the classroom with this beautiful Nature Mandalas activity. Children gather natural materials such as leaves, petals, stones, and twigs, then arrange them in circular patterns to create stunning mandalas that celebrate balance and harmony in nature. As they carefully place each piece, they strengthen concentration, pattern recognition, and an appreciation for the beauty found outdoors.
Materiali:
Foglie, petali, bastoncini, piccole pietre, pigne, ghiande, corteccia, cerchi di carta o basi di cartone (facoltativo), colla (facoltativa per esposizione permanente)
Come farlo:
- Take children on a short nature walk to collect safe and interesting materials such as leaves, petals, stones, and twigs.
- Provide paper or cardboard circles as bases, or let children create directly on the ground or table for a more natural feel.
- Explain that a mandala begins in the center and grows outward in patterns or circles.
- Invite children to place one object in the center, then build outward by arranging similar items in repeating or symmetrical designs.
- Encourage them to observe textures and colors while working by asking, “How does this leaf feel?” or “What shapes do you notice?”
- When the mandalas are finished, display them indoors or take photos before nature reclaims the materials.
- Celebrate their creativity by discussing how each mandala is unique, just like the natural world it was made from.
Varianti:
- Utilizza materiali di stagione: fiori in primavera e foglie colorate in autunno.
- Aggiungi tocchi personali come sassi dipinti o oggetti etichettati.
- Trasformalo in un progetto di gruppo: un grande mandala realizzato con il lavoro di squadra collettivo.
Suggerimenti per la sicurezza e la pulizia durante i lavoretti manuali
Anche le migliori attività artistiche e artigianali per bambini in età prescolare possono trasformarsi in un disastro se non siamo preparati. Con la giusta organizzazione e le giuste abitudini, puoi stimolare la creatività senza preoccuparti di schizzi, macchie o dita appiccicose.

Stabilire i limiti prima che il divertimento inizi
- Zone di crafting: usa tavoli dedicati o tappetini lavabili
- Grembiuli o vecchie magliette: un must per i bambini in età prescolare
- Stabilire regole di "mani pulite" prima di incollare o dipingere
Utilizzo di materiali sicuri e adatti all'età
- Optare sempre per materiali non tossici e lavabili
- Evitare utensili affilati, piccoli rischi di soffocamento o materiali allergenici
- Conservare i materiali pericolosi fuori dalla portata dei bambini
Insegnare la pulizia come parte dell'attività
- Utilizzare contenitori colorati per organizzare i materiali
- Crea canzoni o routine divertenti per le pulizie
- Assegnare dei mini “responsabili della pulizia” per ogni tavolo
Come le arti e i mestieri supportano l'apprendimento Montessori e Reggio
Le filosofie dietro Montessori e Reggio Emilia sostenere con forza le attività artistiche e artigianali per i bambini in età prescolare, non solo come forma d'arte ma come mezzo per imparare, esprimersi e comprendere il mondo.
Promuovere l'indipendenza attraverso il lavoro pratico
- I bambini scelgono i materiali e completano i compiti al proprio ritmo
- I progetti autodiretti creano autonomia e sicurezza
- Gli strumenti e le forniture sono accessibili all'altezza del bambino
Incoraggiare l'osservazione e la creatività ispirata alla natura
- Reggio Emilia privilegia i materiali naturali e l'esplorazione sensoriale
- Le passeggiate nella natura e il gioco con elementi sciolti collegano l'arte al mondo reale
- L'artigianato stagionale rafforza i ritmi e i cicli della vita
Supportare lo sviluppo cognitivo attraverso la ripetizione e la routine
- La ripetizione delle azioni motorie fini aiuta a costruire i percorsi cerebrali
- I rituali legati alle arti e ai mestieri creano ordine, pazienza e concentrazione
- I materiali Montessori possono includere estensioni artigianali (ad esempio, perforatura, tracciamento)
Lavoretti creativi a basso costo: consigli per asili e scuole materne
High-quality arts and crafts for preschoolers don’t require a big budget. With a bit of creativity and planning, you can provide meaningful art experiences without breaking the bank.
Utilizzare materiali riciclati e di uso quotidiano
- Rotoli di carta igienica, tappi di bottiglia, scatole di cereali e ritagli di tessuto
- Collaborare con i genitori per i contenitori per le donazioni
- Insegnare la sostenibilità attraverso il riutilizzo
Acquista all'ingrosso e organizza in modo intelligente
- Acquistare materiali di base (colla, carta, pennelli) da venditori all'ingrosso
- Archivia per categoria e colore per un accesso rapido
- Plastificare i modelli comunemente utilizzati per un uso ripetuto
Pianificare le unità tematiche in anticipo
- Allinea i lavoretti alle stagioni, alle festività o agli argomenti delle lezioni
- Riutilizzare i lavoretti in base all'età con leggere variazioni
- Tieni un raccoglitore di modelli stampabili e istruzioni per il tuo team
Conclusione
Le attività artistiche e manuali per i bambini in età prescolare sono più di un semplice momento divertente della giornata: sono essenziali per sviluppare le capacità motorie fini, incoraggiare l'espressione emotiva e accendere un amore per la creatività che duri tutta la vita. Che siate insegnanti, dirigenti scolastici o genitori, offrire ai bambini la libertà di creare con le proprie mani rafforza la fiducia in se stessi, la connessione e la curiosità.
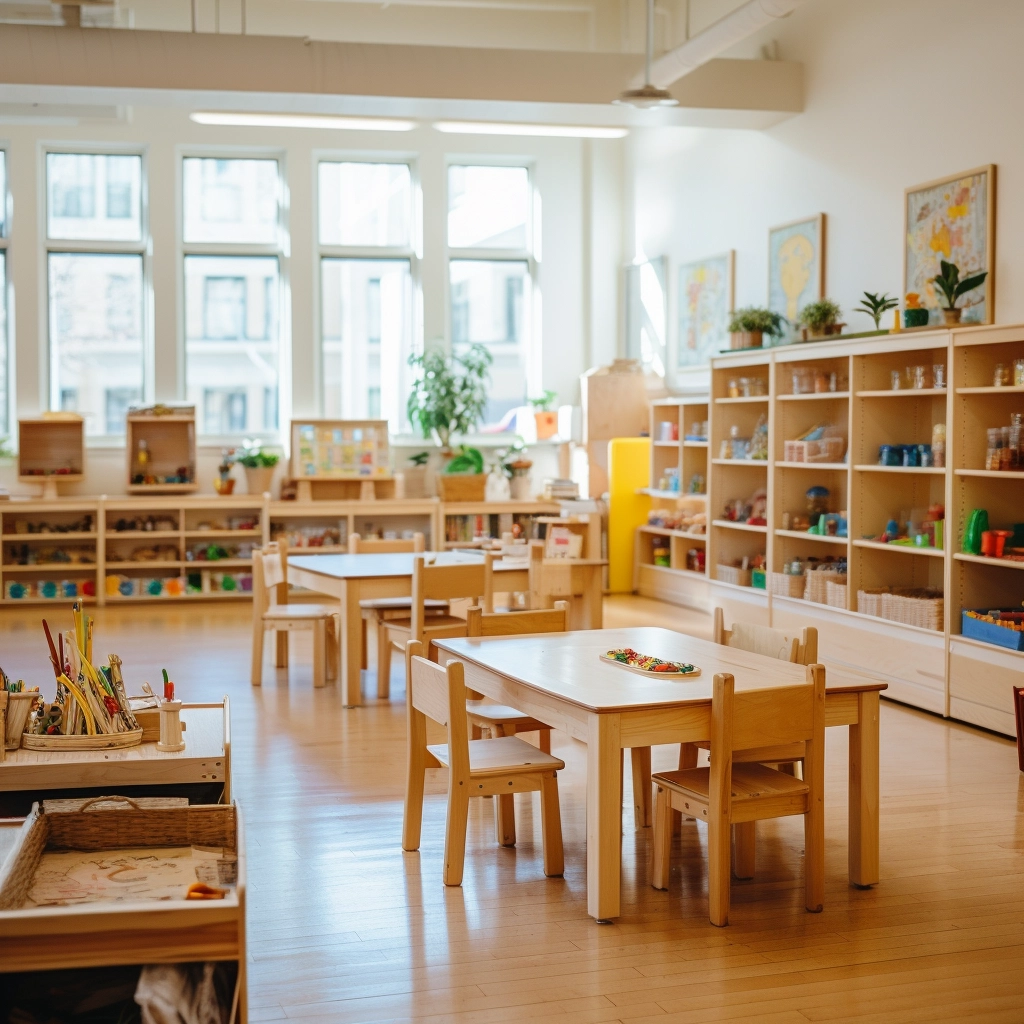
Dietro ogni spazio artigianale di successo c'è un ambiente progettato con cura. Mobili West Shore, siamo specializzati nella creazione di questi ambienti. Con oltre 20 anni di esperienza nella produzione e fornitura di mobili per la scuola materna, offriamo una soluzione completa:Dalla progettazione dell'aula alla personalizzazione degli arredi, dalla produzione al controllo qualità e alla consegna, la nostra gamma di prodotti comprende diversi mobili per la scuola materna in stili, materiali e dimensioni diversi per soddisfare le diverse esigenze degli spazi dedicati all'apprendimento precoce.
Quando sei pronto a valorizzare le tue aree artistiche o a riprogettare lo spazio della scuola materna per ispirare ancora più creatività, siamo qui per aiutarti, perché l'ambiente giusto fa la differenza.